For those interested. Here is the recording from my talk in London March 12, 2016. After watching, its hard to believe how many cool things we have done just since this conference.

Where DevOps, Tech and Life Collide……..@devoperandi
For those interested. Here is the recording from my talk in London March 12, 2016. After watching, its hard to believe how many cool things we have done just since this conference.
http://sched.co/67dI
Alright, finally ready to talk about some StackStorm in depth. In the first part of this post I discussed some depth around Kubernetes Thirdpartyresource and how excited we are to use them. If you haven’t read it I would go back and start there. I however breezed over the Event Drive Automation piece (IFTTT) involving StackStorm. I did this for two reasons: 1) I was terribly embarrassed by the code I had written and 2) It wasn’t anywhere near where it should be in order for people to play with it.
Now that we have a submittal to StackStorm st2contrib, I’m going to open this up to others. Granted its not in its final form. In fact there is a TON left to do but its working and we decided to get the community involved should you be interested.
But first lets answer the question that is probably weighing on many peoples mind. Why StackStorm? There are many other event driven automation systems. The quick answer is they quite simply won us over. But because I like bullet points. Here are a few:
For the record, I have zero affiliation with StackStorm. I just think they have something great going on.
As I mentioned in the first post, our first goal was to automate deployment of AWS RDS databases from the Kubernetes framework. We wanted to accomplish this because then we could provide a seamless way for our dev teams to deploy their own database with a Kubernetes config based on thirdpartyresource (currently in beta).
Here is a diagram of the magic:
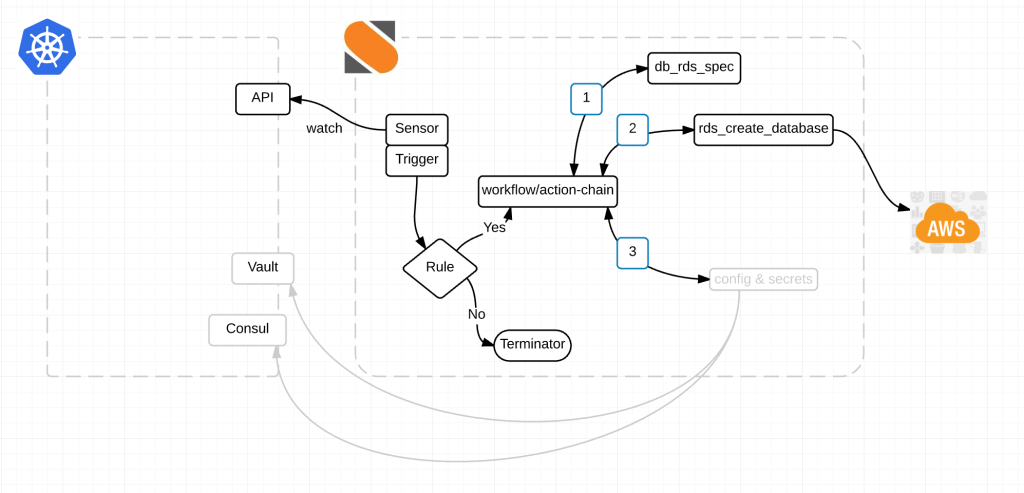
Alright here is what’s happening.
Link to the StackStorm Kubernetes Pack. Take a look at the Readme for information on how to get started.
Obviously this is just a start. We’ve literally just done one thing in creating a database but the possibilities are endless for integrations with Kubernetes.
I mentioned earlier the StackStorm guys are great. And I want to call a couple of them out. Manas Kelshikar, Lakshmi Kannan and Patrick Hoolboom. There are several others that have helped along the way but these three helped get this initial pack together.
The initial pack has been submitted as a pull request to StackStorm for acceptance into st2contrib. Once the pull request has been accepted to st2contrib, I would love it if more people in the Kubernetes community got involved and started contributing as well.
@devoperandi
Wait, what? Doesn’t everyone have this already? While various deployment methodologies including blue/green, A/B, Canary etc etc are fairly prevalent outside of containers, its been quite a different story in the container world and in particular Kubernetes. Now before you go all crazy on me. I’m not saying there aren’t ways by which to do this, there are tons of them but none of them I could consider elegant. We in fact use a combination of multiple replication controllers with labels and updates to the Kubernetes service to accomplish this.
Unless of course you are on OpenShift. In which case you have had these capabilities built-in for a little while now. Props to the OpenShift team.
I’ve also seen some very creative ways of accomplishing blue/green deploys from the guys at Citrix and Zcentric.
But as with many things in Kubernetes, Blue/Green deploys just got the easy button.
Enter Kubernetes Deployment Resource which is currently in v1beta and is better describe as a DeploymentController.
Depending on your deployment strategy the actual process differs.
Currently there are two options:
Recreate: Destroy the existing RC(s) and replace with a new one.
RollingUpgrade: Launch New RC(s) along side the existing ones. Ramp up the new and ramp down the old.
So how does this work? I’m going to try and give the short version without over simplifying to much.
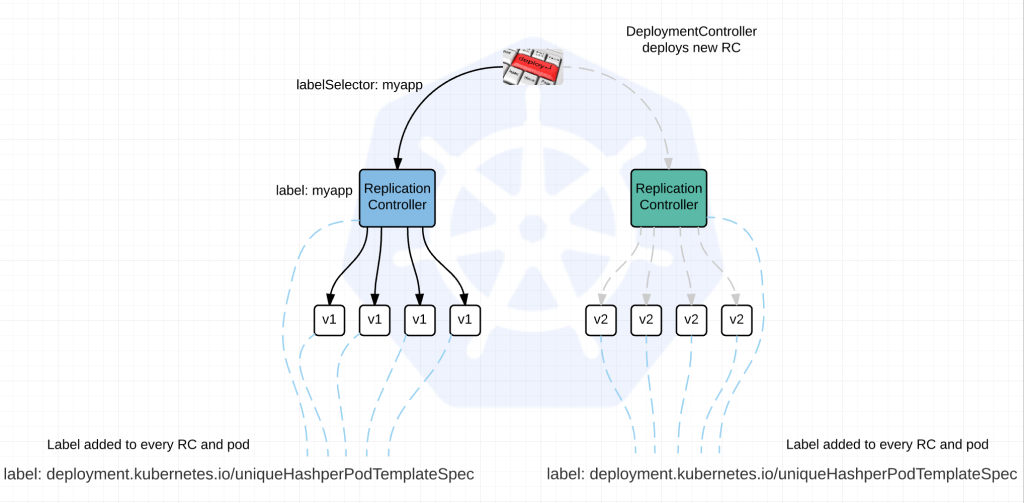
1) The DeploymentController initiates a search for ReplicationControllers using labelSelector:myapp
2) Add a unique label to every RC and Pod based on the PodTemplateSpec which is guaranteed to be unique per version of app being deployed. label: deployment.kubernetes.io/uniqueHashperPodTemplateSpec. So basically the RC and its respective pods will have a label by which the DeploymentController can identify them. The existing RC will get updated with the label (if using RollingUpgrade Strategy), the new RC will automatically be deployed with it. The ReplicationControllers also get an updated labelSelector: so they rely on this label to determine state of the pods.
3) DeploymentController will use these hashes to determine which to ramp up and which to ramp down.
All in all, an excellent way of performing deployments in the future. Until that day comes, we’ll be stuck with our hacks. But awesome to know I won’t have to manage it relatively soon.
Also in the future, alternate deployment strategies and desirable options will be included like A/B deploys, Canary deploys and automated Rollback in case of failure.
For considerably more information on the topic you can go here.
WARNING!!! Beta – Not yet for production.
You might be thinking right now, third party resources? Seriously? With all the amazing stuff going on right now around Kubernetes and you want to talk about that thing at the bottom of the list. Well keep reading, hopefully by the end of this, you too will see the light.
Remember last week when I talked about future projects in my Python Client For Kubernetes blog? Well here it is. One key piece of our infrastructure is quickly becoming StackStorm.
What’s StackStorm you might ask? StackStorm is an open source event driven automation system which hailed originally from OpenStack’s Mistral workflow project. In fact, some of its libraries are from mistral but its no longer directly tied to OpenStack. Its a standalone setup that rocks. As of the time of this writing, StackStorm isn’t really container friendly but they are working to remediate this and I expect a beta to be out in the near future. Come on guys, hook a brother up.
For more information on StackStorm – go here.
I’ll be the first to admit, there documentation took me a little while to grok. Too many big words and not enough pics to describe what’s going on. But once I got it, nothing short of meeting Einstein could have stopped my brain from looping through all the possibilities.
Lets say, we want to manage an RDS database from Kubernetes. We should be able to create, destroy, configure it in conjunction with the application we are running and even more importantly, it must be a fully automated process.
So what’s it take to accomplish something like this? Well in our minds we needed a way to present objects externally i.e. third party resources and we need some type of automation that can watch those events and act on them ala StackStorm.
Here is a diagram of our intentions: We have couple loose ends to complete but soon we’ll be capable of performing this workflow for any custom resource. Database just happens to be the first requirement we had that fit the bill.
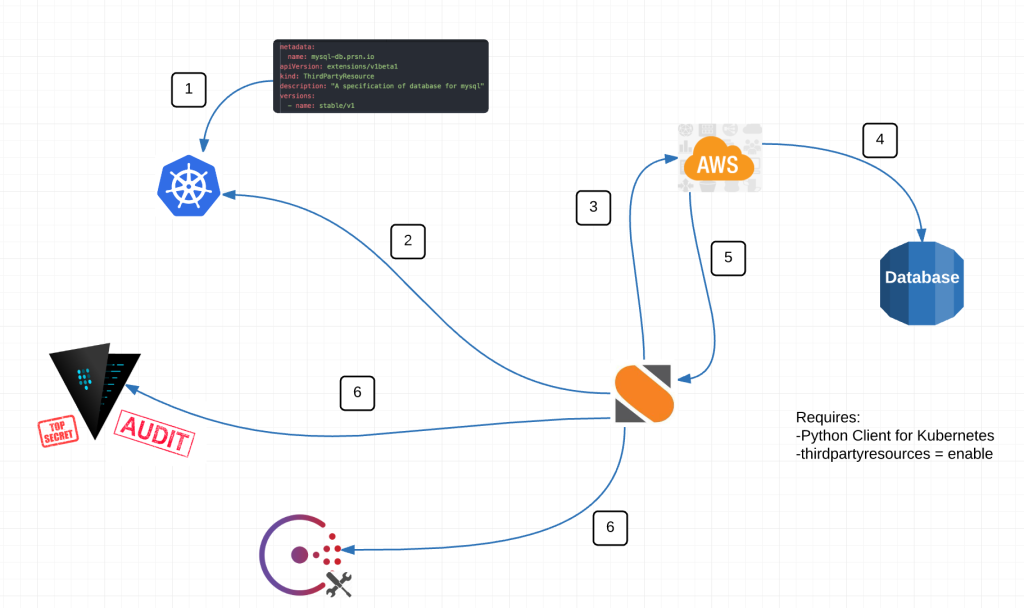
In the diagram above we are perform 6 basic actions.
– Input thirdpartyresource to Kubernetes
– StackStorm watches for resources created, deleted OR modifed
– If trigger – makes call to AWS API to execute an event
– Receives back information
– On creation or deletion, adds or remove necessary information from Vault and Consul
Alright from the top, what is a third party resource exactly? Well its our very own custom resource. Kind of like a pod, endpoint or replication controller are API resources but now we get our own.
Third Party Resources immediately stood out to us because we now have the opportunity to take advantage of all the built-in things Kubernetes provides like metadata, labels, annotations, versioning, api watches etc etc while having the flexibility to define what we want in a resource. What’s more, third party resources can be grouped or nested.
Here is a an example of a third party resource:
metadata:
  name: mysql-db.prsn.io
  labels:
    resource: database
    object: mysql
apiVersion: extensions/v1beta1
kind: ThirdPartyResource
description: "A specification of database for mysql"
versions:
  - name: stable/v1
This looks relatively normal with one major exception. The metadata.name = mysql-db.prsn.io. I’ve no idea why but you must have a fully qualified domain in the name in order for everything to work properly. The other oddity is the “-“. It must be there and you must have one. Something to do with <CamelCaseKind>.
Doing this creates
/apis/prsn.io/stable/v1/namespaces/<namespace>/mysqls/...
By creating the resource above, we have essentially created our very own api endpoint by which to get all resources of this type. This is awesome because now we can create mysql resources and watch them under one api endpoint for consumption by StackStorm.
Now imagine applying a workflow like this to ANYTHING you can wrap your head around. Cool huh?
Remember this is beta and creating resources under the thirdpartyresource (in this case mysqls) requires a little curl at this time.
{
   "metadata": {
     "name": "my-new-mysql-db"
   },
   "apiVersion": "prsn.io/stable/v1",
   "kind": "MysqlDb",
   "engine_version": "5.6.23",
   "instance_size": "huge"
}
There are three important pieces here. 1) its json. 2) apiVersion has the FQDN + versions.name for the thirdpartyresource. 3) kind = MysqlDb <CamelCaseKind>
Now we can curl the Kubernetes api and post this resource.
curl -d "{"metadata":{"name":"my-new-mysql-database"},"apiVersion":"prsn.io/stable/v1","kind":"MysqlDb","engine_version":"5.6.23","instance_size":"huge"}" https://kube_api_url
Now if you hit you kubernetes api endpoint you should see something like this:
{
  "paths": [
    "/api",
    "/api/v1",
    "/apis",
    "/apis/extensions",
    "/apis/extensions/v1beta1",
    "/apis/prsn.io",
    "/apis/prsn.io/stable/v1",
    "/healthz",
    "/healthz/ping",
    "/logs/",
    "/metrics",
    "/resetMetrics",
    "/swagger-ui/",
    "/swaggerapi/",
    "/ui/",
    "/version"
  ]
}
Our very own Kubernetes endpoint now in /apis/prsn.io/stable/v1.
And here is a resource under the mysql thirdpartyresource located at:
/apis/prsn.io/stable/v1/mysqldbs
{
  "kind": "MysqlDb",
  "items": [
    {
      "apiVersion": "prsn.io/stable/v1",
      "kind": "MysqlDb",
      "metadata": {
        "name": "my-new-mysql-db",
        "namespace": "default",
        "selfLink": "/apis/prsn.io/stable/v1/namespaces/default/mysqldbs/my-new-mysql-db"
        ...
      }
    }
  ]
}
If your mind isn’t blown by this point, move along, I’ve got nothin for ya.
Ok on to StackStorm.
Within StackStorm we have a Sensor that watches the Kubernetes api for a given third party resource. In this example, its looking for MysqlDb resources. From there it compares the list of MysqlDb resources against a list of mysql databases (rds in this case) that exist and determines what/if any actions it needs to perform. The great thing about this is StackStorm already has quite a number of what they call packs. Namely an AWS pack. So we didn’t have to do any of the heavy lifting on that end. All we had to do was hook in our python client for Kubernetes, write a little python to compare the two sets of data and trigger actions based off the result.
It also has a local datastore so if you need to store key/value pairs for any length of time, that’s quite easy as well.
Take a look at the bottom of this page for operations against the StackStorm datastore.
We’ll post our python code as soon as it makes sense. And we’ll definitely create a pull request back to the StackStorm project.
Right now we are building the workflow to evaluate what actions to take. We’ll update this page as soon as its complete.
If you have questions or ideas on how else to use StackStorm and ThirdPartyResources, I would love to hear about them. We can all learn from each other.
@devoperandi
Other beta stuff:
deployments – https://github.com/kubernetes/kubernetes/blob/master/docs/proposals/deployment.md
horizontalpodautoscaler – https://github.com/kubernetes/kubernetes/blob/release-1.1/docs/design/horizontal-pod-autoscaler.md
ingress – http://kubernetes.io/v1.1/docs/user-guide/ingress.html
Which to be fair I have talked about this in the blog about Load Balancing
jobs – https://github.com/kubernetes/kubernetes/blob/release-1.1/docs/user-guide/jobs.md
No part of this blog is sponsored or paid for by anyone other than the author.
For reasons I’ll divulge in a future post, we needed a python client to interact with Kubernetes. Our latest and greatest work is going to rely pretty heavily on it and we’ve had difficulty finding one that is fully functional.
SPOILER: Go to the bottom of the article if you just want the code. 😉
We explored options like libCloud, pykube and even went back to some of the original python-kubernetes clients like you would see on Pypi. What we found was they were all either a) out of date, b) still very much in their infancy or c) no longer being contributed. And we realized sitting around waiting on someone else to build and maintain one just wasn’t going to work.
So with a lot of exploring and a ton of learning (primarily due to my lack of python skillz), we came to realize we could simply generate our own with codegen. You see, Kubernetes uses swagger for its API and codegen allows us to create our own python client using the swagger spec.
# on mac install swagger-codegen

brew install swagger-codegen
Acquire v1.json from v1.json at Kubernetes website
and run something like:
swagger-codegen generate -l python -o k8sclient -i v1.json
And this was fantastic……..until it didn’t work and the build fails.
You see, Kubernetes is running swagger spec 1.2 and they are using “type”: “any” which is an undefined custom type and codegen doesn’t know how to handle it.
See the github issues referenced here and here for a more detailed explanation.
The end result is, while custom types in swagger-spec 1.2 are allowed, there was no way to document the custom types for codegen to consume. This is fixed in swagger-spec 2.0 with “additionalProperties” to allow this mapping to occur.
But we still had a problem. We couldn’t easily create a python client from codegen.
So what we have done, right or wrong, is replace everything in the v1.json of
"type": "any"
with
"type": "string"
and it works.
With that here is a link to the v1.json file with the change.
But we also did the same thing for extensions/v1beta because we are working on some future endeavors so here is a link to that as well.
With these v1.json and v1.beta1.json files you should be able to create your own python client for Kubernetes.
Or if you choose, you could just use the clients we created. We intend to keep these clients updated but if you find we haven’t, feel free to create your own. Its dead simple.
https://github.com/mward29/python-k8sclient
https://github.com/mward29/python-k8sclient-v1beta1
As a final departing note, these python clients have NOT been fully vetted. We have not run across any issues as of this moment but if you find an issue before we do, PLEASE be a good samaritan and let us know.
The beta version, because its running against the beta api extensions may not have everything you would expect in it.
First off thanks to Martin for taking this from a POC to a product within Kubernetes.
When it comes to managing secrets inside Kubernetes, Vault is our go to solution. It is not exposed externally at this time although we have considered it for external workloads. We are working with it in a couple areas including dynamic secrets and have intentions of using it with OTP, SSH, MFA and SSL cert rotation in the near future.
We spin Vault up as a part of our default cluster build, use consul as its storage backend, automatically unseal the vault and ship the keys off to admins.
Reference Deploying Consul in Kubernetes for more information there.
First off lets start with the Dockerfile. This is a pretty standard Dockerfile. Nothing crazy here.
FROM alpine:latest
MAINTAINER Martin Devlin <martin.devlin@pearson.com>

ENV VAULT_VERSION 0.4.1
ENV VAULT_PORT 7392

COPY config.json /etc/vault/config.json

RUN apk --update add openssl zip\
&& mkdir -p /etc/vault/ssl \
&& wget http://releases.hashicorp.com/vault/${VAULT_VERSION}/vault_${VAULT_VERSION}_linux_amd64.zip \
&& unzip vault_${VAULT_VERSION}_linux_amd64.zip \
&& mv vault /usr/local/bin/ \
&& rm -f vault_${VAULT_VERSION}_linux_amd64.zip

EXPOSE ${VAULT_PORT}

COPY /run.sh /usr/bin/run.sh
RUN chmod +x /usr/bin/run.sh

ENTRYPOINT ["/usr/bin/run.sh"]
CMD []
But now lets take a look at run.sh. This is where the magic happens.
#!/bin/sh


if [ ! -z ${VAULT_SERVICE_PORT} ]; then
  export VAULT_PORT=${VAULT_SERVICE_PORT}
else
  export VAULT_PORT=7392
fi

if [ ! -z ${CONSUL_SERVICE_HOST} ]; then
  export CONSUL_SERVICE_HOST=${CONSUL_SERVICE_HOST}
else
  export CONSUL_SERVICE_HOST="127.0.0.1"
fi

if [ ! -z ${CONSUL_SERVICE_PORT} ]; then
  export CONSUL_PORT=${CONSUL_SERVICE_PORT}
else
  export CONSUL_PORT=8500
fi

openssl req -x509 -newkey rsa:1024 -nodes -keyout /etc/vault/ssl/some-vault-key.key -out /etc/vault/ssl/some-vault-crt.crt -days some_number_of_days -subj "/CN=some-vault-cn-or-other"

  export VAULT_IP=`hostname -i`

sed -i "s,%%CONSUL_SERVICE_HOST%%,$CONSUL_SERVICE_HOST," /etc/vault/config.json
sed -i "s,%%CONSUL_PORT%%,$CONSUL_PORT,"                 /etc/vault/config.json
sed -i "s,%%VAULT_IP%%,$VAULT_IP,"                       /etc/vault/config.json
sed -i "s,%%VAULT_PORT%%,$VAULT_PORT,"                   /etc/vault/config.json

## Master stuff

master() {

  vault server -config=/etc/vault/config.json $@ &

  if [ ! -f ~/vault_keys.txt ]; then

    export VAULT_SKIP_VERIFY=true

    export VAULT_ADDR="https://${VAULT_IP}:${VAULT_PORT}"

    vault init -address=${VAULT_ADDR} > ~/vault_keys.txt

    export VAULT_TOKEN=`grep 'Initial Root Token:' ~/vault_keys.txt | awk '{print $NF}'`

    vault unseal `grep 'Key 1:' ~/vault_keys.txt | awk '{print $NF}'`
    vault unseal `grep 'Key 2:' ~/vault_keys.txt | awk '{print $NF}'`
    vault unseal `grep 'Key 3:' ~/vault_keys.txt | awk '{print $NF}'`
    vault unseal `grep 'Key 4:' ~/vault_keys.txt | awk '{print $NF}'`
    vault unseal `grep 'Key 5:' ~/vault_keys.txt | awk '{print $NF}'`
    vault unseal `grep 'Key 6:' ~/vault_keys.txt | awk '{print $NF}'`
    vault unseal `grep 'Key 7:' ~/vault_keys.txt | awk '{print $NF}'`
    vault unseal `grep 'Key 8:' ~/vault_keys.txt | awk '{print $NF}'`
    vault unseal `grep 'Key another_key:' ~/vault_keys.txt | awk '{print $NF}'`

  fi

}

case "$1" in
  master)           master $@;;
  *)                exec vault server -config=/etc/vault/config.json $@;;
esac

### Exec sending keys to admins
exec /tmp/shipit.sh


sleep 600
Above we do a few important things:
Here is what config.json looks like. Nothing major. A basic Vault config.json.
### Vault config

backend "consul" {
 address = "%%CONSUL_SERVICE_HOST%%:%%CONSUL_PORT%%"
 path = "vault"
 advertise_addr = "https://%%VAULT_IP%%:%%VAULT_PORT%%"
}

listener "tcp" {
 address = "%%VAULT_IP%%:%%VAULT_PORT%%"
 tls_key_file = "/etc/vault/ssl/some-key.key"
 tls_cert_file = "/etc/vault/ssl/some-crt.crt"
}

disable_mlock = true
Kubernetes Config for Vault. We deploy a service accessible internally to the cluster with proper credentials. And we create a replication controller to ensure a Vault container is always up.
---
apiVersion: v1
kind: Service
metadata:
  name: vault
  namespace: your_namespace
  labels:
    name: vault-svc
spec:
  ports:
    - name: vaultport
      port: 8200
  selector:
    app: vault
---
apiVersion: v1
kind: ReplicationController
metadata:
  name: vault
  namespace: your-namespace
spec:
  replicas: 1
  selector:
    app: vault
  template:
    metadata:
      labels:
        app: vault
    spec:
      containers:
        - name: vault
          image: 'private_repo_url:5000/vault:latest'
          imagePullPolicy: Always
          ports:
            - containerPort: 8200
              name: vaultport
Once Vault is up and running we insert a myriad of policies by which Vault can use to for various secret and auth backends. For obvious reasons I won’t be showing those.
@devoperandi
Note: Some data in code above intentionally changed for security reasons.
Deploying many distributed clustering technologies in Kubernetes can require some finesse. Not so with Consul. It dead simple.
We deploy Consul with Terraform as a part of our Kubernetes cluster deployment strategy. You can read more about it here.
We currently deploy Consul as a 3 node cluster with 2 Kubernetes configuration files. Technically we could narrow it down to one but we tend to keep our service configs separate.
When we bring up a new Kubernetes cluster, we push a bunch of files to Amazon S3. Along with those files are the two listed above. The Kubernetes Master pulls these files down from S3 and places them along with others in /etc/kubernetes/addons/ directory. We then execute everything in /etc/kubernetes/addons in a for loop using kubectl create -f.
Lets take a look at consul-svc.yaml
---
apiVersion: v1
kind: Service
metadata:
  name: svc-consul
  namespace: kube-system
  labels:
    name: consul-svc
spec:
  ports:
    # the port that this service should serve on
    - name: http
      port: 8500
    - name: rpc
      port: 8400
    - name: serflan
      port: 8301
    - name: serfwan
      port: 8302
    - name: server
      port: 8300
    - name: consuldns
      port: 8600
  # label keys and values that must match in order to receive traffic for this service
  selector:
    app: consul
Nothing special about consul-svc.yaml. Just a generic service config file.
So what about consul.yaml
apiVersion: v1
kind: ReplicationController
metadata:
  namespace: kube-system
  name: consul
spec:
  replicas: 3
  selector:
    app: consul
  template:
    metadata:
      labels:
        app: consul
    spec:
      containers:
        - name: consul
          command: [ "/bin/start", "-server", "-bootstrap-expect", "3", "-atlas", "account_user_name/consul", "-atlas-join", "-atlas-token", "%%ATLAS_TOKEN%%" ]
          image: progrium/consul:latest
          imagePullPolicy: Always
          ports:
          - containerPort: 8500
            name: ui-port
          - containerPort: 8400
            name: alt-port
          - containerPort: 53
            name: udp-port
          - containerPort: 443
            name: https-port
          - containerPort: 8080
            name: http-port
          - containerPort: 8301
            name: serflan
          - containerPort: 8302
            name: serfwan
          - containerPort: 8600
            name: consuldns
          - containerPort: 8300
            name: server
Of all this code, there is one important line.
command: [ "/bin/start", "-server", "-bootstrap-expect", "3", "-atlas", "account_user_name/consul", "-atlas-join", "-atlas-token", "%%ATLAS_TOKEN%%" ]
-bootstrap-expect – sets the number of consul servers that need to join before bootstrapping
-atlas – enables atlas integration
-atlas-join – enables auto-join
-atlas-token – sets a token you can get from your Atlas account.
Note: make sure to replace ‘account_user_name’ with your atlas account user name.
Getting an atlas account for this purpose is free so don’t hesitate but make sure you realize, the token you generate should be highly highly secure.
So go sign up for an account. Once done click on your username in the upper right hand corner then click ‘Tokens’.
You’ll see something like this:

Generate a token with a description and use this token in %%ATLAS_TOKEN%% in the consul.yaml above.
In order to populate the Token at run time, we execute a small for loop to perform a sed replace before running ‘kubectl create -f’ on the yamls.
	for f in ${dest}/*.yaml ; do

		# Consul template
	# Deprecated we no longer use CONSUL_SERVICE_IP
	# sed -i "s,%%CONSUL_SERVICE_IP%%,${CONSUL_SERVICE_IP}," $f
		sed -i "s,%%ATLAS_TOKEN%%,${ATLAS_TOKEN}," $f

	done
The two variables listed above get derived from a resource “template_file” in Terraform.
Note: I’ve left out volume mounts from the config. Needless to say, we create volume mounts to a default location and back those up to S3.
Good Luck and let me know if you have questions.
@devoperandi
From my friend Simas. The ever reclusive genius behind the curtains. I’m beginning to feel like I might be repeating myself quite often if he keeps up this pace. I might also have to get my own ass to work so I have something to show.
For those that don’t know, the nginx-controller is basically an alpha external load balancer for Kubernetes that listens on a specified port(s) and routes traffic to applications in Kubernetes. You can read more about that in my post Load Balancing in Kubernetes.
So we’ve come out with an update to the original nginx-controller located (here).
The original nginx-controller was an excellent start so we chose to push the ball forward a little bit. Please understand this has not been thoroughly tested outside our team but we would love your feedback so feel free to have at it.
Here is pretty much the entirety of the code that was added. It creates a map and iterates over it to populate the nginx.conf file.
		knownHosts := make(map[string]extensions.Ingress)
		// we need a loop to see deselect all duplicate entries
		for _, item := range ingresses.Items {
			for _, rule := range item.Spec.Rules {
				if v, ok := knownHosts[rule.Host]; ok {
					knownTS := v.ObjectMeta.CreationTimestamp
					newTS := item.ObjectMeta.CreationTimestamp
					if newTS.Before(knownTS) {
						knownHosts[rule.Host] = item
					}
				} else {
					knownHosts[rule.Host] = item
				}
			}
		}
Here is the link to the Github where the code is located. Feel free to try it out.
First off. All credit for this goes to my friend Simas. I’m simply relaying what he has accomplished because it would be a shame if others didn’t benefit from his expertise. He is truly talented in this space and provides simple yet elegant designs that just work.
Coming into my current position we have 400+ development teams. Virtually all of which are managing their own build pipelines. This requires significant time and effort to manage, develop and automate. Each team designates their own developer on a rotating basis, or worse, completely dedicates a dev to make sure the build process goes smoothly.
What we found when looking across these teams was they were all basically doing the same thing. Sometimes using a different build server, automating using a different scripting language or running in a different code repo but all in all, its the same basic process with the same basic principles. And because we have so many dev teams, we were bound to run into enough teams developing in a particular language that it would make sense to standardize their process so multiple teams could take advantage of it. This combined with the power of docker images and we have a win/win situation.
So let me define what I mean by “build process” just so we can narrow the scope a bit. Build process – The process of building application(s) code using a common build platform. This is our first step in a complete CI/CD workflow.
So why haven’t we finished it already? Along with the Dev teams we have quite a few other engineering teams involved including QA/Performance/CISO etc etc and we haven’t finished laying out how all those teams will work together in the pipeline.
We have questions like:
Do QA/Perf/Security engineers all have access to multiple kubernetes namespaces or do they have their own project area and provide a set of endpoints and services which can be called to utilize their capabilities?
Do we mock cross-functional services in each namespace or provide endpoints to be accessed from anywhere?
What about continuous system/integration testing?
Continuous performance testing? How do we do this without adversely affecting our dev efforts?
Those are just a few of the questions we are working through. We have tons of them. Needless to say, we started with the build process.
We create Docker images for each and every Java/NodeJS/Go/Ruby/language_of_the_month our developers choose. These images are very much standardized. Allowing for built-in, centrally managed, monitored, secure containers that deploy in very short periods of time. The only deltas are the packages for the actual application. We build those in deb packages and standardize the install process, directory locations, version per language type etc etc.
Dev teams get their own namespace in Kubernetes. In fact, in most cases they get three. Dev, Stage and Prod. For the purpose of this conversation every dev team is developing an application stack which could consist of 1 to many micro services. Every namespace has its own Hubot and its own Jenkins build server which is completely vanilla to start with.
See Integrating Hubot and Kubernetes for more info on Hubot.
Each Jenkins build server connects to at least two repositories. A standard jenkins job repo that consists of all the standardized builds for each language and the application code repositories for the applications. EVERY Jenkins server connects to the same jenkins job repo. Jenkins polls each repo for changes every X minutes depending on the requirements of the team. We thought about web hooks to notify Jenkins when a new build is needed but chose to poll from Jenkins instead. Primarily because we treat every external resource as if it has gremlins and we didn’t want to deal with firewalls. We’ve been looking at options to replace this but haven’t settled on anything at this point.
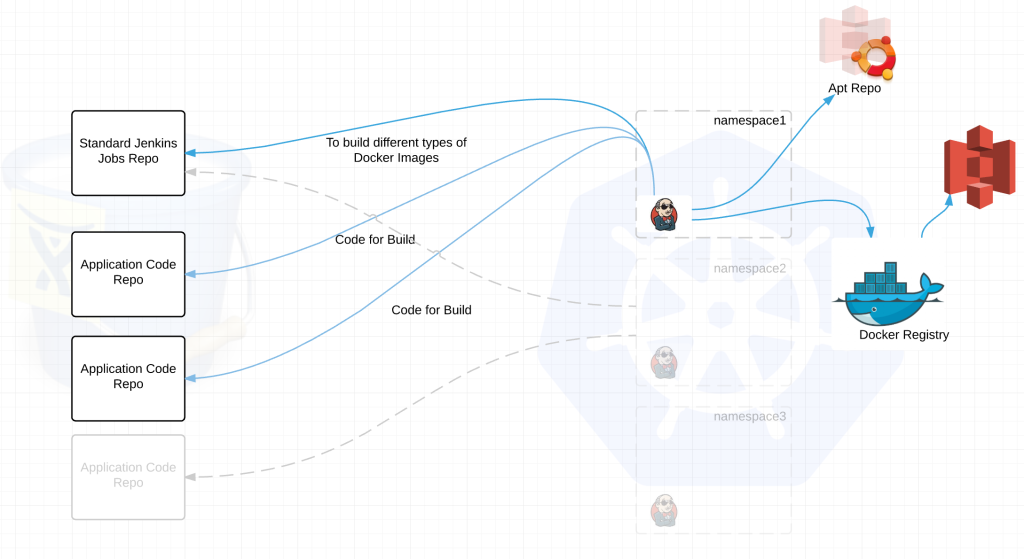
jenkins job repo –
application code repo –
default.json is key to the success of the build process.
It has three primary functions:
Here is a very simple example of what that default.json might look like.
{
  "namespace": "someproject",
  "application": {
    "name": "sample-application",
    "type": "http_html",
    "version": "3.x.x"
  },
  "build": {
    "system_setup": {
      "buildfacts": [ // Configure the Jenkins server
        "java",
        "nodejs"
      ]
    },
    "build_steps": [
      {
        "shell": "some shell commands"
      },
      {
        "gradle": {
          "useWrapper": true,
          "tasks": "clean build -Ddeployment.target=???"
        }
      }
    ]
  },
  "build_command": "some command to execute the build",
  "artifacts": "target/",
  "services": [
    {
      "name": "sample-service",
      "external_url": "www.sample-service.com",
      "application": "someproject/sample-application",
      "instances": {
        "min": 2,
        "max": 5
      }
    }
  ]
}
Ok now for a little more complexity:
So what just happened?
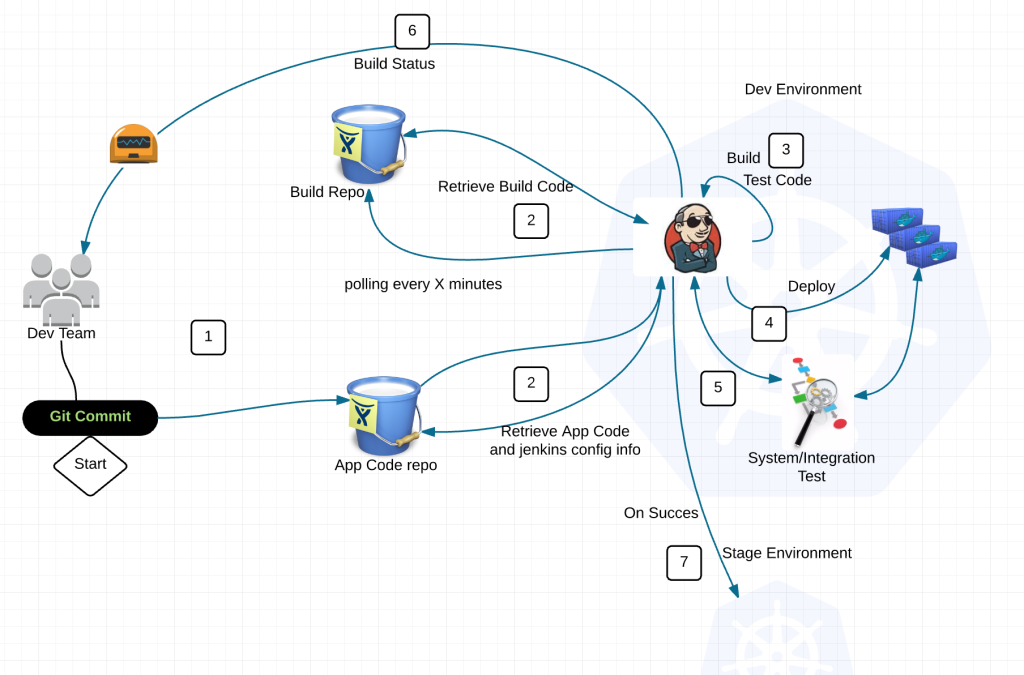
1) Dev commits code to application repository
2) Jenkins polls the jenkins build repo and application repositories for changes
3) If there is a new standard build image (say for Java), jenkins will build the latest version of the application with this image and push the image to the docker registry with a specialized tag. Then notify Dev team of the change to provide feedback through hubot.
When there is a version change in the application code repository Jenkins runs typical local tests, builds deb package, ships it to apt repository, then builds a docker image combining a standardized image from the jenkins build repo with the deb package for the application and pushes the image to the Docker registry.
4) Deploy application into namespace with preconfigured kubectl client
5) Execute system/integration tests
6) Feedback loop to Dev team through Hubot
7) Rinse and repeat into Staging/Prod on success
Now you are probably thinking, what about all those extra libraries that some applications may need but other do not.
Answer: If its not a common library, it goes in the application build.
All in all this is a pretty typical workflow. And for the most part you are absolutely correct. So what value do we get by separating the standard/base build images and placing it into its own repository?
Lets be realistic, there are always benefits and limitations to anything and this design is not the exception.
Here are some difficulties SO FAR:
Worth Mentioning:
Ok so if you made it thus far. I’m either a damn good writer, your seriously interested in what I have to say or you totally crazy about build pipelines. Somehow I don’t think its option 1. Cheers
@devoperandi