Cluster Consul using Kubernetes API

Recently we had the desire to cluster Consul (Hashicorps K/V store) without calling out to Atlas. We deploy many clusters per day as we are constantly testing and we want Consul to simply bring itself up without having to reach out over the internet.

So we added a few changes to our Consul setup, so here goes-

Dockerfile:

This is a typical dockerfile for Consul running on alpine. Nothing out of the ordinary.

FROM alpine:3.2
MAINTAINER 	Martin Devlin <martin.devlin@pearson.com>

ENV CONSUL_VERSION    0.6.3
ENV CONSUL_HTTP_PORT  8500
ENV CONSUL_HTTPS_PORT 8543
ENV CONSUL_DNS_PORT   53

RUN apk --update add openssl zip curl ca-certificates jq \
&& cat /etc/ssl/certs/*.pem > /etc/ssl/certs/ca-certificates.crt \
&& sed -i -r '/^#.+/d' /etc/ssl/certs/ca-certificates.crt \
&& rm -rf /var/cache/apk/* \
&& mkdir -p /etc/consul/ssl /ui /data \
&& wget http://releases.hashicorp.com/consul/${CONSUL_VERSION}/consul_${CONSUL_VERSION}_linux_amd64.zip \
&& unzip consul_${CONSUL_VERSION}_linux_amd64.zip \
&& mv consul /bin/ \
&& rm -f consul_${CONSUL_VERSION}_linux_amd64.zip \
&& cd /ui \
&& wget http://releases.hashicorp.com/consul/${CONSUL_VERSION}/consul_${CONSUL_VERSION}_web_ui.zip \
&& unzip consul_${CONSUL_VERSION}_web_ui.zip \
&& rm -f consul_${CONSUL_VERSION}_linux_amd64.zip

COPY config.json /etc/consul/config.json

EXPOSE ${CONSUL_HTTP_PORT}
EXPOSE ${CONSUL_HTTPS_PORT}
EXPOSE ${CONSUL_DNS_PORT}

COPY run.sh /usr/bin/run.sh
RUN chmod +x /usr/bin/run.sh

ENTRYPOINT ["/usr/bin/run.sh"]
CMD []


config.json:

And here is config.json referenced in the Dockerfile.

{
  "data_dir": "/data",
  "ui_dir": "/ui",
  "client_addr": "0.0.0.0",
  "ports": {
    "http"  : %%CONSUL_HTTP_PORT%%,
    "https" : %%CONSUL_HTTPS_PORT%%,
    "dns"   : %%CONSUL_DNS_PORT%%
  },
  "start_join":{
    %%LIST_PODIPS%%
  },
  "acl_default_policy": "deny",
  "acl_datacenter": "%%ENVIRONMENT%%",
  "acl_master_token": "%%MASTER_TOKEN%%",
  "key_file" : "/etc/consul/ssl/consul.key",
  "cert_file": "/etc/consul/ssl/consul.crt",
  "recursor": "8.8.8.8",
  "disable_update_check": true,
  "encrypt" : "%%GOSSIP_KEY%%",
  "log_level": "INFO",
  "enable_syslog": false
}

If you have read my past Consul blog you might notice we have added the following.

  "start_join":{
    %%LIST_PODIPS%%
  },

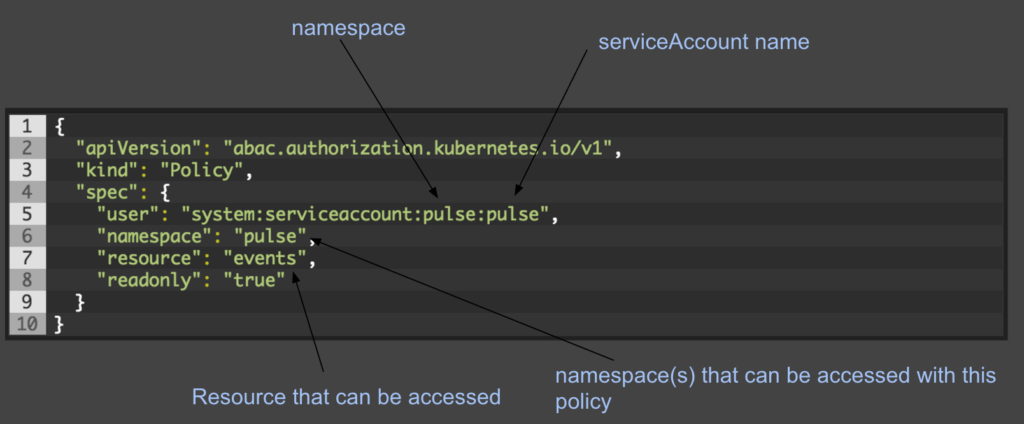
This is important because we are going to have each Consul container query the Kubernetes API using a Kubernetes Token to pull in a list of IPs for the Consul cluster to join up.

Important note – if you are running more than just the default token per namespace, you need to explicitly grant READ access to the API for the Token associated with the container.

And here is run.sh:

#!/bin/sh
KUBE_TOKEN=`cat /var/run/secrets/kubernetes.io/serviceaccount/token`
NAMESPACE=`cat /var/run/secrets/kubernetes.io/serviceaccount/namespace`

if [ -z ${CONSUL_SERVER_COUNT} ]; then
  export CONSUL_SERVER_COUNT=3
fi

if [ -z ${CONSUL_HTTP_PORT} ]; then
  export CONSUL_HTTP_PORT=8500
fi

if [ -z ${CONSUL_HTTPS_PORT} ]; then
  export CONSUL_HTTPS_PORT=8243
fi

if [ -z ${CONSUL_DNS_PORT} ]; then
  export CONSUL_DNS_PORT=53
fi

if [ -z ${CONSUL_SERVICE_HOST} ]; then
  export CONSUL_SERVICE_HOST="127.0.0.1"
fi

if [ -z ${CONSUL_WEB_UI_ENABLE} ]; then
  export CONSUL_WEB_UI_ENABLE="true"
fi

if [ -z ${CONSUL_SSL_ENABLE} ]; then
  export CONSUL_SSL_ENABLE="true"
fi

if [ ${CONSUL_SSL_ENABLE} == "true" ]; then
  if [ ! -z ${CONSUL_SSL_KEY} ] &&  [ ! -z ${CONSUL_SSL_CRT} ]; then
    echo ${CONSUL_SSL_KEY} > /etc/consul/ssl/consul.key
    echo ${CONSUL_SSL_CRT} > /etc/consul/ssl/consul.crt
  else
    openssl req -x509 -newkey rsa:2048 -nodes -keyout /etc/consul/ssl/consul.key -out /etc/consul/ssl/consul.crt -days 365 -subj "/CN=consul.kube-system.svc.cluster.local"
  fi
fi

export CONSUL_IP=`hostname -i`

if [ -z ${ENVIRONMENT} ] || [ -z ${MASTER_TOKEN} ] || [ -z ${GOSSIP_KEY} ]; then
  echo "Error: ENVIRONMENT, MASTER_TOKEN and GOSSIP_KEY environment vars must be set"
  exit 1
fi

LIST_IPS=`curl -sSk -H "Authorization: Bearer $KUBE_TOKEN" https://$KUBERNETES_SERVICE_HOST:$KUBERNETES_PORT_443_TCP_PORT/api/v1/namespaces/$NAMESPACE/pods | jq '.items[] | select(.status.containerStatuses[].name=="consul") | .status .podIP'`

#basic test to see if we have ${CONSUL_SERVER_COUNT} number of containers alive
VALUE='0'

while [ $VALUE != ${CONSUL_SERVER_COUNT} ]; do
  echo "waiting 10s on all the consul containers to spin up"
  sleep 10
  LIST_IPS=`curl -sSk -H "Authorization: Bearer $KUBE_TOKEN" https://$KUBERNETES_SERVICE_HOST:$KUBERNETES_PORT_443_TCP_PORT/api/v1/namespaces/kube-system/pods | jq '.items[] | select(.status.containerStatuses[].name=="consul") | .status .podIP'`
  echo "$LIST_IPS" | sed -e 's/$/,/' -e '$s/,//' > tester
  VALUE=`cat tester | wc -l`
done

LIST_IPS_FORMATTED=`echo "$LIST_IPS" | sed -e 's/$/,/' -e '$s/,//'`

sed -i "s,%%ENVIRONMENT%%,$ENVIRONMENT,"             /etc/consul/config.json
sed -i "s,%%MASTER_TOKEN%%,$MASTER_TOKEN,"           /etc/consul/config.json
sed -i "s,%%GOSSIP_KEY%%,$GOSSIP_KEY,"               /etc/consul/config.json
sed -i "s,%%CONSUL_HTTP_PORT%%,$CONSUL_HTTP_PORT,"   /etc/consul/config.json
sed -i "s,%%CONSUL_HTTPS_PORT%%,$CONSUL_HTTPS_PORT," /etc/consul/config.json
sed -i "s,%%CONSUL_DNS_PORT%%,$CONSUL_DNS_PORT,"     /etc/consul/config.json
sed -i "s,%%LIST_PODIPS%%,$LIST_IPS_FORMATTED,"      /etc/consul/config.json

cmd="consul agent -server -config-dir=/etc/consul -dc ${ENVIRONMENT} -bootstrap-expect ${CONSUL_SERVER_COUNT}"

if [ ! -z ${CONSUL_DEBUG} ]; then
  ls -lR /etc/consul
  cat /etc/consul/config.json
  echo "${cmd}"
  sed -i "s,INFO,DEBUG," /etc/consul/config.json
fi

consul agent -server -config-dir=/etc/consul -dc ${ENVIRONMENT} -bootstrap-expect ${CONSUL_SERVER_COUNT}"

Lets go through the options here: Notice in the script we do have some defaults enabled so we may or may not included them when starting up the container.

LIST_PODIPS = a list of Consul IPs for the consul node to join to

CONSUL_WEB_UI_ENABLE = true|false – if you want a web ui

CONSUL_SSL_ENABLE = SSL for cluster communication

If true expects:

CONSUL_SSL_KEY – SSL Key

CONSUL_SSL_CRT – SSL Cert


First we pull in the Kubernetes Token and Namespace. This is the default location for this information in every container and should work for your needs.

KUBE_TOKEN=`cat /var/run/secrets/kubernetes.io/serviceaccount/token`
NAMESPACE=`cat /var/run/secrets/kubernetes.io/serviceaccount/namespace`

And then we use those ENV VARS with some fancy jq to get a list of IPs formatted so we can shove them into config.json.

LIST_IPS=`curl -sSk -H "Authorization: Bearer $KUBE_TOKEN" https://$KUBERNETES_SERVICE_HOST:$KUBERNETES_PORT_443_TCP_PORT/api/v1/namespaces/$NAMESPACE/pods | jq '.items[] | select(.status.containerStatuses[].name=="consul") | .status .podIP'`

And we wait until the number of CONSUL_SERVER_COUNT has started up

#basic test to see if we have ${CONSUL_SERVER_COUNT} number of containers alive
echo "$LIST_IPS" | sed -e 's/$/,/' -e '$s/,//' > tester
VALUE=`cat tester | wc -l`

while [ $VALUE != ${CONSUL_SERVER_COUNT} ]; do
  echo "waiting 10s on all the consul containers to spin up"
  sleep 10
  echo "$LIST_IPS" | sed -e 's/$/,/' -e '$s/,//' > tester
  VALUE=`cat tester | wc -l`
done

You’ll notice this could certainly be cleaner but its working.

Then we inject the IPs into the config.json:

sed -i "s,%%LIST_PODIPS%%,$LIST_IPS_FORMATTED,"      /etc/consul/config.json

which simplifies our consul runtime command quite nicely:

consul agent -server -config-dir=/etc/consul -dc ${ENVIRONMENT} -bootstrap-expect ${CONSUL_SERVER_COUNT}"


Alright so all of that is in for the Consul image.

Now lets have a look at the Kubernetes config files.

consul.yaml

apiVersion: v1
kind: ReplicationController
metadata:
  namespace: kube-system
  name: consul
spec:
  replicas: ${CONSUL_COUNT}                               # number of consul containers
  # selector identifies the set of Pods that this
  # replication controller is responsible for managing
  selector:
    app: consul
  template:
    metadata:
      labels:
        # Important: these labels need to match the selector above
        # The api server enforces this constraint.
        pool: consulpool
        app: consul
    spec:
      containers:
        - name: consul
          env:
            - name: "ENVIRONMENT"
              value: "SOME_ENVIRONMENT_NAME"             # some name
            - name: "MASTER_TOKEN"
              value: "INITIAL_MASTER_TOKEN_FOR_ACCESS"   # UUID preferable
            - name: "GOSSIP_KEY"
              value: "ENCRYPTION_KEY_FOR_GOSSIP"         # some random key for encryption
            - name: "CONSUL_DEBUG"
              value: "false"                             # to debug or not to debug
            - name: "CONSUL_SERVER_COUNT"
              value: "${CONSUL_COUNT}"                   # integer value for number of containers
          image: 'YOUR_CONSUL_IMAGE_HERE'
          resources:
            limits:
              cpu: ${CONSUL_CPU}                         # how much CPU are you giving the container
              memory: ${CONSUL_RAM}                      # how much RAM are you giving the container
          imagePullPolicy: Always
          ports:
          - containerPort: 8500
            name: ui-port
          - containerPort: 8400
            name: alt-port
          - containerPort: 53
            name: udp-port
          - containerPort: 8543
            name: https-port
          - containerPort: 8500
            name: http-port
          - containerPort: 8301
            name: serflan
          - containerPort: 8302
            name: serfwan
          - containerPort: 8600
            name: consuldns
          - containerPort: 8300
            name: server
#      nodeSelector:                                     # optional
#        role: minion                                    # optional

You might notice we need to move this to a deployment/replicaset instead of a replication controller.

These vars should look familiar by now.

CONSUL_COUNT = number of consul containers we want to run

CONSUL_HTTP_PORT = set port for http

CONSUL_HTTPS_PORT = set port for https

CONSUL_DNS_PORT = set port for dns

ENVIRONMENT = consul datacenter name

MASTER_TOKEN = the root token you want to have super admin privs to access the cluster

GOSSIP_KEY = an encryption key for cluster communication


consul-svc.yaml

---
apiVersion: v1
kind: Service
metadata:
  name: consul
  namespace: kube-system
  labels:
    name: consul
spec:
  ports:
    # the port that this service should serve on
    - name: http
      port: 8500
    - name: https
      port: 8543
    - name: rpc
      port: 8400
    - name: serflan
      port: 8301
    - name: serfwan
      port: 8302
    - name: server
      port: 8300
    - name: consuldns
      port: 53
  # label keys and values that must match in order to receive traffic for this service
  selector:
    pool: consulpool


consul-ing.yaml

apiVersion: extensions/v1beta1
kind: Ingress
metadata:
  name: consul
  namespace: kube-system
  labels:
    ssl: "true"
    httpsBackend: "true"
    httpsOnly: "true"
spec:
  rules:
  - host: consul.%%ENVIRONMENT%%.%%DOMAIN%%
    http:
      paths:
      - backend:
          serviceName: consul
          servicePort: 8543
        path: /

We run ingress controllers so this will provision an ingress so we can make Consul externally available.


@devoperandi


Kubernetes/PaaS: Automated Test Framework

First off, mad props go out to Ben Somogyi and Martin Devlin. They have been digging deep on this and have made great progress. I wanted to make sure I call them out and all the honors go to them. I just have the honor of telling you about it.

You might be thinking right about now, “why an automated test framework? Doesn’t Kubernetes team test their own stuff already?” Of course they do but we have a fair number of apps/integrations to make sure out platform components all work together with Kubernetes. Take for example, when we upgrade Kubernetes, deploy a new stackstorm integration or add some authentication capability. All of these things need to be tested to ensure our platform works every time.

At what point did we decide we needed an automated test framework? Right about the time we realized we were committing so much back to our project that we couldn’t keep up with the testing. Prior to this time, we tested each PR requiring 2 +1s (minus the author) to allow a PR to get merged. What we found was we were spending so much time testing (thoroughly?) that we were loosing valuable development time. We are a pretty small dev shop. Literally 5 (+3 Ops) guys developing new features into our PaaS. So naturally there is a balancing act here. Do we spend more time writing test cases or actually testing ourselves? There comes a tipping when it makes more sense to write test cases and automate it and use people for other things. We felt like we hit that point.

Here is what our current test workflow looks like. Its subject to change but this is our most recent iteration.

QA Automation Workflow

Notice we are running TravisCI to kick everything off. If you have read our other blog posts, you know we also have a Jenkins plugin and you are probably thinking, ‘why Travis when you already have written your own Jenkins plugin?’ Its rather simple really. We use TravisCI to kick off tests through Github which deploys a completely new AWS VPC / Kubernetes Cluster from scratch, runs a series of tests to make sure it came up properly, all the endpoints are available and the deploys Jenkins into a namespace which kicks off a series of internal tests on the cluster.

Basically TravisCI is for external / infrastructure testing to make sure Terraform/Ansible run correctly and all the external dependencies come up and Jenkins to deploy / test at the container level for internal components.

If you haven’t already read it, you may consider reading Kubernetes A/B Cluster Deploys because we are capable of deploying two completely separate clusters inside the same AWS VPC for the purpose of A/B migrations.

Travis looks at any pull requests (PR) being made to our dev branch. For each PR TravisCI will run through the complete QA automation process. Below are the highlights. You can look at the image above for details.

1. create a branch from the PR and merge in the dev branch

2. Linting/Unit tests

3. Cluster deploy

  • If anything fails during deploy of the VPC, paasA or paasB, the process will fail, and tear down the environment with the logs of it in TravisCI build logs.

Here is an example of one of our builds that is failing from the TravisCI.

Screen Shot 2016-08-27 at 1.30.03 PM

4. Test paasA with paasB

  • Smoke Test
  • Deploy ‘Testing’ containers into paasB
  • Retrieve tests
  • Execute tests against paasA
  • Capture results
  • Publish back to Travis

5. Destroy environment


One massive advantage of having A and B clusters is we can use one to test the other. This enables a large portion of our testing automation to exist in containers. Thus making our test automation parallel, fast and scalable to a large extent.

The entire process takes about 25 minutes. Not too shabby for literally building an entire environment from the ground up and running tests against it and we don’t expect the length of time to change much. In large part because of the parallel testing. This is a from scratch, completely automated QA automation framework for PaaS. I’m thinking 25-30 minutes is pretty damn good. You?

Screen Shot 2016-08-27 at 1.44.41 PM


Alright get to the testing already.

First is our helper script for setting a few params like timeouts and numbers of servers for each type. anything in ‘${}’ is a Terraform variable that we inject on Terraform deploy.

helper.bash

#!/bin/bash

## Statics

#Long Timeout (For bootstrap waits)
LONG_TIMEOUT=<integer_seconds>

#Normal Timeout (For kubectl waits)
TIMEOUT=<integer_seconds>

# Should match minion_count in terraform.tfvars
MINION_COUNT=${MINION_COUNT}

LOADBALANCER_COUNT=${LOADBALANCER_COUNT}

ENVIRONMENT=${ENVIRONMENT}

## Functions

# retry_timeout takes 2 args: command [timeout (secs)]
retry_timeout () {
  count=0
  while [[ ! `eval $1` ]]; do
    sleep 1
    count=$((count+1))
    if [[ "$count" -gt $2 ]]; then
      return 1
    fi
  done
}

# values_equal takes 2 values, both must be non-null and equal
values_equal () {
  if [[ "X$1" != "X" ]] || [[ "X$2" != "X" ]] && [[ $1 == $2 ]]; then
    return 0
  else
    return 1
  fi
}

# min_value_met takes 2 values, both must be non-null and 2 must be equal or greater than 1
min_value_met () {
  if [[ "X$1" != "X" ]] || [[ "X$2" != "X" ]] && [[ $2 -ge $1 ]]; then
    return 0
  else
    return 1
  fi
}


You will notice we have divided our high level tests by Kubernetes resource types. Services, Ingresses, Pods etc etc

First we test a few things to make sure our minions and loadbalancer (minions) came up. Notice we are using kubectl for much of this. May as well, its there and its easy.

If you want to know more about what we mean by load balancer minions.

instance_counts.bats

#!/usr/bin/env bats

set -o pipefail

load ../helpers

# Infrastructure

@test "minion count" {
  MINIONS=`kubectl get nodes --selector=role=minion --no-headers | wc -l`
  min_value_met $MINION_COUNT $MINIONS
}

@test "loadbalancer count" {
  LOADBALANCERS=`kubectl get nodes --selector=role=loadbalancer --no-headers | wc -l`
  values_equal $LOADBALANCERS $LOADBALANCERS
}


pod_counts.bats

#!/usr/bin/env bats

set -o pipefail

load ../helpers

@test "bitesize-registry pods" {
  BITESIZE_REGISTRY_DESIRED=`kubectl get rc bitesize-registry --namespace=default -o jsonpath='{.spec.replicas}'`
  BITESIZE_REGISTRY_CURRENT=`kubectl get rc bitesize-registry --namespace=default -o jsonpath='{.status.replicas}'`
  values_equal $BITESIZE_REGISTRY_DESIRED $BITESIZE_REGISTRY_CURRENT
}

@test "kube-dns pods" {
  KUBE_DNS_DESIRED=`kubectl get rc kube-dns-v18 --namespace=kube-system -o jsonpath='{.spec.replicas}'`
  KUBE_DNS_CURRENT=`kubectl get rc kube-dns-v18 --namespace=kube-system -o jsonpath='{.status.replicas}'`
  values_equal $KUBE_DNS_DESIRED $KUBE_DNS_CURRENT
}

@test "consul pods" {
  CONSUL_DESIRED=`kubectl get rc consul --namespace=kube-system -o jsonpath='{.spec.replicas}'`
  CONSUL_CURRENT=`kubectl get rc consul --namespace=kube-system -o jsonpath='{.status.replicas}'`
  values_equal $CONSUL_DESIRED $CONSUL_CURRENT
}

@test "vault pods" {
  VAULT_DESIRED=`kubectl get rc vault --namespace=kube-system -o jsonpath='{.spec.replicas}'`
  VAULT_CURRENT=`kubectl get rc vault --namespace=kube-system -o jsonpath='{.status.replicas}'`
  values_equal $VAULT_DESIRED $VAULT_CURRENT
}

@test "es-master pods" {
  ES_MASTER_DESIRED=`kubectl get rc es-master --namespace=default -o jsonpath='{.spec.replicas}'`
  ES_MASTER_CURRENT=`kubectl get rc es-master --namespace=default -o jsonpath='{.status.replicas}'`
  values_equal $ES_MASTER_DESIRED $ES_MASTER_CURRENT
}

@test "es-data pods" {
  ES_DATA_DESIRED=`kubectl get rc es-data --namespace=default -o jsonpath='{.spec.replicas}'`
  ES_DATA_CURRENT=`kubectl get rc es-data --namespace=default -o jsonpath='{.status.replicas}'`
  values_equal $ES_DATA_DESIRED $ES_DATA_CURRENT
}

@test "es-client pods" {
  ES_CLIENT_DESIRED=`kubectl get rc es-client --namespace=default -o jsonpath='{.spec.replicas}'`
  ES_CLIENT_CURRENT=`kubectl get rc es-client --namespace=default -o jsonpath='{.status.replicas}'`
  values_equal $ES_CLIENT_DESIRED $ES_CLIENT_CURRENT
}

@test "monitoring-heapster-v6 pods" {
  HEAPSTER_DESIRED=`kubectl get rc monitoring-heapster-v6 --namespace=kube-system -o jsonpath='{.spec.replicas}'`
  HEAPSTER_CURRENT=`kubectl get rc monitoring-heapster-v6 --namespace=kube-system -o jsonpath='{.status.replicas}'`
  values_equal $HEAPSTER_DESIRED $HEAPSTER_CURRENT
}


service.bats

#!/usr/bin/env bats

set -o pipefail

load ../helpers

# Services

@test "kubernetes service" {
  retry_timeout "kubectl get svc kubernetes --namespace=default --no-headers" $TIMEOUT
}

@test "bitesize-registry service" {
  retry_timeout "kubectl get svc bitesize-registry --namespace=default --no-headers" $TIMEOUT
}

@test "fabric8 service" {
  retry_timeout "kubectl get svc fabric8 --namespace=default --no-headers" $TIMEOUT
}

@test "kube-dns service" {
  retry_timeout "kubectl get svc kube-dns --namespace=kube-system --no-headers" $TIMEOUT
}

@test "kube-ui service" {
  retry_timeout "kubectl get svc kube-ui --namespace=kube-system --no-headers" $TIMEOUT
}

@test "consul service" {
  retry_timeout "kubectl get svc consul --namespace=kube-system --no-headers" $TIMEOUT
}

@test "vault service" {
  retry_timeout "kubectl get svc vault --namespace=kube-system --no-headers" $TIMEOUT
}

@test "elasticsearch service" {
  retry_timeout "kubectl get svc elasticsearch --namespace=default --no-headers" $TIMEOUT
}

@test "elasticsearch-discovery service" {
  retry_timeout "kubectl get svc elasticsearch-discovery --namespace=default --no-headers" $TIMEOUT
}

@test "monitoring-heapster service" {
  retry_timeout "kubectl get svc monitoring-heapster --namespace=kube-system --no-headers" $TIMEOUT
}


ingress.bats

#!/usr/bin/env bats

set -o pipefail

load ../helpers

# Ingress

@test "consul ingress" {
  retry_timeout "kubectl get ing consul --namespace=kube-system --no-headers" $TIMEOUT
}

@test "vault ingress" {
  retry_timeout "kubectl get ing vault --namespace=kube-system --no-headers" $TIMEOUT
}

Now that we have a pretty good level of certainty the cluster stood up as expected, we can begin deeper testing into the various components and integrations within our platform. Stackstorm, Kafka, ElasticSearch, Grafana, Keycloak, Vault and Consul. AWS endpoints, internal endpoints, port mappings, security……….. and the list goes on.  All core components that our team provides our customers.

Stay tuned for more as it all begins to fall into place.

Kubernetes – Stupid Human mistakes going to prod

So I figured we would have a little fun with this post. It doesn’t all have to be highly technical right?

As with any new platform, application or service the opportunity for learning what NOT to do is ever present and when taken in the right light, can be quite hilarious for others to consume. So without further ado, here is our list of what NOT to do going to production with Kubernetes:

  1. Disaster Recovery testing should probably be a planned event
  2. Don’t let the Lead make real quick ‘minor’ changes
  3. Don’t let anyone else do it either
  4. Kube-dns resources required
  5. Communication is good
  6. ETCD….just leave it alone
  7. Init 0 is not a good command to ‘restart’ a server


I think you will recognize virtually everything here is related to people. We are the biggest disasters waiting to happen. With that being said, give your people some slack to make mistakes. It can be more fun that way.


Disaster Recovery testing should probably be a planned event

This one is probably my favorite for two reasons: I can neither confirm nor deny who did this and somehow no customers managed to notice.

Back in Oct/Nov of 2015 we had dev teams working on the Kubernetes/PaaS/Bitesize but their applications weren’t in production yet. We however were treating the environment as if it were production. Semi-Scheduled upgrades, no changes without the test process etc etc. As you probably know by now, our entire deploy process for Kubernetes and surrounding applications are in Terraform. But this was before we started using remote state Terraform. So if someone happened to be in the wrong directory AND happened to run a terraform destroy AND THEN typed YES to validate that’s what they wanted, we can confirm a production (kinda) environment will go down with reckless abandon.

The cool part is we managed to redeploy, restore databases and applications running on the platform within 30 minutes and NO ONE NOTICED (or at least they never said anything…..maybe they felt bad for us).

Yes yes yes, our customers didn’t have proper monitoring in place just yet.

Needless to say, the particular individual has been harassed endlessly by team mates and will never live it down.

The term “Beer Mike” exists for a reason.

what we learned: “Beer Mike” will pull off some cool shit or blow it up. Middle ground is rare.

Follow up: Our first customer going to production asked us sometime later if we had every performed DR testing. We were able to honestly say, ‘yes’. 😉


Don’t let the Lead make real quick ‘minor’ changes

As most of you know by now, we automate EVERYTHING. But I’ve been known to make changes and then go back and add it to automation. Especially in the early days prior to us being in production even though we had various development teams using the platform. I made a change to a security group during troubleshooting that allowed two of our components in the platform to communicate with each other in the environment. It was a valid change, it needed to happen and it made our customers happy………until we upgraded.

what we learned: AUTOMATE FIRST


Don’t let anyone else do it either

Whats worse about this one is this particular individual is extremely smart but made a change and took off for a week. That was fun.

what we learned: don’t let anyone else do it either.


Kube-dns resources required

This one pretty much speaks for itself but here are the details. Our kube-dns container was set for best-effort and got a grand total of 50Mi memory and 1/10th of a cpu to serve internal dns for our entire platform. Notice I said container (not plural). We also failed to scale it out. So when one of our customers decided to perform a 6500 concurrent (and I mean concurrent) user load test, things were a tad bit slow.

what we learned: scale kube-dns. Having 1/3 to 1/4 as many running in the cluster is a good idea. At larger scale above 100 nodes, it can be 1/8. These measurements highly depend on how many services in your environment use kube-dns.  Example: Nginx Ingress Controllers rely on it heavily.


Communication is good

Establish good communication channels early on with your customers. In our case, the various teams using our platform. We didn’t know until it started that there was a 6500 concurrent user load test. Ouch! What’s worse is, it was apart of a really large perf testing effort and they thought it was only going to be 450 concurrent users.

what we learned: Stay close to our customers. Keep in touch.


ETCD….just leave it alone

Yes this is Kubernetes and yes its quite resilient but don’t just restore ETCD, plan it out a bit, test that its going to work, have others validate that shit.

We had been playing around with scrubbing ETCD data and then dropping everything into a new Kubernetes cluster which would successfully start up all the namespaces, containers, replication controllers and everything we needed to run. The problem was, when we scrub the data and restored back into the same cluster with servers that already had labels and config values. You see, node labels are in ETCD. Our scrub script would pull all that out to make it generic so it could be deployed into another cluster. The problem is, when you do that to an existing cluster instead of a new cluster coming up, it would wipe all the labels associated with our minions which meant NONE of the containers would spin up. Fun for all.

What we learned: If you want to migrate shit, pull data from the API and do it that way. Getting fancy with ETCD leads to DUH moments.


Init 0 is not a good command to ‘restart’ a server

An anonymous colleague of mine meant to restart a server running an nginx controller during troubleshooting. Init 0 doesn’t work so good for that. Fortunately we run everything in ASGs so it just spun up another node but still not the smartest thing in the world if you can avoid it.


That’s it folks. I’m sure there are more. We’ll add to this list as the teams memory becomes less forgetful.


@devoperandi

Kubernetes: A/B Cluster Deploys

Everything thing mentioned has been POCed and proven to work so far in testing. We run an application called Pulse in which we demoed it staying up throughout this A/B migration process.

Recently the team went through an exercise on how to deploy/manage a complete cluster upgrade. There were a couple options discussed along with what it would take to accomplish both.

  • In-situ upgrade – the usual
  • A/B upgrade –  a challenge

In the end, we chose to move forward with A/B upgrades. Keeping in mind the vast majority of our containers are stateless and thus quite easy to move around. Stateful containers are a bit bigger beast but we are working on that as well.

We fully understand A/B migrations will be difficult and In-situ will be required at some point but what the hell. Why not stretch ourselves a bit right?

So here is the gist:

Build a Terraform/Ansible code base that can deploy an AWS VPC with all the core components. Minus the databases in this picture this is basically our shell. Security groups, two different ELBs for live and pre-live, a bastion box, subnets and routes, our dns hosted zone and a gateway.

Screen Shot 2016-08-05 at 1.05.59 PM

This would be its own Terraform apply. Allowing our Operations folks to manage security groups, some global dns entries, any VPN connections, bastion access etc etc without touching the actual Kubernetes clusters.

We would then have a separate Terraform apply that will stand up what we call paasA. Which includes an Auth server, our Kubernetes nodes for load balancing (running ingress controllers), master-a, and all of our minions with the kubernetes ingress-controllers receiving traffic through frontend-live ELB.

Screen Shot 2016-08-05 at 1.06.31 PM

Once we decide to upgrade, we would spin up paasB. which is essentially a duplicate of paasA running within the same VPC.

Screen Shot 2016-08-05 at 1.06.41 PM

When paasB comes up, it gets added to the frontend pre-live ELB for smoke testing, end-to-end testing and the like.

Once paasB is tested to our satisfaction, we make the switch to the live ELB while preserving the ability to switch back if we find something major preventing a complete cut-over.

Screen Shot 2016-08-05 at 1.06.54 PM

We then bring down paasA and wwwaaaahhhllllllaaaaaa, PaaS upgrade complete.

Screen Shot 2016-08-05 at 1.07.25 PM

Now I think its obvious I’m way over simplifying this so lets get into some details.

ELBs – They stay up all the time. Our Kubernetes minions running nginx-controllers get labelled in AWS. So we can quickly update the ELBs whether live or prelive to point at the correct servers.

S3 buckets – We store our config files and various execution scripts in S3 for configuring our minions and the master. In this A/B scenario, each Cluster (paasA and paas) have their own S3 bucket where their config files are stored.

Auth Servers – Our paas deploys include our Keycloak Auth servers. We still need to work through how we transfer all the configurations or IF we choose to no longer deploy auth servers as apart of the Cluster deploy but instead as apart of the VPC.

Masters – New as apart of cluster deploy in keeping with true A/B.

Its pretty cool to run two clusters side by side AND be able to bring them up and down individually. But where this gets really awesome is when we can basically take all applications running in paasA and deploy them into paasB. I’m talking about a complete migration of assets. Secrets, Jenkins, Namespaces, ACLs, Resource Quotas and ALL applications running on paasA minus any self generated items.

To be clear, we are not simply copying everything over. We are recreating objects using one cluster as the source and the other cluster as the destination. We are reading JSON objects from the Kubernetes API and using those objects along with their respective configuration to create the same object in another cluster. If you read up on Ubernetes, you will find their objectives are very much in-line with this concept. We also have ZERO intent of duplicating efforts long term. The reality is, we needed this functionality before the Kubernetes project could get there. As Kubernetes federation continues to mature, we will continue to adopt and change. Even replacing our code with theirs. With this in mind, we have specifically written our code to perform some of these actions in a way that can very easily be removed.

Now you are thinking, why didn’t you just contribute back to the core project? We are in several ways. Just not this one because we love the approach the Kubernetes team is already taking with this. We just needed something to get us by until they can make theirs production ready.

Now with that I will say we have some very large advantages that enable us to accomplish something like this. Lets take Jenkins for example. We run Jenkins in every namespace in our clusters. Our Jenkins machines are self-configuring and for the most part stateless. So while we have to copy infrastructure level items like Kubernetes Secrets to paasB, we don’t have to copy each application. All we have to do is spin up the Jenkins container in each namespace and let them deploy all the applications necessary for their namespace. All the code and configuration to do so exists in Git repos. Thus PaaS admins don’t need to know how each application stack in our PaaS is configured. A really really nice advantage.

Our other advantage is, our databases currently reside outside of Kubernetes (except some mongo and cassandra containers in dev) on virtual machines. So we aren’t yet worried about migration of stateful data sets thus it has made our work around A/B cluster migrations a much smaller stepping stone. We are however placing significant effort into this area. We are getting help from the guys at Jetstack.io around storage and we are working diligently with people like @chrislovecnm to understand how we can bring database containers into production. Some of this is reliant upon new features like Petsets and some of it requires changes in how various databases work. Take for example Cassandra snitches where Chris has managed to create a Kubernetes native snitch. Awesome work Chris.

So what about Consul, its stateful right? And its in your cluster yes?

Well that’s a little different animal. Consul is a stateful application in that it runs in a cluster. So we are considering two different ways by which to accomplish this.

  1. Externalize our flannel overlay network using aws-vpc and allow the /16s to route to one another. Then we could essentially create one Consul cluster across two Kubernetes clusters, allow data to sync and then decommission the consul containers on the paasA.
  2. Use some type of small application to keep two consul clusters in sync for a period of time during paas upgrade.

Both of the options above have benefits and limitations.

Option 1:

  • Benefits:
    • could use a similar method for other clustered applications like Cassandra.
    • would do a better job ensuring the data is synced.
    • could push data replication to the cluster level where it should be.
  • Limitations:
    • we could essentially bring down the whole Consul cluster with a wrong move. Thus some of the integrity imagined in a full A/B cluster migration would be negated.

Option 2:

  • Benefits:
    • keep a degree of separation between each Kubernetes cluster during upgrade so one can not impact the other.
    • pretty easy to implement
  • Limitations:
    • specific implementation
    • much more to keep track of
    • won’t scale for other stateful applications

I’m positive the gents on my team will call me out on several more but this is what I could think off off the top.

We have already implemented Option #2 in a POC of our A/B migration.

But we haven’t chosen a firm direction with this yet. So if you have additional insight, please comment back.

Barring stateful applications, what are we using to migrate all this stuff between clusters? StackStorm. We already have it performing other automation tasks outside the cluster, we have python libraries k8sv1 and k8sv1beta for the Kubernetes API endpoints and its quite easy to extract the data and push it into another cluster. Once we are done with the POC we’ll be pushing this to our stackstorm repo here. @peteridah you rock.

In our current POC, we migrate everything. In our next POC, we’ll enable the ability to deploy specific application stacks from one cluster to another. This will also provide us the ability to deploy an application stack from one cluster into another for things like performance testing or deep breach management testing.

Lastly we are working through how to go about stateful container migrations. There are many ideas floating around but we would really enjoy hearing yours.

For future generations:

  • We will need some sort of metadata framework for those application stacks that span multiple namespaces to ensure we duplicate an environment properly.


To my team-

My hat off to you. Martin, Simas, Eric, Yiwei, Peter, John, Ben and Andy for all your work on this.

Kubernetes Authentication – OpenID Connect

Authentication is often that last thing you decide to implement right before you go to production and you realize the security audit is going to block your staging or more likely production deploy. Its that thing that everyone recognizes as extremely important yet never manages to factor into the prototype/poc. Its the piece of the pie that could literally break a entire project with a single security incident but we somehow manage to accept Basic Authentication as ‘good enough’.

Now I’m not going to tell you I’m any different. In fact, its quite the opposite. What’s worse is I’ve got little to no excuse. I worked at Ping Identity for crying out loud. After as many incidents as I’ve heard of happening without good security, you would think I’d learn my lesson by now. But no, I put it off for quite some time in Kubernetes, accepting Basic Authentication to secure our future. That is, until now.

Caveat: There is a fair amount of complexity so if you find I’ve missed something important. PLEASE let me know in the comments so others can benefit.


Currently there are 4 Authentication methods that can be used in Kubernetes. Notice I did NOT say Authorization methods. Here is a very quick summary.

  • Client Certificate Authentication – Fairly static even though multiple certificate authorities can be used. This would require a new client cert to be generated per user.
  • Token File Authentication – Static in nature. Tokens all stored in a file on the host. No TTL. List of Tokens can only be changed by modifying the file and restarting the api server.
  • Basic Authentication – Need I say more? very similar to htpasswd.
  • OpenID Connect Authentication – The only solution with the possibility of being SSO based and allowing for dynamic user management.

Authentication within Kubernetes is still very much in its infancy and there is a ton to do in this space but with OpenID Connect, we can create an acceptable solution with other OpenSource tools.

One of those solutions is a combination of mod_auth_openidc and Keycloak.

mod_auth_openidc – an authentication/authorization module for Apache 2.x created by Ping Identity.

Keycloak – Integrated SSO and IDM for browser apps and RESTful web services.

Now to be clear, if you were to be running OpenShift (RedHat’s spin on Kubernetes), this process would be a bit simpler as Keycloak was recently acquired by Red Hat and they have placed a lot of effort into integrating the two.


The remainder of this blog assumes no OpenShift is in play and we are running vanilla Kubernetes 1.2.2+

The high level-

Apache server

  1. mod_auth_openidc installed on apache server from here
  2. mod_proxy loaded
  3. mod_ssl loaded
  4. ‘USE_X_FORWARDED_HOST = True’ is added to /usr/lib/python2.7/site-packages/cloudinit/settings.py if using Python 2.7ish

Kubernetes API server

  1. configure Kubernetes for OpenID Connect

Keycloak

  1. Setup really basic realm for Kubernetes


KeyCloak Configuration:

This walk-through assumes you have a Keycloak server created already.

For information on deploying a Keycloak server, their documentation can be found here.

First lets add a realm called “Demo”

Screen Shot 2016-06-10 at 5.51.41 PM

Now lets create a Client “Kubernetes”

Screen Shot 2016-06-10 at 5.52.49 PM

Screen Shot 2016-06-10 at 5.54.20 PM

Notice in the image above the “Valid Redirect URIs” must be the

Apache_domain_URL + /redirect_uri

provided you are using my templates or the docker image I’ve created.


Now within the Kubernetes Client lets create a role called “user”

Screen Shot 2016-06-10 at 5.58.32 PM


And finally for testing, lets create a user in Keycloak.

Screen Shot 2016-06-10 at 6.00.19 PM

Notice how I have set the email when creating the user.

This is because I’ve set email in the oidc user claim in Kubernetes

- --oidc-username-claim=email

AND the following in the Apache server.

OIDCRemoteUserClaim email
OIDCScope "openid email"

If you should choose to allow users to register with Keycloak I highly recommend you make email *required* if using this blog as a resource.


Apache Configuration:

First lets configure our Apache server or better yet just spin up a docker container.

To spin up a separate server do the following:

  1. mod_auth_openidc installed on apache server from here
  2. mod_proxy loaded
  3. mod_ssl loaded
  4. ‘USE_X_FORWARDED_HOST = True’ is added to /usr/lib/python2.7/site-packages/cloudinit/settings.py if using Python 2.7ish
  5. Configure auth_openidc.conf and place it at /etc/httpd/conf.d/auth_openidc.conf in on centos.
    1. Reference the Readme here for config values.

To spin up a container:

Run a docker container with environment variables set. This Readme briefly explains each environment var. And the following template can be copied from here.

<VirtualHost _default_:443>
   SSLEngine on
   SSLProxyEngine on
   SSLProxyVerify ${SSLPROXYVERIFY}
   SSLProxyCheckPeerCN ${SSLPROXYCHECKPEERCN}
   SSLProxyCheckPeerName ${SSLPROXYCHECKPEERNAME}
   SSLProxyCheckPeerExpire ${SSLPROXYCHECKPEEREXPIRE}
   SSLProxyMachineCertificateFile ${SSLPROXYMACHINECERT}
   SSLCertificateFile ${SSLCERT}
   SSLCertificateKeyFile ${SSLKEY}

  OIDCProviderMetadataURL ${OIDCPROVIDERMETADATAURL}

  OIDCClientID ${OIDCCLIENTID}
  OIDCClientSecret ${OIDCCLIENTSECRET}

  OIDCCryptoPassphrase ${OIDCCRYPTOPASSPHRASE}
  OIDCScrubRequestHeaders ${OIDCSCRUBREQUESTHEADERS}
  OIDCRemoteUserClaim email
  OIDCScope "openid email"

  OIDCRedirectURI https://${REDIRECTDOMAIN}/redirect_uri

  ServerName ${SERVERNAME}
  ProxyPass / https://${SERVERNAME}/

  <Location "/">
    AuthType openid-connect
    #Require claim sub:email
    Require valid-user
    RequestHeader set Authorization "Bearer %{HTTP_OIDC_ACCESS_TOKEN}e" env=HTTP_OIDC_ACCESS_TOKEN
    LogLevel debug
  </Location>

</VirtualHost>

Feel free to use the openidc.yaml as a starting point if deploying in Kubernetes.


Kubernetes API Server:

kube-apiserver.yaml

    - --oidc-issuer-url=https://keycloak_domain/auth/realms/demo
    - --oidc-client-id=kubernetes
    - --oidc-ca-file=/path/to/ca.pem
    - --oidc-username-claim=email

oidc-issuer-url

  • substitute keycloak_domain for the ip or domain to your keycloak server
  • substitute ‘demo’ for the keycloak realm you setup

oidc-client-id

  • same client id as is set in Apache

oidc-ca

  • this is a shared ca between kubernetes and keycloak


OK so congrats. You should now be able to hit the Kubernetes Swagger UI with Keycloak/OpenID Connect authentication

Screen Shot 2016-06-10 at 6.08.47 PM

And you might be thinking to yourself about now, why the hell would I authenticate to Kubernetes through a web console?

Well remember how the kube-proxy can proxy requests through the Kubernetes API endpoint to various UIs like say Kube-UI. Tada. Now you can secure them properly.

Today all we have done is build authentication. Albeit pretty cool cause we have gotten ourselves out of statically managed Tokens, Certs or Basic Auth. But we haven’t factored in Authorization. In a future post, we’ll look at authorization and how to do it dynamically through webhooks.


Kubernetes Python Clients – 1.2.2

I just created the Python Kubernetes Client for v1.2.2.

I’ve also added some additional information on how to gen your own client if you need/want to.

https://github.com/mward29/python-k8sclient-1-2-2


**Update

Created AutoScaling and new beta extensions client

https://github.com/mward29/python-k8sclient-autoscaling-v1

https://github.com/mward29/python-k8sclient-v1beta1-v1.2.2

Enjoy!

Kubernetes – Scheduling and Multiple Availability Zones

The Kubernetes Scheduler is a very important part of the overall platform but its functionality and capabilities are not widely known. Why? because for the most part the scheduler just runs out of the box with little to no additional configuration.

So what does this thing do? It determines what server in the cluster a new pod should run on. Pretty simple yet oh so complex. The scheduler has to very quickly answer questions like-

How much resource (memory, cpu, disk) is this pod going to require?

What workers (minions) in the cluster have the resources available to manage this pod?

Are there external ports associated with this pod? If so, what hosts may already be utilizing that port?

Does the pod config have nodeSelector set? If so, which of the workers have a label fitting this requirement?

Has a weight been added to a given policy?

What affinity rules are in place for this pod?

What Anti-affinity rules does this pod apply to?

All of these questions and more are answered through two concepts within the scheduler. Predicates and Priority functions.

Predicates – as the name suggests, predicates set the foundation or base for selecting a given host for a pod.

Priority functions – Assign a number between 0 and 10 with 0 being worst fit and 10 being best.

These two concepts combined determine where a given pod will be hosted in the cluster.


Ok so lets look at the default configuration as of Kubernetes 1.2.

{
	"kind" : "Policy",
	"version" : "v1",
	"predicates" : [
		{"name" : "PodFitsPorts"},
		{"name" : "PodFitsResources"},
		{"name" : "NoDiskConflict"},
		{"name" : "MatchNodeSelector"},
		{"name" : "HostName"}
	],
	"priorities" : [
		{"name" : "LeastRequestedPriority", "weight" : 1},
		{"name" : "BalancedResourceAllocation", "weight" : 1},
		{"name" : "ServiceSpreadingPriority", "weight" : 1}
	]
}


The predicates listed perform the following actions: I think they are fairly obvious but I’m going to list their function for posterity.

{“name” : “PodFitsPorts”} – Makes sure the pod doesn’t require ports that are already taken on hosts

{“name” : “PodFitsResources”} – Ensure CPU and Memory are available on the host for the given pod

{“name” : “NoDiskConflict”} – Makes sure if the Pod has Local disk requirements that the Host can fulfill it

{“name” : “MatchNodeSelector”} – If nodeSelector is set, determine which nodes match

{“name” : “HostName”} – A Pod can be added to a specific host through the hostname


Priority Functions: These get a little bit interesting.

{“name” : “LeastRequestedPriority”, “weight” : 1} – Calculates percentage of expected resource consumption based on what the POD requested.

{“name” : “BalancedResourceAllocation”, “weight” : 1} – Calculates actual consumed resources and determines best fit on this calc.

{“name” : “ServiceSpreadingPriority”, “weight” : 1} – Minimizes the number of pods belonging to the same service from living on the same host.


So here is where things start to get really cool with the Scheduler. With v1.2, Kubernetes has it built-in to spread Pods across multiple Zones (Availability Zones in AWS). This works for both GCE and AWS. We run in AWS so I’m going to show the config for that here. Setup accordingly for GCE.

All you have to do in AWS is label your workers(minions) properly and Kubernetes will handle the rest. It is a very specific label you must use. Now I will say, we added a little weight to ServiceSpreadingPriority to make sure Kubernetes gave more priority to spreading pods across AZs.

kubectl label nodes <server_name> failure-domain.beta.kubernetes.io/region=$REGION
kubectl label nodes <server_name> failure-domain.beta.kubernetes.io/zone=$AVAIL_ZONE

You’ll notice the label looks funny. ‘failure-domain’ made a number of my Ops colleagues cringe when they saw it for the first time prior to understanding its meaning. One of them happened to be looking at our newly created cluster and thought we already had an outage. My Bad!

You will notice $REGION and $AVAIL_ZONE are variables we set.

The $REGION we define in Terraform during cluster build but it looks like any typical AWS region.

REGION="us-west-2"

The availability zone we derive on the fly by having our EC2 instances query the AWS API via curl. The IP address is a globally usable IP for all EC2 instances. So you can literally copy this command and use it.

AVAIL_ZONE=`curl http://169.254.169.254/latest/meta-data/placement/availability-zone`


IMPORTANT NOTE: If you create a customer policy for the Scheduler, you MUST include everything in it you want. The DEFAULT policies will not exist if you don’t place them in the config. Here is our policy.

{
	"kind" : "Policy",
	"version" : "v1",
	"predicates" : [
		{"name" : "PodFitsPorts"},
		{"name" : "PodFitsResources"},
		{"name" : "NoDiskConflict"},
		{"name" : "MatchNodeSelector"},
		{"name" : "HostName"}
	],
	"priorities" : [
		{"name" : "ServiceSpreadingPriority", "weight" : 2},
		{"name" : "LeastRequestedPriority", "weight" : 1},
		{"name" : "BalancedResourceAllocation", "weight" : 1}
	]
}


And within the kube-scheduler.yaml config we have:

- --policy-config-file="/path/to/customscheduler.json"


Alright, if that wasn’t enough. You can write your own schedulers within Kubernetes. Personally I’ve not had to do this but here is a link that can provide more information if you are interested.


And if you need more depth around Kubernetes Scheduling the best article I’ve seen written on it is at OpenShift. You can find more information around Affinity/Anti-Affinity, Configurable Predicates and Configurable Priority functions.

Kubernetes – Jobs

Ever want to run a recurring cronjob in Kubernetes? Maybe you want to recursively pull an AWS S3 bucket or gather data by inspecting your cluster. How about running some analytics in parallel or even running a series of tests to make sure the new deploy of your cluster was successful?

A Kubernetes Job might just be the answer.

So what exactly is a job anyway? Basically its a short lived replication controller. A job ensures that a task is successfully implemented even when faults in the infrastructure would otherwise cause it to fail. Consider it the fault tolerant way of executing a one-time pod/request. Or better yet cron with some brains. Oh and speaking of which, you’ll actually be able to run Jobs at specific times and dates here pretty soon in Kubernetes 1.3.

For example:

I have a Cassandra cluster in Kubernetes and I want to run:

nodetool repair -pr -h <host_ip>

on every node in my 10 node Cassandra cluster. And because I’m smart I’m going to run 10 different jobs, one at a time so I don’t overload my cluster during the repair.

Here be a yaml for you:

apiVersion: batch/v1
kind: Job
metadata:
  name: nodetool
spec:
  template:
    metadata:
      name: nodetool
    spec:
      containers:
      - name: nodetool
        image: some_private_repo:8500/nodetool
        command: ["/usr/bin/nodetool",  "repair", "-h", "$(cassandra_host_ip)"]
      restartPolicy: Never

A Kubernetes Job will ensure that each job runs through to successful completion. Pretty cool huh? Now mind you, its not smart. Its not checking to see if nodetool repair was successful. It simply looking to see if the pod exited successfully.

Another key point about Jobs is they don’t just go away after they run. Because you may want to check on the logs or status of the job or something. (Not that anyone would ever be smart and push that information to a log aggregation service). Thus its important to remember to run a Job to clean up your jobs? Yep. Do it. Just setup a Job to keep things tidy. Odd, I know, but it works.

kubectl delete jobs/nodetool

Now lets imagine I’m a bit sadistic and I want to run all my ‘nodetool repair’ jobs in parallel. Well that can be done too. Aaaannnnd lets imagine that I have a list of all the Cassandra nodes I want to repair in a queue somewhere.

I could execute the nodetool repair job and simply scale up the number of replicas. As long as the pod can pull the last Cassandra host from the queue, I could literally run multiple repairs in parallel. Now my Cassandra cluster might not like that much and I may or may not have done something like this before but…..well…we’ll just leave that alone.

kubectl scale --replicas=10 jobs/nodetoolrepair

There is a lot more to jobs than just this but it should give you an idea of what can be done. If you find yourself in a mire of complexity trying to figure out how to run some complex job, head back to the source. Kubernetes Jobs. I think I reread this link 5 times before I groked all of it. Ok, maybe it was 10. or so. Oh fine, I still don’t get it all.

To see jobs that are hanging around-

kubectl get pods -a


@devoperandi

Vault in Kubernetes – Take 2

A while back I wrote about how we use Vault in Kubernetes and recently a good samaritan brought it to my attention that so much has changed with our implementation that I should update/rewrite a post about our current setup.

Again congrats to Martin Devlin for all the effort he has put in. Amazing engineer.

So here goes. Please keep in mind, I’ve intentionally abstracted various things out of these files. You won’t be able to copy and paste to stand up your own. This is meant to provide insight into how you could go about it.

If it has ###SOMETHING### its been abstracted.

If it has %%something%%, we use another script that replaces those for real values. This will be far less necessary in Kubernetes 1.3 when we can begin using variables in config files. NICE!

Also understand, I am not providing all of the components we use to populate policies, create tokens, initialize Vault, load secrets etc etc. Those are things I’m not comfortable providing at this time.

Here is our most recent Dockerfile for Vault:

FROM alpine:3.2
MAINTAINER 	Martin Devlin <martin.devlin@pearson.com>

ENV VAULT_VERSION    0.5.2
ENV VAULT_HTTP_PORT  ###SOME_HIGH_PORT_HTTP###
ENV VAULT_HTTPS_PORT ###SOME_HIGH_PORT_HTTPS###

COPY config.json /etc/vault/config.json

RUN apk --update add openssl zip\
&& mkdir -p /etc/vault/ssl \
&& wget http://releases.hashicorp.com/vault/${VAULT_VERSION}/vault_${VAULT_VERSION}_linux_amd64.zip \
&& unzip vault_${VAULT_VERSION}_linux_amd64.zip \
&& mv vault /usr/local/bin/ \
&& rm -f vault_${VAULT_VERSION}_linux_amd64.zip

EXPOSE ${VAULT_HTTP_PORT}
EXPOSE ${VAULT_HTTPS_PORT}

COPY /run.sh /usr/bin/run.sh
RUN chmod +x /usr/bin/run.sh

ENTRYPOINT ["/usr/bin/run.sh"]
CMD []

Same basic docker image build on Alpine. Not too much has changed here other than some ports, version of Vault and we have added a config.json so we can dynamically create the consul backend and set our listeners.

Lets have a look at config.json

### Vault config

backend "consul" {
  address = "%%CONSUL_HOST%%:%%CONSUL_PORT%%"
  path = "vault"
  advertise_addr = "https://%%VAULT_IP%%:%%VAULT_HTTPS_PORT%%"
  scheme = "%%CONSUL_SCHEME%%"
  token = %%CONSUL_TOKEN%%
  tls_skip_verify = 1
}

listener "tcp" {
  address = "%%VAULT_IP%%:%%VAULT_HTTPS_PORT%%"
  tls_key_file = "/###path_to_key##/some_vault.key"
  tls_cert_file = "/###path_to_crt###/some_vault.crt"
}

listener "tcp" {
  address = "%%VAULT_IP%%:%%VAULT_HTTP_PORT%%"
  tls_disable = 1
}

disable_mlock = true

We dynamically configure config.json with

CONSUL_HOST = Kubernetes Consul Service IP

CONSUL_PORT = Kubernetes Consul Service Port

CONSUL_SCHEME = HTTPS OR HTTP for connection to Consul

CONSUL_TOKEN = ACL TOKEN to access Consul

VAULT_IP = VAULT_IP

VAULT_HTTPS_PORT = Vault HTTPS Port

VAULT_HTTP_PORT = Vault HTTP Port


run.sh has changed significantly however. We’ve added ssl support and cleaned things up a bit. We are working on another project to transport the keys external to the cluster but for now this is a manual process after everything is stood up. Our intent moving forward is to store this information in what we call ‘the brain’ and provide access to each key to different people. Maybe sometime in the next few months I can talk more about that.

#!/bin/sh
if [ -z ${VAULT_HTTP_PORT} ]; then
  export VAULT_HTTP_PORT=###SOME_HIGH_PORT_HTTP###
fi
if [ -z ${VAULT_HTTPS_PORT} ]; then
  export VAULT_HTTPS_PORT=###SOME_HIGH_PORT_HTTPS###
fi

if [ -z ${CONSUL_SERVICE_HOST} ]; then
  export CONSUL_SERVICE_HOST="127.0.0.1"
fi

if [ -z ${CONSUL_SERVICE_PORT_HTTPS} ]; then
  export CONSUL_HTTP_PORT=SOME_CONSUL_PORT
else
  export CONSUL_HTTP_PORT=${CONSUL_SERVICE_PORT_HTTPS}
fi

if [ -z ${CONSUL_SCHEME} ]; then
  export CONSUL_SCHEME="https"
fi

if [ -z ${CONSUL_TOKEN} ]; then
  export CONSUL_TOKEN=""
else
  CONSUL_TOKEN=`echo ${CONSUL_TOKEN} | base64 -d`
fi

if [ ! -z "${VAULT_SSL_KEY}" ] &&  [ ! -z "${VAULT_SSL_CRT}" ]; then
  echo "${VAULT_SSL_KEY}" | sed -e 's/\"//g' | sed -e 's/^[ \t]*//g' | sed -e 's/[ \t]$//g' > /etc/vault/ssl/vault.key
  echo "${VAULT_SSL_CRT}" | sed -e 's/\"//g' | sed -e 's/^[ \t]*//g' | sed -e 's/[ \t]$//g' > /etc/vault/ssl/vault.crt
else
  openssl req -x509 -newkey rsa:2048 -nodes -keyout /etc/vault/ssl/vault.key -out /etc/vault/ssl/vault.crt -days 365 -subj "/CN=vault.kube-system.svc.cluster.local" 
fi

export VAULT_IP=`hostname -i`

sed -i "s,%%CONSUL_HOST%%,$CONSUL_SERVICE_HOST,"   /etc/vault/config.json
sed -i "s,%%CONSUL_PORT%%,$CONSUL_HTTP_PORT,"      /etc/vault/config.json
sed -i "s,%%CONSUL_SCHEME%%,$CONSUL_SCHEME,"       /etc/vault/config.json
sed -i "s,%%CONSUL_TOKEN%%,$CONSUL_TOKEN,"         /etc/vault/config.json
sed -i "s,%%VAULT_IP%%,$VAULT_IP,"                 /etc/vault/config.json
sed -i "s,%%VAULT_HTTP_PORT%%,$VAULT_HTTP_PORT,"   /etc/vault/config.json
sed -i "s,%%VAULT_HTTPS_PORT%%,$VAULT_HTTPS_PORT," /etc/vault/config.json

cmd="vault server -config=/etc/vault/config.json $@;"

if [ ! -z ${VAULT_DEBUG} ]; then
  ls -lR /etc/vault
  cat /###path_to_/vault.crt###
  cat /etc/vault/config.json
  echo "${cmd}"
  sed -i "s,INFO,DEBUG," /etc/vault/config.json
fi

## Master stuff

master() {

  vault server -config=/etc/vault/config.json $@ &

  if [ ! -f ###/path_to/something.txt### ]; then

    export VAULT_SKIP_VERIFY=true
    
    export VAULT_ADDR="https://${VAULT_IP}:${VAULT_HTTPS_PORT}"

    vault init -address=${VAULT_ADDR} > ###/path_to/something.txt####

    export VAULT_TOKEN=`grep 'Initial Root Token:' ###/path_to/something.txt### | awk '{print $NF}'`
    
    vault unseal `grep 'Key 1:' ###/path_to/something.txt### | awk '{print $NF}'`
    vault unseal `grep 'Key 2:' ###/path_to/something.txt### | awk '{print $NF}'`
    vault unseal `grep 'Key 3:' ###/path_to/something.txt### | awk '{print $NF}'`

  fi

}

case "$1" in
  master)           master $@;;
  *)                exec vault server -config=/etc/vault/config.json $@;;
esac

Alright now that we have our image, lets have a look at how we deploy it. Now that we have SSL in place and we’ve got some good ACLs we expose Vault external to the Cluster but still internal to our environment. This allows us to automatically populate Vault with secrets, keys and certs from various sources while still providing a high level of security.

service.yaml

apiVersion: v1
kind: Service
metadata:
  name: vault
  namespace: kube-system
  labels:
    name: vault
spec:
  ports:
    - name: vaultport
      port: ###SOME_VAULT_PORT_HERE###
      protocol: TCP
      targetPort: ###SOME_VAULT_PORT_HERE###
    - name: vaultporthttp
      port: 8200
      protocol: TCP
      targetPort: 8200
  selector:
    app: vault

Ingress.yaml

apiVersion: extensions/v1beta1
kind: Ingress
metadata:
  name: vault
  namespace: kube-system
  labels:
    ssl: "true"
spec:
  rules:
  - host: ###vault%%ENVIRONMENT%%.somedomain.com###
    http:
      paths:
      - backend:
          serviceName: vault
          servicePort: ###SOME_HIGH_PORT_HTTPS###
        path: /


replicationcontroller.yaml

apiVersion: v1
kind: ReplicationController
metadata:
  name: vault
  namespace: kube-system
spec:
  replicas: 3
  selector:
    app: vault
  template:
    metadata:
      labels:
        pool: vaultpool
        app: vault
    spec:
      containers:
        - name: vault
          image: '###BUILD_YOUR_IMAGE_AND_PUT_IT_HERE###'
          imagePullPolicy: Always
          env:
            - name: CONSUL_TOKEN
              valueFrom:
                secretKeyRef:
                  name: vault-mgmt
                  key: vault-mgmt
            - name: "VAULT_DEBUG"
              value: "false"
            - name: "VAULT_SSL_KEY"
              valueFrom:
                secretKeyRef:
                  name: ###MY_SSL_KEY###
                  key: ###key###
            - name: "VAULT_SSL_CRT"
              valueFrom:
                secretKeyRef:
                  name: ###MY_SSL_CRT###
                  key: ###CRT###
          readinessProbe:
            httpGet:
              path: /v1/sys/health
              port: 8200
            initialDelaySeconds: 10
            timeoutSeconds: 1
          ports:
            - containerPort: ###SOME_VAULT_HTTPS_PORT###
              name: vaultport
            - containerPort: 8200
              name: vaulthttpport
      nodeSelector:
        role: minion

WARNING: Add your volume mounts and such for the Kubernetes Secrets associated with the vault ssl crt and key.


As you can see, significant improvements made to how we build Vault in Kubernetes. I hope this helps in your own endeavors.

Feel free to reach out on Twitter or through the comments.


Kubernetes – ServiceAccounts

serviceAccounts are a relatively unknown entity within Kubernetes. Everyone has heard of them, everyone has likely added them to –admission-control on the ApiServer but few have actually configured or used them. Being guilty of this myself for quite some time I figured I would give a brief idea on why they are important and how they can be used.

serviceAccounts are for any process running inside a pod that needs access the Kubernetes API OR to a secret. Is it mandatory to access a Kubernetes Secret? No. Is it recommended, you bet. Not having serviceAccounts active through –admission-control can also leave a big gaping security hole in your platform. So make sure its active.

Here is the high-level-

  1. serviceAccounts are tied to Namespaces.
  2. Kubernetes Secrets can be tied to serviceAccounts and thus limited to specific NameSpaces.
  3. If non are specified, a ‘default’ with relatively limited access will be supplied on NameSpace create.
  4. Policies can be placed on serviceAccounts to add/remove API access.
  5. serviceAccounts can be specified during Pod or RC creation.
  6. In order to change the serviceAccount for a Pod, a restart of the Pod is necessary.
  7. serviceAccount must be created prior to use in a Pod.
  8. serviceAccount Tokens are used to allow a serviceAccounts to access a Kubernetes Secret.
  9. Using ImagePullSecrets for various Container Registries can be done with serviceAccounts.


Creating a custom serviceAccount is dead simple. Below is a yaml file to do so.

apiVersion: v1
kind: ServiceAccount
metadata:
  name: pulse


And creating a policy for a serviceAccount isn’t too bad either.

(NOTE: must have –authorization-mode=ABAC set for Authorization plugin)

Screen Shot 2016-04-15 at 7.52.44 PM


Now we have a serviceAccount named Pulse and we’ve applied a policy that allows Kube API ReadOnly access to view events related to the Pulse Namespace.

Now lets associate a Secret with this Pulse serviceAccount.

apiVersion: v1
kind: Secret
metadata:
  name: pulse-secret
  annotations: 
    kubernetes.io/service-account.name: pulse
type: kubernetes.io/service-account-token
type: Opaque
data:
  password: eUiXZDFIOPU2ErTmCg==
  username: my_special_user_name

Ok now we have a Secret that is only accessible from a process running in the Pulse namespace that is using the pulse serviceAccount.

Name:   pulse-secret
Namespace:  pulse
Annotations:  kubernetes.io/service-account.name=pulse,kubernetes.io/service-account.uid=930e6ia5-35cf-5gi5-8d06-00549fi45306

Type: kubernetes.io/service-account-token

Data
====
ca.crt: 1452 bytes
token: some_token_for_pulse_serviceaccount

Which brings me to my next point. You can have multiple serviceAccounts per Namespace. This means granularity in what processes you allow access to various pieces of the Kubernetes API AND what processes WITHIN a namespace you want to have access to a Secret.

In closing, serviceAccounts can be granular, they can limit access to Secrets, when combined with abac policies they can provide specific access to the Kube API and they are fairly easy to use and consume.