Kubernetes: A/B Cluster Deploys

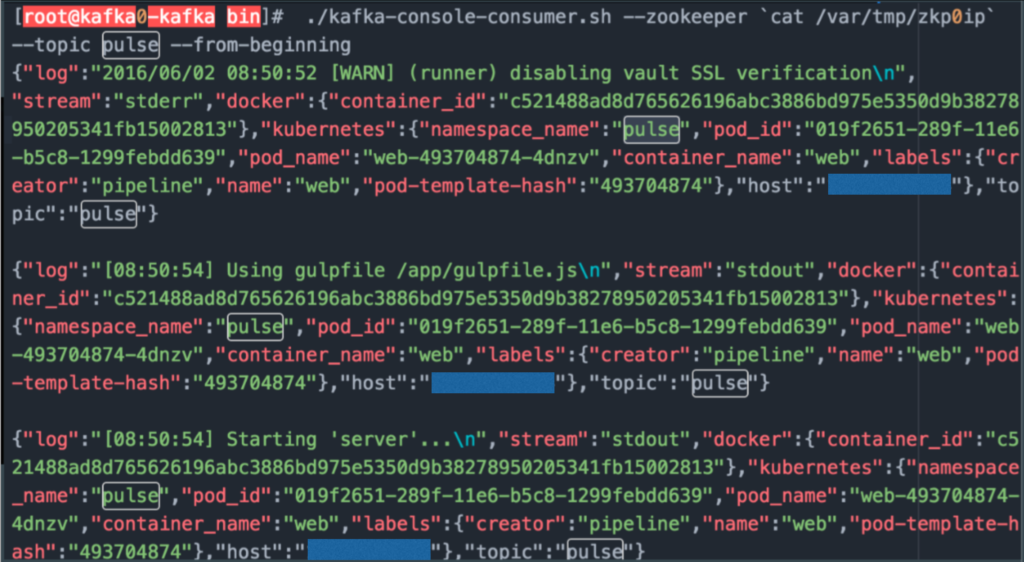
Everything thing mentioned has been POCed and proven to work so far in testing. We run an application called Pulse in which we demoed it staying up throughout this A/B migration process.

Recently the team went through an exercise on how to deploy/manage a complete cluster upgrade. There were a couple options discussed along with what it would take to accomplish both.

  • In-situ upgrade – the usual
  • A/B upgrade –  a challenge

In the end, we chose to move forward with A/B upgrades. Keeping in mind the vast majority of our containers are stateless and thus quite easy to move around. Stateful containers are a bit bigger beast but we are working on that as well.

We fully understand A/B migrations will be difficult and In-situ will be required at some point but what the hell. Why not stretch ourselves a bit right?

So here is the gist:

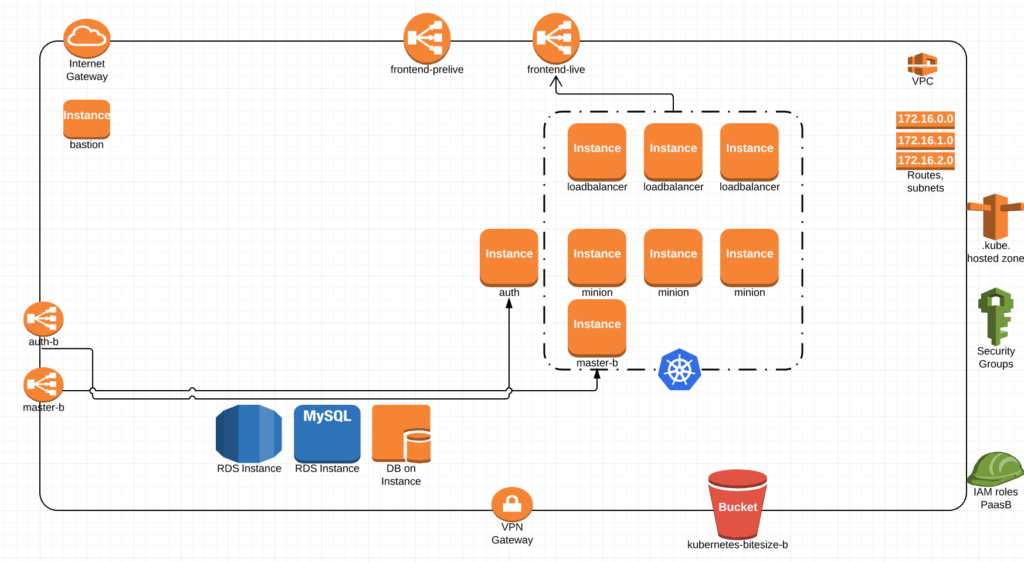
Build a Terraform/Ansible code base that can deploy an AWS VPC with all the core components. Minus the databases in this picture this is basically our shell. Security groups, two different ELBs for live and pre-live, a bastion box, subnets and routes, our dns hosted zone and a gateway.

Screen Shot 2016-08-05 at 1.05.59 PM

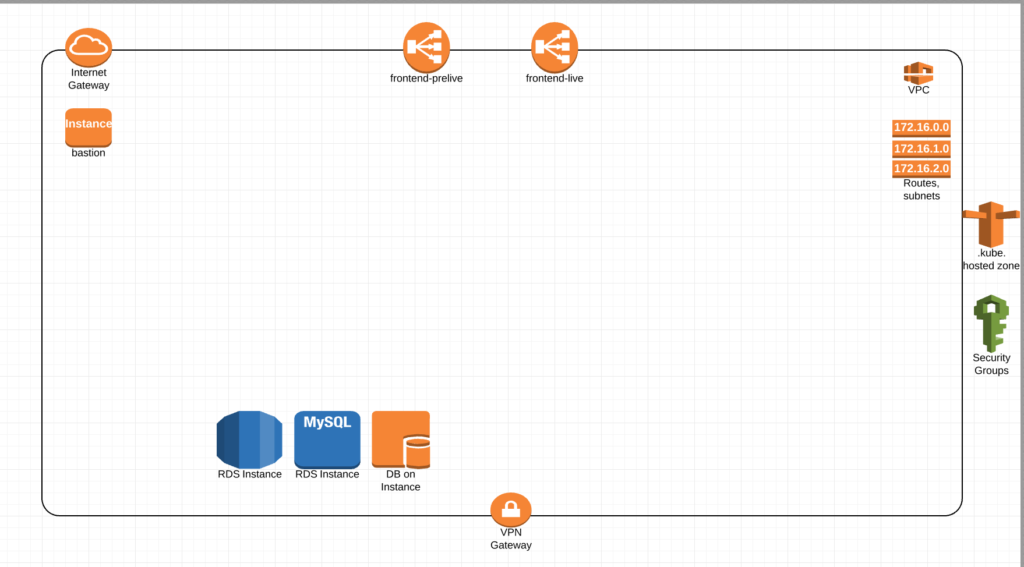
This would be its own Terraform apply. Allowing our Operations folks to manage security groups, some global dns entries, any VPN connections, bastion access etc etc without touching the actual Kubernetes clusters.

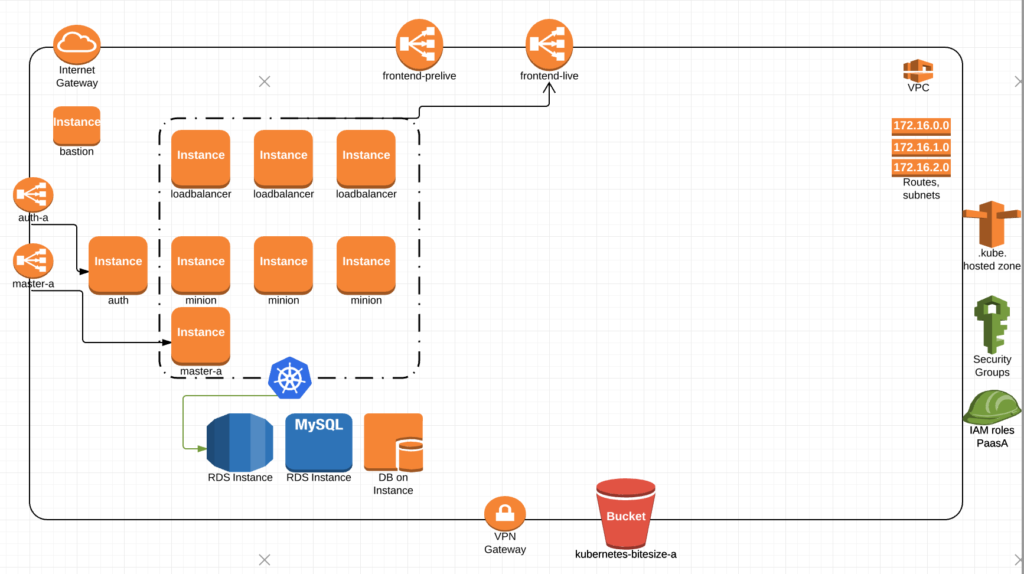
We would then have a separate Terraform apply that will stand up what we call paasA. Which includes an Auth server, our Kubernetes nodes for load balancing (running ingress controllers), master-a, and all of our minions with the kubernetes ingress-controllers receiving traffic through frontend-live ELB.

Screen Shot 2016-08-05 at 1.06.31 PM

Once we decide to upgrade, we would spin up paasB. which is essentially a duplicate of paasA running within the same VPC.

Screen Shot 2016-08-05 at 1.06.41 PM

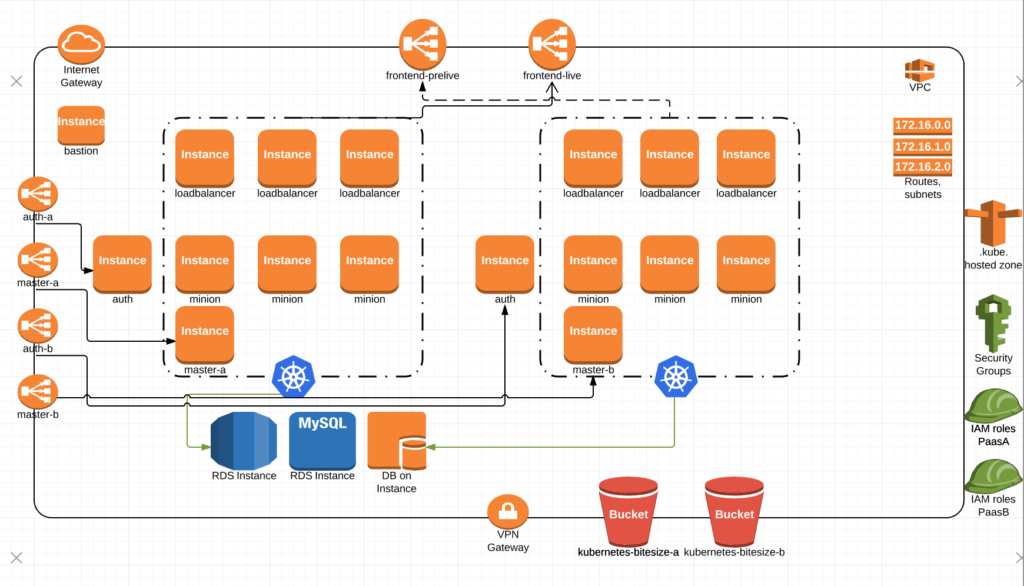
When paasB comes up, it gets added to the frontend pre-live ELB for smoke testing, end-to-end testing and the like.

Once paasB is tested to our satisfaction, we make the switch to the live ELB while preserving the ability to switch back if we find something major preventing a complete cut-over.

Screen Shot 2016-08-05 at 1.06.54 PM

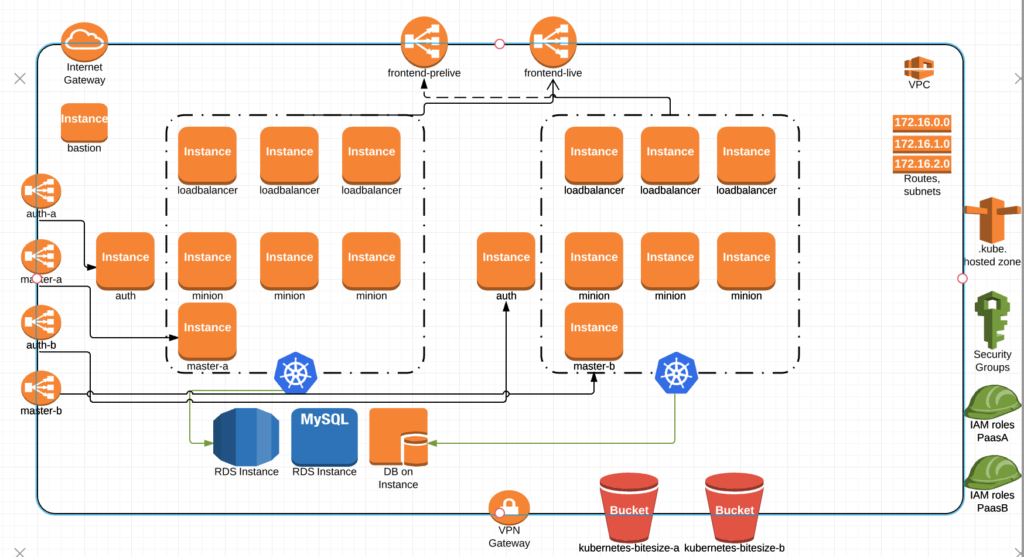
We then bring down paasA and wwwaaaahhhllllllaaaaaa, PaaS upgrade complete.

Screen Shot 2016-08-05 at 1.07.25 PM

Now I think its obvious I’m way over simplifying this so lets get into some details.

ELBs – They stay up all the time. Our Kubernetes minions running nginx-controllers get labelled in AWS. So we can quickly update the ELBs whether live or prelive to point at the correct servers.

S3 buckets – We store our config files and various execution scripts in S3 for configuring our minions and the master. In this A/B scenario, each Cluster (paasA and paas) have their own S3 bucket where their config files are stored.

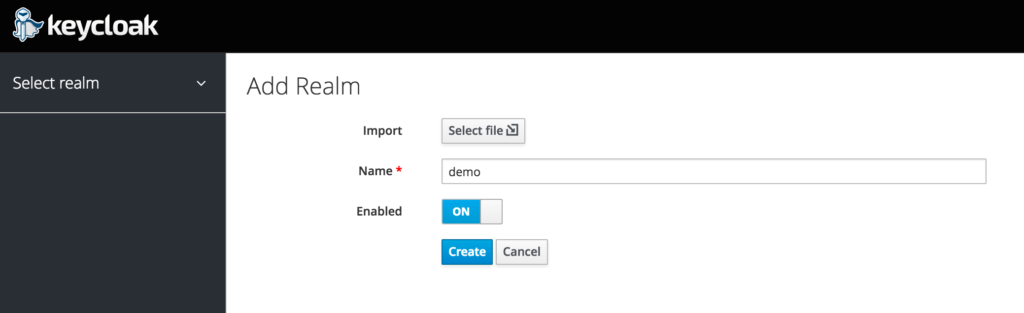
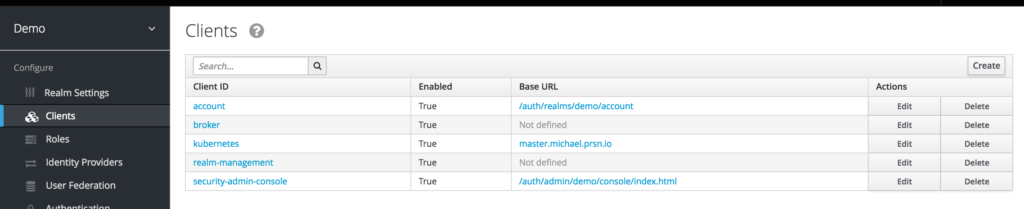
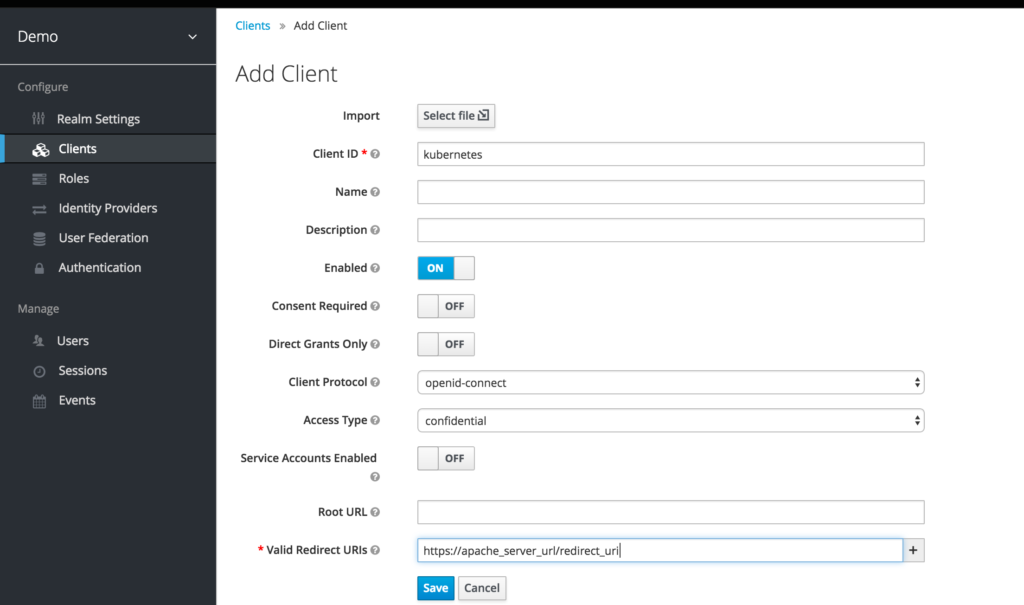
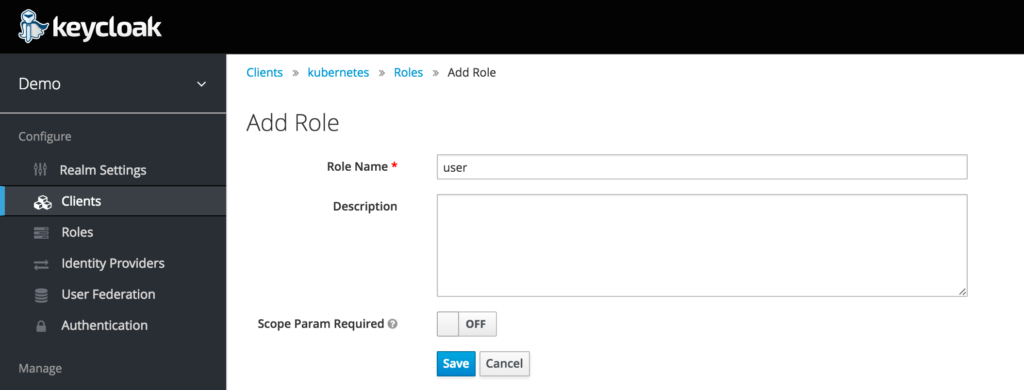
Auth Servers – Our paas deploys include our Keycloak Auth servers. We still need to work through how we transfer all the configurations or IF we choose to no longer deploy auth servers as apart of the Cluster deploy but instead as apart of the VPC.

Masters – New as apart of cluster deploy in keeping with true A/B.

Its pretty cool to run two clusters side by side AND be able to bring them up and down individually. But where this gets really awesome is when we can basically take all applications running in paasA and deploy them into paasB. I’m talking about a complete migration of assets. Secrets, Jenkins, Namespaces, ACLs, Resource Quotas and ALL applications running on paasA minus any self generated items.

To be clear, we are not simply copying everything over. We are recreating objects using one cluster as the source and the other cluster as the destination. We are reading JSON objects from the Kubernetes API and using those objects along with their respective configuration to create the same object in another cluster. If you read up on Ubernetes, you will find their objectives are very much in-line with this concept. We also have ZERO intent of duplicating efforts long term. The reality is, we needed this functionality before the Kubernetes project could get there. As Kubernetes federation continues to mature, we will continue to adopt and change. Even replacing our code with theirs. With this in mind, we have specifically written our code to perform some of these actions in a way that can very easily be removed.

Now you are thinking, why didn’t you just contribute back to the core project? We are in several ways. Just not this one because we love the approach the Kubernetes team is already taking with this. We just needed something to get us by until they can make theirs production ready.

Now with that I will say we have some very large advantages that enable us to accomplish something like this. Lets take Jenkins for example. We run Jenkins in every namespace in our clusters. Our Jenkins machines are self-configuring and for the most part stateless. So while we have to copy infrastructure level items like Kubernetes Secrets to paasB, we don’t have to copy each application. All we have to do is spin up the Jenkins container in each namespace and let them deploy all the applications necessary for their namespace. All the code and configuration to do so exists in Git repos. Thus PaaS admins don’t need to know how each application stack in our PaaS is configured. A really really nice advantage.

Our other advantage is, our databases currently reside outside of Kubernetes (except some mongo and cassandra containers in dev) on virtual machines. So we aren’t yet worried about migration of stateful data sets thus it has made our work around A/B cluster migrations a much smaller stepping stone. We are however placing significant effort into this area. We are getting help from the guys at Jetstack.io around storage and we are working diligently with people like @chrislovecnm to understand how we can bring database containers into production. Some of this is reliant upon new features like Petsets and some of it requires changes in how various databases work. Take for example Cassandra snitches where Chris has managed to create a Kubernetes native snitch. Awesome work Chris.

So what about Consul, its stateful right? And its in your cluster yes?

Well that’s a little different animal. Consul is a stateful application in that it runs in a cluster. So we are considering two different ways by which to accomplish this.

  1. Externalize our flannel overlay network using aws-vpc and allow the /16s to route to one another. Then we could essentially create one Consul cluster across two Kubernetes clusters, allow data to sync and then decommission the consul containers on the paasA.
  2. Use some type of small application to keep two consul clusters in sync for a period of time during paas upgrade.

Both of the options above have benefits and limitations.

Option 1:

  • Benefits:
    • could use a similar method for other clustered applications like Cassandra.
    • would do a better job ensuring the data is synced.
    • could push data replication to the cluster level where it should be.
  • Limitations:
    • we could essentially bring down the whole Consul cluster with a wrong move. Thus some of the integrity imagined in a full A/B cluster migration would be negated.

Option 2:

  • Benefits:
    • keep a degree of separation between each Kubernetes cluster during upgrade so one can not impact the other.
    • pretty easy to implement
  • Limitations:
    • specific implementation
    • much more to keep track of
    • won’t scale for other stateful applications

I’m positive the gents on my team will call me out on several more but this is what I could think off off the top.

We have already implemented Option #2 in a POC of our A/B migration.

But we haven’t chosen a firm direction with this yet. So if you have additional insight, please comment back.

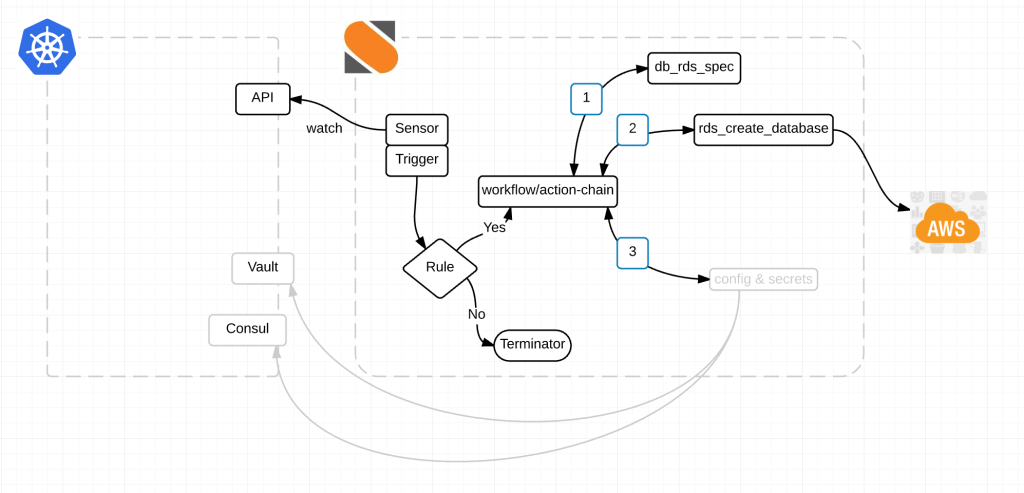
Barring stateful applications, what are we using to migrate all this stuff between clusters? StackStorm. We already have it performing other automation tasks outside the cluster, we have python libraries k8sv1 and k8sv1beta for the Kubernetes API endpoints and its quite easy to extract the data and push it into another cluster. Once we are done with the POC we’ll be pushing this to our stackstorm repo here. @peteridah you rock.

In our current POC, we migrate everything. In our next POC, we’ll enable the ability to deploy specific application stacks from one cluster to another. This will also provide us the ability to deploy an application stack from one cluster into another for things like performance testing or deep breach management testing.

Lastly we are working through how to go about stateful container migrations. There are many ideas floating around but we would really enjoy hearing yours.

For future generations:

  • We will need some sort of metadata framework for those application stacks that span multiple namespaces to ensure we duplicate an environment properly.


To my team-

My hat off to you. Martin, Simas, Eric, Yiwei, Peter, John, Ben and Andy for all your work on this.

Kubernetes Authentication – OpenID Connect

Authentication is often that last thing you decide to implement right before you go to production and you realize the security audit is going to block your staging or more likely production deploy. Its that thing that everyone recognizes as extremely important yet never manages to factor into the prototype/poc. Its the piece of the pie that could literally break a entire project with a single security incident but we somehow manage to accept Basic Authentication as ‘good enough’.

Now I’m not going to tell you I’m any different. In fact, its quite the opposite. What’s worse is I’ve got little to no excuse. I worked at Ping Identity for crying out loud. After as many incidents as I’ve heard of happening without good security, you would think I’d learn my lesson by now. But no, I put it off for quite some time in Kubernetes, accepting Basic Authentication to secure our future. That is, until now.

Caveat: There is a fair amount of complexity so if you find I’ve missed something important. PLEASE let me know in the comments so others can benefit.


Currently there are 4 Authentication methods that can be used in Kubernetes. Notice I did NOT say Authorization methods. Here is a very quick summary.

  • Client Certificate Authentication – Fairly static even though multiple certificate authorities can be used. This would require a new client cert to be generated per user.
  • Token File Authentication – Static in nature. Tokens all stored in a file on the host. No TTL. List of Tokens can only be changed by modifying the file and restarting the api server.
  • Basic Authentication – Need I say more? very similar to htpasswd.
  • OpenID Connect Authentication – The only solution with the possibility of being SSO based and allowing for dynamic user management.

Authentication within Kubernetes is still very much in its infancy and there is a ton to do in this space but with OpenID Connect, we can create an acceptable solution with other OpenSource tools.

One of those solutions is a combination of mod_auth_openidc and Keycloak.

mod_auth_openidc – an authentication/authorization module for Apache 2.x created by Ping Identity.

Keycloak – Integrated SSO and IDM for browser apps and RESTful web services.

Now to be clear, if you were to be running OpenShift (RedHat’s spin on Kubernetes), this process would be a bit simpler as Keycloak was recently acquired by Red Hat and they have placed a lot of effort into integrating the two.


The remainder of this blog assumes no OpenShift is in play and we are running vanilla Kubernetes 1.2.2+

The high level-

Apache server

  1. mod_auth_openidc installed on apache server from here
  2. mod_proxy loaded
  3. mod_ssl loaded
  4. ‘USE_X_FORWARDED_HOST = True’ is added to /usr/lib/python2.7/site-packages/cloudinit/settings.py if using Python 2.7ish

Kubernetes API server

  1. configure Kubernetes for OpenID Connect

Keycloak

  1. Setup really basic realm for Kubernetes


KeyCloak Configuration:

This walk-through assumes you have a Keycloak server created already.

For information on deploying a Keycloak server, their documentation can be found here.

First lets add a realm called “Demo”

Screen Shot 2016-06-10 at 5.51.41 PM

Now lets create a Client “Kubernetes”

Screen Shot 2016-06-10 at 5.52.49 PM

Screen Shot 2016-06-10 at 5.54.20 PM

Notice in the image above the “Valid Redirect URIs” must be the

Apache_domain_URL + /redirect_uri

provided you are using my templates or the docker image I’ve created.


Now within the Kubernetes Client lets create a role called “user”

Screen Shot 2016-06-10 at 5.58.32 PM


And finally for testing, lets create a user in Keycloak.

Screen Shot 2016-06-10 at 6.00.19 PM

Notice how I have set the email when creating the user.

This is because I’ve set email in the oidc user claim in Kubernetes

- --oidc-username-claim=email

AND the following in the Apache server.

OIDCRemoteUserClaim email
OIDCScope "openid email"

If you should choose to allow users to register with Keycloak I highly recommend you make email *required* if using this blog as a resource.


Apache Configuration:

First lets configure our Apache server or better yet just spin up a docker container.

To spin up a separate server do the following:

  1. mod_auth_openidc installed on apache server from here
  2. mod_proxy loaded
  3. mod_ssl loaded
  4. ‘USE_X_FORWARDED_HOST = True’ is added to /usr/lib/python2.7/site-packages/cloudinit/settings.py if using Python 2.7ish
  5. Configure auth_openidc.conf and place it at /etc/httpd/conf.d/auth_openidc.conf in on centos.
    1. Reference the Readme here for config values.

To spin up a container:

Run a docker container with environment variables set. This Readme briefly explains each environment var. And the following template can be copied from here.

<VirtualHost _default_:443>
   SSLEngine on
   SSLProxyEngine on
   SSLProxyVerify ${SSLPROXYVERIFY}
   SSLProxyCheckPeerCN ${SSLPROXYCHECKPEERCN}
   SSLProxyCheckPeerName ${SSLPROXYCHECKPEERNAME}
   SSLProxyCheckPeerExpire ${SSLPROXYCHECKPEEREXPIRE}
   SSLProxyMachineCertificateFile ${SSLPROXYMACHINECERT}
   SSLCertificateFile ${SSLCERT}
   SSLCertificateKeyFile ${SSLKEY}

  OIDCProviderMetadataURL ${OIDCPROVIDERMETADATAURL}

  OIDCClientID ${OIDCCLIENTID}
  OIDCClientSecret ${OIDCCLIENTSECRET}

  OIDCCryptoPassphrase ${OIDCCRYPTOPASSPHRASE}
  OIDCScrubRequestHeaders ${OIDCSCRUBREQUESTHEADERS}
  OIDCRemoteUserClaim email
  OIDCScope "openid email"

  OIDCRedirectURI https://${REDIRECTDOMAIN}/redirect_uri

  ServerName ${SERVERNAME}
  ProxyPass / https://${SERVERNAME}/

  <Location "/">
    AuthType openid-connect
    #Require claim sub:email
    Require valid-user
    RequestHeader set Authorization "Bearer %{HTTP_OIDC_ACCESS_TOKEN}e" env=HTTP_OIDC_ACCESS_TOKEN
    LogLevel debug
  </Location>

</VirtualHost>

Feel free to use the openidc.yaml as a starting point if deploying in Kubernetes.


Kubernetes API Server:

kube-apiserver.yaml

    - --oidc-issuer-url=https://keycloak_domain/auth/realms/demo
    - --oidc-client-id=kubernetes
    - --oidc-ca-file=/path/to/ca.pem
    - --oidc-username-claim=email

oidc-issuer-url

  • substitute keycloak_domain for the ip or domain to your keycloak server
  • substitute ‘demo’ for the keycloak realm you setup

oidc-client-id

  • same client id as is set in Apache

oidc-ca

  • this is a shared ca between kubernetes and keycloak


OK so congrats. You should now be able to hit the Kubernetes Swagger UI with Keycloak/OpenID Connect authentication

Screen Shot 2016-06-10 at 6.08.47 PM

And you might be thinking to yourself about now, why the hell would I authenticate to Kubernetes through a web console?

Well remember how the kube-proxy can proxy requests through the Kubernetes API endpoint to various UIs like say Kube-UI. Tada. Now you can secure them properly.

Today all we have done is build authentication. Albeit pretty cool cause we have gotten ourselves out of statically managed Tokens, Certs or Basic Auth. But we haven’t factored in Authorization. In a future post, we’ll look at authorization and how to do it dynamically through webhooks.


Logging – Kafka topic by Kubernetes namespace

In the beginning, there was logging ……… AND there were single homed, single server applications, engineers to rummage through server logs, CDs for installing OSs and backup tape drives. Fortunately most everything else has gone the way of the dodo. Unfortunately, logging in large part has not.

When we started our PaaS project, we recognized logging was going to be of interest in a globally distributed, containerized, volatile, ever changing environment. CISO, QA and various business units all have data requirements that can be gathered from logs. All having different use cases and all wanting log data they can’t seem to aggregate together due to the distributed nature of our organization. Now some might think, we’ve done that. We use Splunk or ELK and pump all the logs into it and KA-CHOW!!! were done. Buutttt its not quite that simple. We have a crap ton of applications, tens of thousands of servers, tons of appliances, gear and stuff all over the globe. We have one application that literally uses 1 entire ELK stack by itself because the amount of data its pumping out is so ridiculous.

So with project Bitesize coming along nicely, we decided to take our first baby step into this realm. This is a work in progress but here is the gist. Dynamically configured topics through fluentd containers running in Kubernetes on each server host. A scalable Kafka cluster that holds data for a limited amount of time. Saves data off to permanent storage for long-term/bulk analytics. A Rest API or http interface. A management tool for security of the endpoint.

Where we’re at today is dynamically pushing data into Kafka via Fluentd based on Kubernetes namespace. So what does that mean exactly? EACH of our application stacks (by namespace) can get their own logs for their own applications without seeing everything else.

I’d like to give mad props to Yiwei Chen for making this happen. Great work mate. His image can be found on Docker hub at ywchenbu/fluentd:0.8.

This image contains just a few key fluentd plugins.

fluentd-plugin-kafka

fluentd-kubernetes-metadata-filter

fluentd-record-transformer – built into fluentd. No required install.

We are still experimenting with this so expect it to change but it works quite nicely and could be modified for use cases other than topics by namespace.

You should have the following directory in place on each server in your cluster.

Directory – /var/log/pos    # So fluentd can keep track of its log position


Here is td-agent.yaml.

apiVersion: v1
kind: Pod
metadata:
  name: td-agent
  namespace: kube-system
spec:
  volumes:
  - name: log
    hostPath:
      path: /var/log/containers
  - name: dlog
    hostPath:
      path: /var/lib/docker/containers
  - name: mntlog
    hostPath:
      path: /mnt/docker/containers
  - name: config
    hostPath:
      path: /etc/td-agent
  - name: varrun
    hostPath:
      path: /var/run/docker.sock
  - name: pos
    hostPath:
      path: /var/log/pos
  containers:
  - name: td-agent
    image: ywchenbu/fluentd:0.8
    imagePullPolicy: Always
    securityContext:
      privileged: true
    volumeMounts:
      - mountPath: /var/log/containers
        name: log
        readOnly: true
      - mountPath: /var/lib/docker/containers
        name: dlog
        readOnly: true
      - mountPath: /mnt/docker/containers
        name: mntlog
        readOnly: true
      - mountPath: /etc/td-agent
        name: config
        readOnly: true
      - mountPath: /var/run/docker.sock
        name: varrun
        readOnly: true
      - mountPath: /var/log/pos
        name: pos

You will probably notice something thing about this config that we don’t like. The fact that its running in privileged mode. We intend to change this in near future but currently fluentd cant read the log files without it. Not a difficult change, just haven’t made it yet.

This yaml gets placed in

/etc/kubernetes/manifests/td-agent.yaml

Kubernetes should automatically pick this up and deploy td-agent.


And here is where the magic happens. Below is td-agent.conf. Which according to our yaml should be located at

/etc/td-agent/td-agent.conf
<source>
  type tail
  path /var/log/containers/*.log
  pos_file /var/log/pos/es-containers.log.pos
  time_format %Y-%m-%dT%H:%M:%S.%NZ
  tag kubernetes.*
  format json
  read_from_head true
</source>

<filter kubernetes.**>
  type kubernetes_metadata
</filter>

<filter **>
  @type record_transformer
  enable_ruby
  <record>
    topic ${kubernetes["namespace_name"]}
  </record>
</filter>

<match **>
  @type kafka
  zookeeper SOME_IP1:2181,SOME_IP2:2181 # Set brokers via Zookeeper
  default_topic default
  output_data_type json
  output_include_tag  false
  output_include_time false
  max_send_retries  3
  required_acks 0
  ack_timeout_ms  1500
</match>

What’s happening here?

  1. Fluentd is looking for all log files in /var/log/containers/*.log
  2. Our kubernetes-metadata-filter is adding info to the log file with pod_id, pod_name, namespace, container_name and labels.
  3. We are transforming the data to use the namespace as the kafka topic
  4. And finally pushing the log entry to Kafka.


Here is an example of a log file you can expect to get from Kafka. All in json.

kafkaoutput


Alright so now that we have data being pushed to Kafka topic by namespace what can we do with it?

Next we’ll work on getting data out of Kafka.

Securing the Kafka endpoint so it can be consumed from anywhere.

And generally rounding out the implementation.


Eventually we hope Kafka will become an endpoint by which logs from across the organization can be consume. But naturally, we are starting bitesized.


Please follow me and retweet if you like what you see. Much appreciated.


@devoperandi


Kubernetes Python Clients – 1.2.2

I just created the Python Kubernetes Client for v1.2.2.

I’ve also added some additional information on how to gen your own client if you need/want to.

https://github.com/mward29/python-k8sclient-1-2-2


**Update

Created AutoScaling and new beta extensions client

https://github.com/mward29/python-k8sclient-autoscaling-v1

https://github.com/mward29/python-k8sclient-v1beta1-v1.2.2

Enjoy!

Kubernetes – Scheduling and Multiple Availability Zones

The Kubernetes Scheduler is a very important part of the overall platform but its functionality and capabilities are not widely known. Why? because for the most part the scheduler just runs out of the box with little to no additional configuration.

So what does this thing do? It determines what server in the cluster a new pod should run on. Pretty simple yet oh so complex. The scheduler has to very quickly answer questions like-

How much resource (memory, cpu, disk) is this pod going to require?

What workers (minions) in the cluster have the resources available to manage this pod?

Are there external ports associated with this pod? If so, what hosts may already be utilizing that port?

Does the pod config have nodeSelector set? If so, which of the workers have a label fitting this requirement?

Has a weight been added to a given policy?

What affinity rules are in place for this pod?

What Anti-affinity rules does this pod apply to?

All of these questions and more are answered through two concepts within the scheduler. Predicates and Priority functions.

Predicates – as the name suggests, predicates set the foundation or base for selecting a given host for a pod.

Priority functions – Assign a number between 0 and 10 with 0 being worst fit and 10 being best.

These two concepts combined determine where a given pod will be hosted in the cluster.


Ok so lets look at the default configuration as of Kubernetes 1.2.

{
	"kind" : "Policy",
	"version" : "v1",
	"predicates" : [
		{"name" : "PodFitsPorts"},
		{"name" : "PodFitsResources"},
		{"name" : "NoDiskConflict"},
		{"name" : "MatchNodeSelector"},
		{"name" : "HostName"}
	],
	"priorities" : [
		{"name" : "LeastRequestedPriority", "weight" : 1},
		{"name" : "BalancedResourceAllocation", "weight" : 1},
		{"name" : "ServiceSpreadingPriority", "weight" : 1}
	]
}


The predicates listed perform the following actions: I think they are fairly obvious but I’m going to list their function for posterity.

{“name” : “PodFitsPorts”} – Makes sure the pod doesn’t require ports that are already taken on hosts

{“name” : “PodFitsResources”} – Ensure CPU and Memory are available on the host for the given pod

{“name” : “NoDiskConflict”} – Makes sure if the Pod has Local disk requirements that the Host can fulfill it

{“name” : “MatchNodeSelector”} – If nodeSelector is set, determine which nodes match

{“name” : “HostName”} – A Pod can be added to a specific host through the hostname


Priority Functions: These get a little bit interesting.

{“name” : “LeastRequestedPriority”, “weight” : 1} – Calculates percentage of expected resource consumption based on what the POD requested.

{“name” : “BalancedResourceAllocation”, “weight” : 1} – Calculates actual consumed resources and determines best fit on this calc.

{“name” : “ServiceSpreadingPriority”, “weight” : 1} – Minimizes the number of pods belonging to the same service from living on the same host.


So here is where things start to get really cool with the Scheduler. With v1.2, Kubernetes has it built-in to spread Pods across multiple Zones (Availability Zones in AWS). This works for both GCE and AWS. We run in AWS so I’m going to show the config for that here. Setup accordingly for GCE.

All you have to do in AWS is label your workers(minions) properly and Kubernetes will handle the rest. It is a very specific label you must use. Now I will say, we added a little weight to ServiceSpreadingPriority to make sure Kubernetes gave more priority to spreading pods across AZs.

kubectl label nodes <server_name> failure-domain.beta.kubernetes.io/region=$REGION
kubectl label nodes <server_name> failure-domain.beta.kubernetes.io/zone=$AVAIL_ZONE

You’ll notice the label looks funny. ‘failure-domain’ made a number of my Ops colleagues cringe when they saw it for the first time prior to understanding its meaning. One of them happened to be looking at our newly created cluster and thought we already had an outage. My Bad!

You will notice $REGION and $AVAIL_ZONE are variables we set.

The $REGION we define in Terraform during cluster build but it looks like any typical AWS region.

REGION="us-west-2"

The availability zone we derive on the fly by having our EC2 instances query the AWS API via curl. The IP address is a globally usable IP for all EC2 instances. So you can literally copy this command and use it.

AVAIL_ZONE=`curl http://169.254.169.254/latest/meta-data/placement/availability-zone`


IMPORTANT NOTE: If you create a customer policy for the Scheduler, you MUST include everything in it you want. The DEFAULT policies will not exist if you don’t place them in the config. Here is our policy.

{
	"kind" : "Policy",
	"version" : "v1",
	"predicates" : [
		{"name" : "PodFitsPorts"},
		{"name" : "PodFitsResources"},
		{"name" : "NoDiskConflict"},
		{"name" : "MatchNodeSelector"},
		{"name" : "HostName"}
	],
	"priorities" : [
		{"name" : "ServiceSpreadingPriority", "weight" : 2},
		{"name" : "LeastRequestedPriority", "weight" : 1},
		{"name" : "BalancedResourceAllocation", "weight" : 1}
	]
}


And within the kube-scheduler.yaml config we have:

- --policy-config-file="/path/to/customscheduler.json"


Alright, if that wasn’t enough. You can write your own schedulers within Kubernetes. Personally I’ve not had to do this but here is a link that can provide more information if you are interested.


And if you need more depth around Kubernetes Scheduling the best article I’ve seen written on it is at OpenShift. You can find more information around Affinity/Anti-Affinity, Configurable Predicates and Configurable Priority functions.

Kubernetes – Jobs

Ever want to run a recurring cronjob in Kubernetes? Maybe you want to recursively pull an AWS S3 bucket or gather data by inspecting your cluster. How about running some analytics in parallel or even running a series of tests to make sure the new deploy of your cluster was successful?

A Kubernetes Job might just be the answer.

So what exactly is a job anyway? Basically its a short lived replication controller. A job ensures that a task is successfully implemented even when faults in the infrastructure would otherwise cause it to fail. Consider it the fault tolerant way of executing a one-time pod/request. Or better yet cron with some brains. Oh and speaking of which, you’ll actually be able to run Jobs at specific times and dates here pretty soon in Kubernetes 1.3.

For example:

I have a Cassandra cluster in Kubernetes and I want to run:

nodetool repair -pr -h <host_ip>

on every node in my 10 node Cassandra cluster. And because I’m smart I’m going to run 10 different jobs, one at a time so I don’t overload my cluster during the repair.

Here be a yaml for you:

apiVersion: batch/v1
kind: Job
metadata:
  name: nodetool
spec:
  template:
    metadata:
      name: nodetool
    spec:
      containers:
      - name: nodetool
        image: some_private_repo:8500/nodetool
        command: ["/usr/bin/nodetool",  "repair", "-h", "$(cassandra_host_ip)"]
      restartPolicy: Never

A Kubernetes Job will ensure that each job runs through to successful completion. Pretty cool huh? Now mind you, its not smart. Its not checking to see if nodetool repair was successful. It simply looking to see if the pod exited successfully.

Another key point about Jobs is they don’t just go away after they run. Because you may want to check on the logs or status of the job or something. (Not that anyone would ever be smart and push that information to a log aggregation service). Thus its important to remember to run a Job to clean up your jobs? Yep. Do it. Just setup a Job to keep things tidy. Odd, I know, but it works.

kubectl delete jobs/nodetool

Now lets imagine I’m a bit sadistic and I want to run all my ‘nodetool repair’ jobs in parallel. Well that can be done too. Aaaannnnd lets imagine that I have a list of all the Cassandra nodes I want to repair in a queue somewhere.

I could execute the nodetool repair job and simply scale up the number of replicas. As long as the pod can pull the last Cassandra host from the queue, I could literally run multiple repairs in parallel. Now my Cassandra cluster might not like that much and I may or may not have done something like this before but…..well…we’ll just leave that alone.

kubectl scale --replicas=10 jobs/nodetoolrepair

There is a lot more to jobs than just this but it should give you an idea of what can be done. If you find yourself in a mire of complexity trying to figure out how to run some complex job, head back to the source. Kubernetes Jobs. I think I reread this link 5 times before I groked all of it. Ok, maybe it was 10. or so. Oh fine, I still don’t get it all.

To see jobs that are hanging around-

kubectl get pods -a


@devoperandi

Vault in Kubernetes – Take 2

A while back I wrote about how we use Vault in Kubernetes and recently a good samaritan brought it to my attention that so much has changed with our implementation that I should update/rewrite a post about our current setup.

Again congrats to Martin Devlin for all the effort he has put in. Amazing engineer.

So here goes. Please keep in mind, I’ve intentionally abstracted various things out of these files. You won’t be able to copy and paste to stand up your own. This is meant to provide insight into how you could go about it.

If it has ###SOMETHING### its been abstracted.

If it has %%something%%, we use another script that replaces those for real values. This will be far less necessary in Kubernetes 1.3 when we can begin using variables in config files. NICE!

Also understand, I am not providing all of the components we use to populate policies, create tokens, initialize Vault, load secrets etc etc. Those are things I’m not comfortable providing at this time.

Here is our most recent Dockerfile for Vault:

FROM alpine:3.2
MAINTAINER 	Martin Devlin <martin.devlin@pearson.com>

ENV VAULT_VERSION    0.5.2
ENV VAULT_HTTP_PORT  ###SOME_HIGH_PORT_HTTP###
ENV VAULT_HTTPS_PORT ###SOME_HIGH_PORT_HTTPS###

COPY config.json /etc/vault/config.json

RUN apk --update add openssl zip\
&& mkdir -p /etc/vault/ssl \
&& wget http://releases.hashicorp.com/vault/${VAULT_VERSION}/vault_${VAULT_VERSION}_linux_amd64.zip \
&& unzip vault_${VAULT_VERSION}_linux_amd64.zip \
&& mv vault /usr/local/bin/ \
&& rm -f vault_${VAULT_VERSION}_linux_amd64.zip

EXPOSE ${VAULT_HTTP_PORT}
EXPOSE ${VAULT_HTTPS_PORT}

COPY /run.sh /usr/bin/run.sh
RUN chmod +x /usr/bin/run.sh

ENTRYPOINT ["/usr/bin/run.sh"]
CMD []

Same basic docker image build on Alpine. Not too much has changed here other than some ports, version of Vault and we have added a config.json so we can dynamically create the consul backend and set our listeners.

Lets have a look at config.json

### Vault config

backend "consul" {
  address = "%%CONSUL_HOST%%:%%CONSUL_PORT%%"
  path = "vault"
  advertise_addr = "https://%%VAULT_IP%%:%%VAULT_HTTPS_PORT%%"
  scheme = "%%CONSUL_SCHEME%%"
  token = %%CONSUL_TOKEN%%
  tls_skip_verify = 1
}

listener "tcp" {
  address = "%%VAULT_IP%%:%%VAULT_HTTPS_PORT%%"
  tls_key_file = "/###path_to_key##/some_vault.key"
  tls_cert_file = "/###path_to_crt###/some_vault.crt"
}

listener "tcp" {
  address = "%%VAULT_IP%%:%%VAULT_HTTP_PORT%%"
  tls_disable = 1
}

disable_mlock = true

We dynamically configure config.json with

CONSUL_HOST = Kubernetes Consul Service IP

CONSUL_PORT = Kubernetes Consul Service Port

CONSUL_SCHEME = HTTPS OR HTTP for connection to Consul

CONSUL_TOKEN = ACL TOKEN to access Consul

VAULT_IP = VAULT_IP

VAULT_HTTPS_PORT = Vault HTTPS Port

VAULT_HTTP_PORT = Vault HTTP Port


run.sh has changed significantly however. We’ve added ssl support and cleaned things up a bit. We are working on another project to transport the keys external to the cluster but for now this is a manual process after everything is stood up. Our intent moving forward is to store this information in what we call ‘the brain’ and provide access to each key to different people. Maybe sometime in the next few months I can talk more about that.

#!/bin/sh
if [ -z ${VAULT_HTTP_PORT} ]; then
  export VAULT_HTTP_PORT=###SOME_HIGH_PORT_HTTP###
fi
if [ -z ${VAULT_HTTPS_PORT} ]; then
  export VAULT_HTTPS_PORT=###SOME_HIGH_PORT_HTTPS###
fi

if [ -z ${CONSUL_SERVICE_HOST} ]; then
  export CONSUL_SERVICE_HOST="127.0.0.1"
fi

if [ -z ${CONSUL_SERVICE_PORT_HTTPS} ]; then
  export CONSUL_HTTP_PORT=SOME_CONSUL_PORT
else
  export CONSUL_HTTP_PORT=${CONSUL_SERVICE_PORT_HTTPS}
fi

if [ -z ${CONSUL_SCHEME} ]; then
  export CONSUL_SCHEME="https"
fi

if [ -z ${CONSUL_TOKEN} ]; then
  export CONSUL_TOKEN=""
else
  CONSUL_TOKEN=`echo ${CONSUL_TOKEN} | base64 -d`
fi

if [ ! -z "${VAULT_SSL_KEY}" ] &&  [ ! -z "${VAULT_SSL_CRT}" ]; then
  echo "${VAULT_SSL_KEY}" | sed -e 's/\"//g' | sed -e 's/^[ \t]*//g' | sed -e 's/[ \t]$//g' > /etc/vault/ssl/vault.key
  echo "${VAULT_SSL_CRT}" | sed -e 's/\"//g' | sed -e 's/^[ \t]*//g' | sed -e 's/[ \t]$//g' > /etc/vault/ssl/vault.crt
else
  openssl req -x509 -newkey rsa:2048 -nodes -keyout /etc/vault/ssl/vault.key -out /etc/vault/ssl/vault.crt -days 365 -subj "/CN=vault.kube-system.svc.cluster.local" 
fi

export VAULT_IP=`hostname -i`

sed -i "s,%%CONSUL_HOST%%,$CONSUL_SERVICE_HOST,"   /etc/vault/config.json
sed -i "s,%%CONSUL_PORT%%,$CONSUL_HTTP_PORT,"      /etc/vault/config.json
sed -i "s,%%CONSUL_SCHEME%%,$CONSUL_SCHEME,"       /etc/vault/config.json
sed -i "s,%%CONSUL_TOKEN%%,$CONSUL_TOKEN,"         /etc/vault/config.json
sed -i "s,%%VAULT_IP%%,$VAULT_IP,"                 /etc/vault/config.json
sed -i "s,%%VAULT_HTTP_PORT%%,$VAULT_HTTP_PORT,"   /etc/vault/config.json
sed -i "s,%%VAULT_HTTPS_PORT%%,$VAULT_HTTPS_PORT," /etc/vault/config.json

cmd="vault server -config=/etc/vault/config.json $@;"

if [ ! -z ${VAULT_DEBUG} ]; then
  ls -lR /etc/vault
  cat /###path_to_/vault.crt###
  cat /etc/vault/config.json
  echo "${cmd}"
  sed -i "s,INFO,DEBUG," /etc/vault/config.json
fi

## Master stuff

master() {

  vault server -config=/etc/vault/config.json $@ &

  if [ ! -f ###/path_to/something.txt### ]; then

    export VAULT_SKIP_VERIFY=true
    
    export VAULT_ADDR="https://${VAULT_IP}:${VAULT_HTTPS_PORT}"

    vault init -address=${VAULT_ADDR} > ###/path_to/something.txt####

    export VAULT_TOKEN=`grep 'Initial Root Token:' ###/path_to/something.txt### | awk '{print $NF}'`
    
    vault unseal `grep 'Key 1:' ###/path_to/something.txt### | awk '{print $NF}'`
    vault unseal `grep 'Key 2:' ###/path_to/something.txt### | awk '{print $NF}'`
    vault unseal `grep 'Key 3:' ###/path_to/something.txt### | awk '{print $NF}'`

  fi

}

case "$1" in
  master)           master $@;;
  *)                exec vault server -config=/etc/vault/config.json $@;;
esac

Alright now that we have our image, lets have a look at how we deploy it. Now that we have SSL in place and we’ve got some good ACLs we expose Vault external to the Cluster but still internal to our environment. This allows us to automatically populate Vault with secrets, keys and certs from various sources while still providing a high level of security.

service.yaml

apiVersion: v1
kind: Service
metadata:
  name: vault
  namespace: kube-system
  labels:
    name: vault
spec:
  ports:
    - name: vaultport
      port: ###SOME_VAULT_PORT_HERE###
      protocol: TCP
      targetPort: ###SOME_VAULT_PORT_HERE###
    - name: vaultporthttp
      port: 8200
      protocol: TCP
      targetPort: 8200
  selector:
    app: vault

Ingress.yaml

apiVersion: extensions/v1beta1
kind: Ingress
metadata:
  name: vault
  namespace: kube-system
  labels:
    ssl: "true"
spec:
  rules:
  - host: ###vault%%ENVIRONMENT%%.somedomain.com###
    http:
      paths:
      - backend:
          serviceName: vault
          servicePort: ###SOME_HIGH_PORT_HTTPS###
        path: /


replicationcontroller.yaml

apiVersion: v1
kind: ReplicationController
metadata:
  name: vault
  namespace: kube-system
spec:
  replicas: 3
  selector:
    app: vault
  template:
    metadata:
      labels:
        pool: vaultpool
        app: vault
    spec:
      containers:
        - name: vault
          image: '###BUILD_YOUR_IMAGE_AND_PUT_IT_HERE###'
          imagePullPolicy: Always
          env:
            - name: CONSUL_TOKEN
              valueFrom:
                secretKeyRef:
                  name: vault-mgmt
                  key: vault-mgmt
            - name: "VAULT_DEBUG"
              value: "false"
            - name: "VAULT_SSL_KEY"
              valueFrom:
                secretKeyRef:
                  name: ###MY_SSL_KEY###
                  key: ###key###
            - name: "VAULT_SSL_CRT"
              valueFrom:
                secretKeyRef:
                  name: ###MY_SSL_CRT###
                  key: ###CRT###
          readinessProbe:
            httpGet:
              path: /v1/sys/health
              port: 8200
            initialDelaySeconds: 10
            timeoutSeconds: 1
          ports:
            - containerPort: ###SOME_VAULT_HTTPS_PORT###
              name: vaultport
            - containerPort: 8200
              name: vaulthttpport
      nodeSelector:
        role: minion

WARNING: Add your volume mounts and such for the Kubernetes Secrets associated with the vault ssl crt and key.


As you can see, significant improvements made to how we build Vault in Kubernetes. I hope this helps in your own endeavors.

Feel free to reach out on Twitter or through the comments.


Kubernetes, StackStorm and third party resources – Part 2

Alright, finally ready to talk about some StackStorm in depth. In the first part of this post I discussed some depth around Kubernetes Thirdpartyresource and how excited we are to use them. If you haven’t read it I would go back and start there. I however breezed over the Event Drive Automation piece (IFTTT) involving StackStorm. I did this for two reasons: 1) I was terribly embarrassed by the code I had written and 2) It wasn’t anywhere near where it should be in order for people to play with it.

Now that we have a submittal to StackStorm st2contrib, I’m going to open this up to others. Granted its not in its final form. In fact there is a TON left to do but its working and we decided to get the community involved should you be interested.

But first lets answer the question that is probably weighing on many peoples mind. Why StackStorm? There are many other event driven automation systems. The quick answer is they quite simply won us over. But because I like bullet points. Here are a few:

  1. None of the competition were in a position to work with, support or develop a community around IFTTT integration with Kubernetes.
  2. StackStorm is an open frame work that you and I can contribute back to.
  3. Its built on OpenStack’s Mistral Workflow engine so while this is a startup like company, the foundation of what they are doing has been around for quite some time.
  4. Stable
  5. Open Source code base. (caveat: there are some components that are enterprise add-ons that are not)
  6. Damn their support is good. Let me just say, we are NOT enterprise customers of StackStorm and I personally haven’t had better support in my entire career. Their community slack channel is awesome. Their people are awesome. Major props on this. At risk of being accused of getting a kick-back, I’m a groupie, a fanboy. If leadership changes this (I’m looking at you Mr. Powell), I’m leaving. This is by far and away their single greatest asset. Don’t get me wrong, the tech is amazing but the people got us hooked.

For the record, I have zero affiliation with StackStorm. I just think they have something great going on.


As I mentioned in the first post, our first goal was to automate deployment of AWS RDS databases from the Kubernetes framework. We wanted to accomplish this because then we could provide a seamless way for our dev teams to deploy their own database with a Kubernetes config based on thirdpartyresource (currently in beta).

Here is a diagram of the magic:

Screen Shot 2016-02-13 at 5.48.07 PM

Alright here is what’s happening.

  1. We have a StackStorm Sensor watching the Kubernetes API endpoint at /apis/extensions/v1beta1/watch/thirdpartyresources for events. thirdpartyresource.py
  2. When a new event happens, the sensor picks it up and kicks off a trigger. Think of a trigger like a broadcast message within StackStorm.
  3. Rules listen to trigger types that I think of as channels. Kind of like a channel on the telly. A rule based on some criteria, decides whether or not to act on any given event. It either chooses to drop the event or to take action on it. rds_create_db.yaml
  4. An action-chain then performs a series of actions. Those actions can either fail or succeed and additional actions happen based on the result of the last. db_create_chain.yaml
    1. db_rds_spec munges the data of the event. Turns it into usable information.
    2. from there rds_create_database reaches out to AWS and creates an RDS database.
    3. And finally configuration information and secrets are passed back to Consul and Vault for use by the application(s) within Kubernetes. Notice how the action for Vault and Consul are grey. Its because its not done yet. We are working on it this sprint.

Link to the StackStorm Kubernetes Pack. Take a look at the Readme for information on how to get started.

Obviously this is just a start. We’ve literally just done one thing in creating a database but the possibilities are endless for integrations with Kubernetes.

I mentioned earlier the StackStorm guys are great. And I want to call a couple of them out. Manas Kelshikar, Lakshmi Kannan and Patrick Hoolboom. There are several others that have helped along the way but these three helped get this initial pack together.

The initial pack has been submitted as a pull request to StackStorm for acceptance into st2contrib. Once the pull request has been accepted to st2contrib, I would love it if more people in the Kubernetes community got involved and started contributing as well.


@devoperandi