Migrate Docker Registry to GCloud Container Registry

Recently we chose to migrate our container registry to GCloud for the following reasons:

  1. We didn’t want to host it ourselves anymore.
  2. We wanted to distribute our docker images world wide for consumption in our Multi-Region scenario.
  3. We run Google Apps/Email and we could just hook into that for permissions to the registry.
  4. Its as close as we could find to a native docker push/pull scenario without spending stupid amounts of money.
  5. Endless number of repositories which was important considering we already have 30 right now and we are just getting started.
  6. We only get charged for storage consumption and egress requests (some caveats apply).
  7. Our old registry was only accessible from within our Platform and developers requested access so they could run images locally.

As was written in a historical post we also evaluated AWS ECR and took a high level look at several other docker image storage opportunities.

What we found is Google Cloud is doing some great things like providing excellent search opportunities we were missing with our own registry.

Its quite easy to search repositories, images and tags. Even though several of the search capabilities are in an alpha state, I’ve found they work quite well.

List images in a repo:

gcloud alpha container images list --repositories=<repository_name>

List version tags for a given image:

gcloud alpha container images list-tags gcr.io/<repository_name>/<image_name>


We then decided to take it to the next phase and ship all our images to Gcloud from our private repository and begin testing it in earnest. Stay tuned for more.

So we wrote a migration script to migrate everything from our private repo.

https://github.com/pearsontechnology/migr8-registry-gcloud

Its completely opensource and under Apache 2.0 so feel free to use it if you find it valuable.

The Readme is pretty good and is quite easy to initiate. It will transfer all repositories, images and version tags.

All you have to do is supply 4 environment variables and make sure glcoud sdk is installed and authenticated.

export GCLOUD_URL="gcr.io/<project-name>"
export REG_URL="docker-registry.example.com:5000"
export GCLOUDPATH = "/usr/bin/gcloud"
export DOCKERPATH = "/usr/bin/docker"


Registry Migration (ECR)

Today I’m going to provide a Registry migration script using Python that will allow you to migrate from a private docker registry to ECR. Keep in mind, its a script people. It got the job done. Its not fancy. Its not meant to cover all the possible ways in which you could do this. It doesn’t have a bunch of error handling. Its not meant to be run all the time. But it should give you a start if you need/want to do something similar. Please read the comments in the script. There are some environment vars and such to set prior to running.

Make sure AWS CLI is configured and run:

aws ecr get-login --region us-east-1

then run the command it gives back to you to login.

If you see the following error when running the script, you just managed to overload your repo. As a result I made the script more serial (instead of parallel) to help out but I still managed to overload it in serial mode once.

Received unexpected HTTP status: 500 Internal Server Error
Traceback (most recent call last):
  File "migrate.py", line 101, in <module>

  File "migrate.py", line 29, in __init__
    self._get_catalog()
  File "migrate.py", line 39, in _get_catalog
    self._run(mylist)
  File "migrate.py", line 55, in _run
    else:
  File "migrate.py", line 98, in _upload_image

  File "/usr/lib64/python2.7/subprocess.py", line 575, in check_output
    raise CalledProcessError(retcode, cmd, output=output)


If you get something like below you probably aren’t logged into ECR with the user you are running the script with.

Traceback (most recent call last):
  File "migrate.py", line 98, in <module>
    MigrateToEcr()
  File "migrate.py", line 29, in __init__
    self._get_catalog()
  File "migrate.py", line 39, in _get_catalog
    self._run(mylist)
  File "migrate.py", line 43, in _run
    self._ensure_new_repo_exists(line)
  File "migrate.py", line 74, in _ensure_new_repo_exists
    checkrepo = subprocess.check_output(command, shell=True)
  File "/usr/lib64/python2.7/subprocess.py", line 575, in check_output
    raise CalledProcessError(retcode, cmd, output=output)
subprocess.CalledProcessError: Command '/usr/local/bin/aws ecr describe-repositories' returned non-zero exit status 255

Link to the script on Github.


Why we aren’t using ECR in a follow on post.

How we do builds in Kubernetes

First off. All credit for this goes to my friend Simas. I’m simply relaying what he has accomplished because it would be a shame if others didn’t benefit from his expertise. He is truly talented in this space and provides simple yet elegant designs that just work.

Coming into my current position we have 400+ development teams. Virtually all of which are managing their own build pipelines. This requires significant time and effort to manage, develop and automate. Each team designates their own developer on a rotating basis, or worse, completely dedicates a dev to make sure the build process goes smoothly.

What we found when looking across these teams was they were all basically doing the same thing. Sometimes using a different build server, automating using a different scripting language or running in a different code repo but all in all, its the same basic process with the same basic principles. And because we have so many dev teams, we were bound to run into enough teams developing in a particular language that it would make sense to standardize their process so multiple teams could take advantage of it. This combined with the power of docker images and we have a win/win situation.

So let me define what I mean by “build process” just so we can narrow the scope a bit. Build process – The process of building application(s) code using a common build platform. This is our first step in a complete CI/CD workflow.

So why haven’t we finished it already? Along with the Dev teams we have quite a few other engineering teams involved including QA/Performance/CISO etc etc and we haven’t finished laying out how all those teams will work together in the pipeline.

We have questions like:

Do QA/Perf/Security engineers all have access to multiple kubernetes namespaces or do they have their own project area and provide a set of endpoints and services which can be called to utilize their capabilities?

Do we mock cross-functional services in each namespace or provide endpoints to be accessed from anywhere?

What about continuous system/integration testing?

Continuous performance testing? How do we do this without adversely affecting our dev efforts?

Those are just a few of the questions we are working through. We have tons of them. Needless to say, we started with the build process.

We create Docker images for each and every Java/NodeJS/Go/Ruby/language_of_the_month our developers choose. These images are very much standardized. Allowing for built-in, centrally managed, monitored, secure containers that deploy in very short periods of time. The only deltas are the packages for the actual application. We build those in deb packages and standardize the install process, directory locations, version per language type etc etc.

Dev teams get their own namespace in Kubernetes. In fact, in most cases they get three. Dev, Stage and Prod. For the purpose of this conversation every dev team is developing an application stack which could consist of 1 to many micro services. Every namespace has its own Hubot and its own Jenkins build server which is completely vanilla to start with.

See Integrating Hubot and Kubernetes for more info on Hubot.

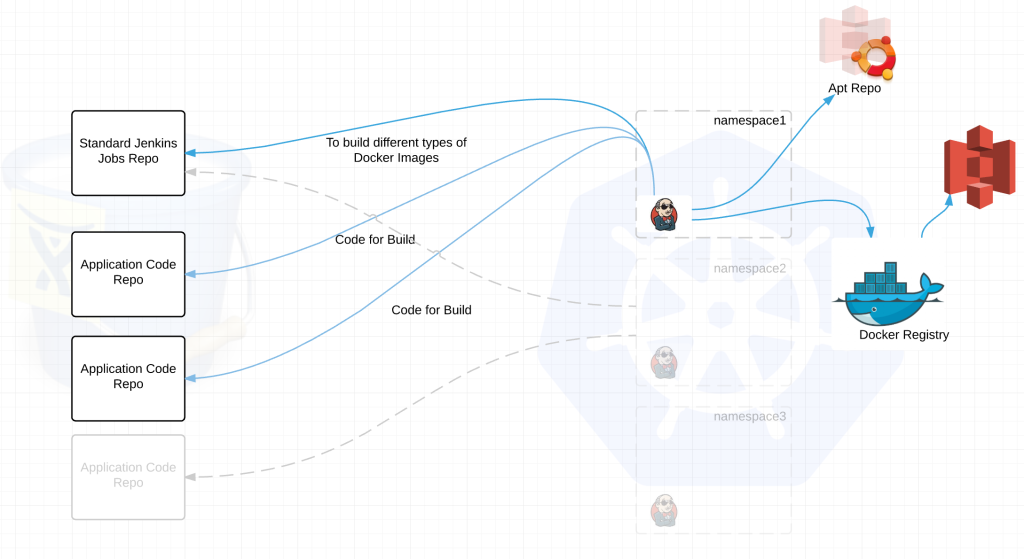
Each Jenkins build server connects to at least two repositories. A standard jenkins job repo that consists of all the standardized builds for each language and the application code repositories for the applications. EVERY Jenkins server connects to the same jenkins job repo. Jenkins polls each repo for changes every X minutes depending on the requirements of the team. We thought about web hooks to notify Jenkins when a new build is needed but chose to poll from Jenkins instead. Primarily because we treat every external resource as if it has gremlins and we didn’t want to deal with firewalls. We’ve been looking at options to replace this but haven’t settled on anything at this point.
Screen Shot 2016-01-08 at 6.34.53 PM


jenkins job repo –

  1. all the possible standardized build jobs
  2. dockerfiles for building base images – ie java,nodejs,ruby etc etc
  3. metadata on communicating with the local hubot
  4. sets up kubectl for its namespace

application code repo –

  1. Contains application code
  2. Contains a default.json file

default.json is key to the success of the build process.

It has three primary functions:

  1. Informs Jenkins what type of build it should be setup for. Ex. If XYZ team writes code in Java and NodeJS, it tells Jenkins to configure itself for those build types. This way we aren’t configuring every Jenkins server for build artifacts it will never build.
  2. It tells Jenkins meta-data about the application like application name, version, namespace(s) to deploy to, min/max number of containers to deploy, associated kubernetes services etc etc
  3. Provides Jenkins various build commands and artifacts particular to the application

Here is a very simple example of what that default.json might look like.

{
  "namespace": "someproject",
  "application": {
    "name": "sample-application",
    "type": "http_html",
    "version": "3.x.x"
  },
  "build": {
    "system_setup": {
      "buildfacts": [ // Configure the Jenkins server
        "java",
        "nodejs"
      ]
    },
    "build_steps": [
      {
        "shell": "some shell commands"
      },
      {
        "gradle": {
          "useWrapper": true,
          "tasks": "clean build -Ddeployment.target=???"
        }
      }
    ]
  },
  "build_command": "some command to execute the build",
  "artifacts": "target/",
  "services": [
    {
      "name": "sample-service",
      "external_url": "www.sample-service.com",
      "application": "someproject/sample-application",
      "instances": {
        "min": 2,
        "max": 5
      }
    }
  ]
}


Ok now for a little more complexity:
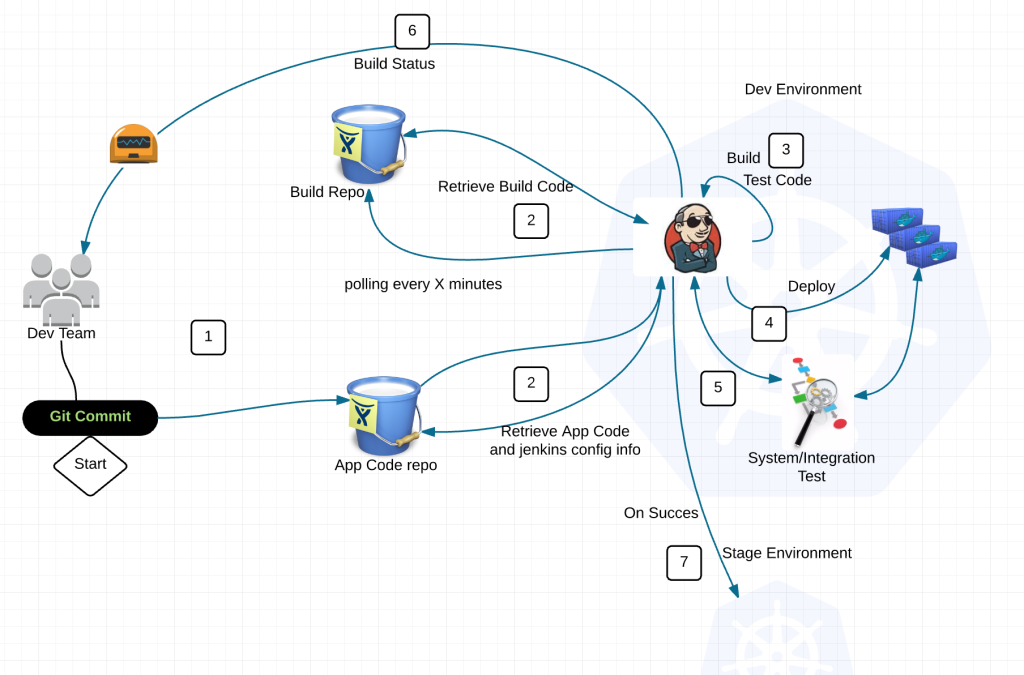
 

Screen Shot 2016-01-08 at 6.41.45 PM

So what just happened?

1) Dev commits code to application repository

2) Jenkins polls the jenkins build repo and application repositories for changes

3) If there is a new standard build image (say for Java), jenkins will build the latest version of the application with this image and push the image to the docker registry with a specialized tag. Then notify Dev team of the change to provide feedback through hubot.

When there is a version change in the application code repository Jenkins runs typical local tests, builds deb package, ships it to apt repository, then builds a docker image combining a standardized image from the jenkins build repo with the deb package for the application and pushes the image to the Docker registry.

4) Deploy application into namespace with preconfigured kubectl client

5) Execute system/integration tests

6) Feedback loop to Dev team through Hubot

7) Rinse and repeat into Staging/Prod on success


Now you are probably thinking, what about all those extra libraries that some applications may need but other do not.

Answer: If its not a common library, it goes in the application build.


All in all this is a pretty typical workflow.  And for the most part you are absolutely correct. So what value do we get by separating the standard/base build images and placing it into its own repository?

  • App Eng develops standard images for each language and bakes in security/compliance/regulatory concerns
  • Separation of concerns – Devs write code, System/App eng handles the rest including automated feedback loops
  • Security Guarantee – Baked in security, compliance and regulatory requirements ensuring consistency across the platform
  • Devs spend more time doing what they do best
  • Economies of scale – Now we can have a few people creating/managing images while maintaining a distributed build platform
  • Scalable build process – Every Dev team has their own Jenkins without the overhead associated with managing it
  • Jenkins servers can be upgraded, replaced, redeployed, refactored, screwed up, thrown out, crapped on and we can be back to a running state in a matter of minutes. WOOHOO Jenkins is now cattle.
  • Standardized containers means less time spent troubleshooting
  • Less chance of unrecognized security concerns across the landscape
  • Accelerated time to market with even less risk


Lets be realistic, there are always benefits and limitations to anything and this design is not the exception.

Here are some difficulties SO FAR:

  • Process challenges in adjusting to change
  • Devs can’t run whatever version for a given language they want
  • Devs could be prevented from taking advantage of new features in the latest versions of say Java IF the App Eng team can’t keep up


Worth Mentioning:

  • Both Devs and App Eng don’t have direct access to Jenkins servers
  • Because direct access is discourage, exceptional logging combined with exceptional analytics is an absolute must


Ok so if you made it thus far. I’m either a damn good writer, your seriously interested in what I have to say or you totally crazy about build pipelines. Somehow I don’t think its option 1. Cheers


@devoperandi

Load Balancing in Kubernetes

There are two different types of load balancing in Kubernetes. I’m going to label them internal and external.

Internal – aka “service” is load balancing across containers of the same type using a label. These services generally expose an internal cluster ip and port(s) that can be referenced internally as an environment variable to each pod.

Ex. 3 of the same application are running across multiple nodes in a cluster. A service can load balance between these containers with a single endpoint. Allowing for container failures and even node failures within the cluster while preserving accessibility of the application.


External

Services can also act as external load balancers if you wish through a NodePort or LoadBalancer type.

NodePort will expose a high level port externally on every node in the cluster. By default somewhere between 30000-32767. When scaling this up to 100 or more nodes, it becomes less than stellar. Its also not great because who hits an application over high level ports like this? So now you need another external load balancer to do the port translation for you. Not optimal.

LoadBalancer helps with this somewhat by creating an external load balancer for you if running Kubernetes in GCE, AWS or another supported cloud provider. The pods get exposed on a high range external port and the load balancer routes directly to the pods. This bypasses the concept of a service in Kubernetes, still requires high range ports to be exposed, allows for no segregation of duties, requires all nodes in the cluster to be externally routable (at minimum) and will end up causing real issues if you have more than X number of applications to expose where X is the range created for this task.

Because services were not the long-term answer for external routing, some contributors came out with Ingress and Ingress Controllers. This in my mind is the future of external load balancing in Kubernetes. It removes most, if not all, the issues with NodePort and Loadbalancer, is quite scalable and utilizes some technologies we already know and love like HAproxy, Nginx or Vulcan. So lets take a high level look at what this thing does.

Ingress – Collection of rules to reach cluster services.

Ingress Controller – HAproxy, Vulcan, Nginx pod that listens to the /ingresses endpoint to update itself and acts as a load balancer for Ingresses. It also listens on its assigned port for external requests.

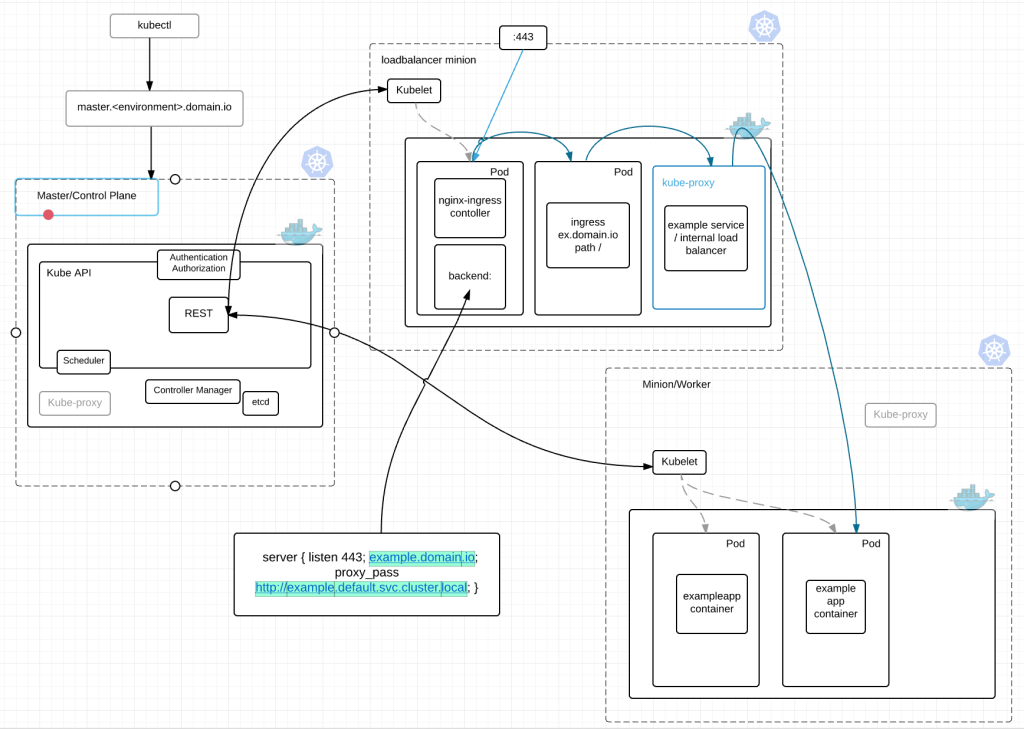
Screen Shot 2016-01-02 at 9.13.53 AM


In the diagram above we have an Ingress Controller listening on :443 consisting of an nginx pod. This pod looks at the kubernetes master for newly created Ingresses. It then parses each Ingress and creates a backend for each ingress in nginx. Nginx –> Ingress –> Service –> application pod.

With this combination we get the benefits of a full fledged load balancer, listening on normal ports for traffic that is fully automated.

Creating new Ingresses are quite simple. You’ll notice this is a beta extension. It will be GA pretty soon.

apiVersion: extensions/v1beta1
kind: Ingress
metadata:
  name: example-ingress
spec:
  rules:
  - host: ex.domain.io
    http:
      paths:
      - path: /
        backend:
          serviceName: example
          servicePort: 443

Creating the Ingress Controller is also quite easy.

apiVersion: v1
kind: ReplicationController
metadata:
  name: nginx-ingress
  labels:
    app: nginx-ingress
spec:
  replicas: 1
  selector:
    app: nginx-ingress
  template:
    metadata:
      labels:
        app: nginx-ingress
    spec:
      containers:
      - image: gcr.io/google_containers/nginx-ingress:0.1
        imagePullPolicy: Always
        name: nginx
        ports:
        - containerPort: 80
          hostPort: 80

Here is an ingress controller for nginx. I would use this as a template by which to create your own. The default pod is in its infancy and doesn’t handle multiple backends very well. Its written in Go but you could quite easily write this in whatever language you want. Its a pretty simple little program.

For more information here is the link to Ingress Controllers at Kubernetes project.


envconsul and Docker ….. soo long config files

As Docker continues to grow in popularity there are quite a few things that become readily apparent. Fortunately I’m only going to address one of them. Enter envconsul to retrieve application config data at run time.

This post assumes you already have a running Consul server with some data you wish to retrieve.

envconsul was written by Hashicorp, a great company that I personally respect. In everything I’ve touched made by this great little company, I’ve yet to be disappointed. Their applications are rock solid.

Github Link:

https://github.com/hashicorp/envconsul


envconsul utilizes a key/value stored called Consul to retrieve configuration data and present them as environment variables to the application at runtime. This concept offers up a lot of opportunity around dynamic configuration, centralized configuration management and security because there aren’t free text usernames and passwords hanging around the file system. Not that any respectable company would ever do that right? No way. Never. Ok maybe it kinda happens almost always. With envconsul, we can solve that.


Build envconsul:

Currently there is no package in the general package managers for envconsul so I like to pull the repo, make the binary and copy it into /usr/bin which places the binary in the path and makes it immediately executable.

git clone https://github.com/hashicorp/envconsul.git
cd envconsul
make

If you decide you like envconsul, bake it right into your vm or container and you’ll always have it available.


Create a envconsul.cnf file:

Basically this file tells envconsul where the consul server exists.

consul = "consul.mydomain.com:8500"
timeout = "5s"


Add it to your Dockerfile:

I mentioned this had to do with Docker right? Well in the Dockerfile when you build your images you can bake envconsul right into to run command with something like the following:

CMD /usr/sbin/apache2ctl -k start && envconsul -config=/etc/envconsul.cnf -sanitize=false -upcase=false myblog env /usr/local/tomcat/bin/catalina.sh run

Let’s imagine I have an Tomcat container with Apache Web Server running in front of it. In the command above I’m starting apache and then executing envconsul to call the consul server.
So what have I really done here?

I’ve set sanitize to false otherwise envconsul will replace “invalid” characters as underscores
I’ve referenced the envconsul.cnf with -config
I’ve set upcase to false cause being a Linux nut, I know some devs like to ingest environment variables that aren’t just uppercase
I’ve specified the key myblog to get data back from consul
I’ve added env so envconsul presents the results from consul as environment variables to catalina.sh


One thing I love about envconsul is when it provides the environment variables to the application, it is ONLY to the application. Logging in as root and running printenv won’t even provide the variables envconsul presents to the application.


This has been a very basic “get it up and running” scenario around envconsul. There are other things to explore like ssl, authentication and consul API Tokens so head over to the Github page dig in.


And if you have found this valuable, Tweet it please.