How to use Stackstorm AWS (boto3) pack to interact with AWS services

Introduction

Stackstorm (st2) is a platform which you can use as an automation framework. St2 has many features to support automating software development on-prem or cloud.

St2 packs are the units of content deployment and you can use different actions on pack(s) to create workflows.

In this blogpost, I’m going to demonstrate how to use st2 aws boto3 pack to manage services on aws.

Setup St2 environment

First of all you need to have a development environment with st2 installed. It is very easy to setup a vagrant box with st2. You can use the link below to setup the vagrant environment with st2 instantly.

st2vagrant

Also follow the Quick Start guide of st2 to get some hands on. You need to become aware of yourself about the concepts of pack, actions, etc.

Quick Start

St2 AWS pack

Once you setup the environment, it is super simple to install a pack. There are hundreds of packs available for you to download and you also can contribute to the pack development. Use the link stated below to search a pack based on your needs. For example, may be you want ansible pack to deal with ansible via st2.

Stackstorm Exchange

However, I want to install st2 aws pack in this occasion. You can simply search and copy the command to install the pack on stackstorm-exchange.

st2 pack install aws

This is one version of the aws pack which has lots of actions. The aws boto3 pack, by contrast, is more powerful and simple due to very valid reasons. The main reasons are simplicity and minimum or zero maintenance of the pack. Let’s assume that, boto3 action adds a new parameter in future, but aws.boto3action needs zero changes, i’d rather say that, this action is immune to the changes in boto3 action(s).

You can install the aws boto3 pack using the command below;

st2 pack install aws=boto3

In this pack, you just need only two actions to do anything on AWS that is why I said, it is very simple. Those two actions are;

  1. aws.assume_role
  2. aws.boto3action

The aws.assume_role action

This action is used to get the AWS credentials using AWS assume role. For example, see below code snippet.

assume_role:
action: aws.assume_role
input:
role_arn: <% $.assume_role %>
publish:
credentials: <% task(assume_role).result.result %>

In the preceding example, the aws.assume_role action has one input parameter which is AWS IAM role with proper permission. So basically, it needs to have required permission to perform various activities on AWS. For example, you may want to have ec2:* permission to manage EC2 related activities. It needs to have autoscaling:* permission to carry out autoscaling related activities so on and so forth.

Sample policy document for assume_role would be something like below;

{
"Version": "2012-10-17",
"Statement": [
{
"Action": [
"ec2:*",
"iam:*",
"autoscaling:*",
"ssm:SendCommand",
"ssm:DescribeInstanceInformation",
"ssm:GetCommandInvocation"
],
"Effect": "Allow",
"Resource": "*"
}
]
}

When you pass an IAM role as assume role it returns AWS credentials and that credentials is saved in a variable to use at a later time. See the credentials variable under publish tag in the preceding yaml code snippet.

The aws.boto3action action

Let’s assume we need to get the information regarding a Launch Configuration. As per boto3, the relevant action to get Launch Configuration information is, describe_auto_scaling_groups. See the link mentioned below;

http://boto3.readthedocs.io/en/latest/reference/services/autoscaling.html#AutoScaling.Client.describe_auto_scaling_groups

The describe_auto_scaling_groups action comes under AutoScaling service. Once you know these information you can interact this boto3 action within st2 as stated below;

action: aws.boto3action
input:
region: <% $.region %>
service: autoscaling
action_name: describe_launch_configurations
params: <% dict(LaunchConfigurationNames => list($.lc_name)) %>
credentials: <% $.credentials %>

Let’s go through each input in detail.

region: The AWS region that you want to perform the action.
service: The AWS service category. For example, ec2, autoscaling, efs,
iam, kinesis, etc. Check all the available service in boto3 using the link below;

Available Services

action_name: Name of the boto3 action. In the above example, it is, describe_launch_configurations.

params: Input parameters for the action, describe_launch_configurations in this case. It has to be passed as a dict. You can refer the boto3 action to get a detailed explanation about the parameters and their data types. Please note that , lc_name is a input parameter which specifies the name of Launch Configuration.

You should feel free to poke around and see how this st2 aws boto3 pack works.

The aws.boto3action is used to execute relevant boto3 actions vis st2.

Summary

Six months ago, I started using st2. In fact Mike is the one who is responsible. He tasked me with database automation work using st2. So I definitely should thank him for that because I learned quite a bit.
The aws boto3 pack is designed with an eye towards the future, that is why it is protected from the changes in boto3 world which I believe is the most important factor when it comes software design. When you start using this pack, it will quickly become apparent how easy it is to use.

Discussion on the future of the AWS pack

Cheers!

Kubernetes, StackStorm and third party resources

WARNING!!! Beta – Not yet for production.

You might be thinking right now, third party resources? Seriously? With all the amazing stuff going on right now around Kubernetes and you want to talk about that thing at the bottom of the list. Well keep reading, hopefully by the end of this, you too will see the light.

Remember last week when I talked about future projects in my Python Client For Kubernetes blog? Well here it is. One key piece of our infrastructure is quickly becoming StackStorm.

What’s StackStorm you might ask? StackStorm is an open source event driven automation system which hailed originally from OpenStack’s Mistral workflow project. In fact, some of its libraries are from mistral but its no longer directly tied to OpenStack. Its a standalone setup that rocks. As of the time of this writing, StackStorm isn’t really container friendly but they are working to remediate this and I expect a beta to be out in the near future. Come on guys, hook a brother up.

For more information on StackStorm – go here.

I’ll be the first to admit, there documentation took me a little while to grok. Too many big words and not enough pics to describe what’s going on. But once I got it, nothing short of meeting Einstein could have stopped my brain from looping through all the possibilities.

Lets say, we want to manage an RDS database from Kubernetes. We should be able to create, destroy, configure it in conjunction with the application we are running and even more importantly, it must be a fully automated process.

So what’s it take to accomplish something like this? Well in our minds we needed a way to present objects externally i.e. third party resources and we need some type of automation that can watch those events and act on them ala StackStorm.

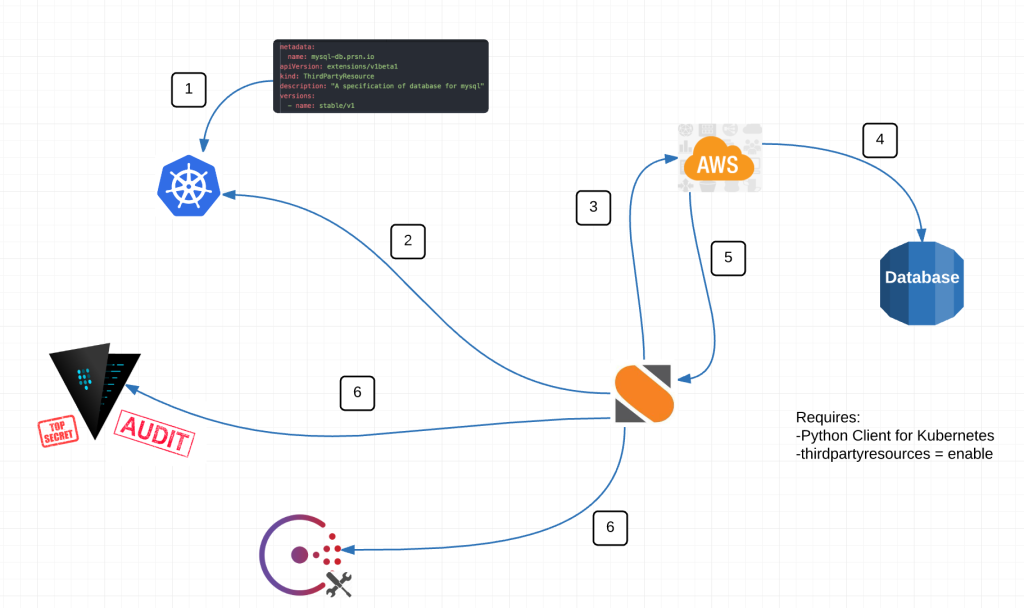
Here is a diagram of our intentions: We have couple loose ends to complete but soon we’ll be capable of performing this workflow for any custom resource. Database just happens to be the first requirement we had that fit the bill.

Screen Shot 2016-02-05 at 8.24.51 PM

In the diagram above we are perform 6 basic actions.

– Input thirdpartyresource to Kubernetes

– StackStorm watches for resources created, deleted OR modifed

– If trigger – makes call to AWS API to execute an event

– Receives back information

– On creation or deletion, adds or remove necessary information from Vault and Consul


Alright from the top, what is a third party resource exactly? Well its our very own custom resource. Kind of like a pod, endpoint or replication controller are API resources but now we get our own.

Third Party Resources immediately stood out to us because we now have the opportunity to take advantage of all the built-in things Kubernetes provides like metadata, labels, annotations, versioning, api watches etc etc while having the flexibility to define what we want in a resource. What’s more, third party resources can be grouped or nested.

Here is a an example of a third party resource:

metadata:
  name: mysql-db.prsn.io
  labels:
    resource: database
    object: mysql
apiVersion: extensions/v1beta1
kind: ThirdPartyResource
description: "A specification of database for mysql"
versions:
  - name: stable/v1

This looks relatively normal with one major exception. The metadata.name = mysql-db.prsn.io. I’ve no idea why but you must have a fully qualified domain in the name in order for everything to work properly. The other oddity is the “-“. It must be there and you must have one. Something to do with <CamelCaseKind>.

Doing this creates

/apis/prsn.io/stable/v1/namespaces/<namespace>/mysqls/...

By creating the resource above, we have essentially created our very own api endpoint by which to get all resources of this type. This is awesome because now we can create mysql resources and watch them under one api endpoint for consumption by StackStorm.

Now imagine applying a workflow like this to ANYTHING you can wrap your head around. Cool huh?

Remember this is beta and creating resources under the thirdpartyresource (in this case mysqls) requires a little curl at this time.

{
   "metadata": {
     "name": "my-new-mysql-db"
   },
   "apiVersion": "prsn.io/stable/v1",
   "kind": "MysqlDb",
   "engine_version": "5.6.23",
   "instance_size": "huge"
}

There are three important pieces here. 1) its json. 2) apiVersion has the FQDN + versions.name for the thirdpartyresource. 3) kind = MysqlDb <CamelCaseKind>

Now we can curl the Kubernetes api and post this resource.

curl -d "{"metadata":{"name":"my-new-mysql-database"},"apiVersion":"prsn.io/stable/v1","kind":"MysqlDb","engine_version":"5.6.23","instance_size":"huge"}" https://kube_api_url


Now if you hit you kubernetes api endpoint you should see something like this:

{
  "paths": [
    "/api",
    "/api/v1",
    "/apis",
    "/apis/extensions",
    "/apis/extensions/v1beta1",
    "/apis/prsn.io",
    "/apis/prsn.io/stable/v1",
    "/healthz",
    "/healthz/ping",
    "/logs/",
    "/metrics",
    "/resetMetrics",
    "/swagger-ui/",
    "/swaggerapi/",
    "/ui/",
    "/version"
  ]
}

Our very own Kubernetes endpoint now in /apis/prsn.io/stable/v1.

And here is a resource under the mysql thirdpartyresource located at:

/apis/prsn.io/stable/v1/mysqldbs
{
  "kind": "MysqlDb",
  "items": [
    {
      "apiVersion": "prsn.io/stable/v1",
      "kind": "MysqlDb",
      "metadata": {
        "name": "my-new-mysql-db",
        "namespace": "default",
        "selfLink": "/apis/prsn.io/stable/v1/namespaces/default/mysqldbs/my-new-mysql-db"
        ...
      }
    }
  ]
}

If your mind isn’t blown by this point, move along, I’ve got nothin for ya.


Ok on to StackStorm.

Within StackStorm we have a Sensor that watches the Kubernetes api for a given third party resource. In this example, its looking for MysqlDb resources. From there it compares the list of MysqlDb resources against a list of mysql databases (rds in this case) that exist and determines what/if any actions it needs to perform. The great thing about this is StackStorm already has quite a number of what they call packs. Namely an AWS pack. So we didn’t have to do any of the heavy lifting on that end. All we had to do was hook in our python client for Kubernetes, write a little python to compare the two sets of data and trigger actions based off the result.

AWS/StackStorm Pack

It also has a local datastore so if you need to store key/value pairs for any length of time, that’s quite easy as well.

Take a look at the bottom of this page for operations against the StackStorm datastore.

We’ll post our python code as soon as it makes sense. And we’ll definitely create a pull request back to the StackStorm project.

Right now we are building the workflow to evaluate what actions to take. We’ll update this page as soon as its complete.


If you have questions or ideas on how else to use StackStorm and ThirdPartyResources, I would love to hear about them. We can all learn from each other.


@devoperandi


Other beta stuff:

deployments – https://github.com/kubernetes/kubernetes/blob/master/docs/proposals/deployment.md

horizontalpodautoscaler – https://github.com/kubernetes/kubernetes/blob/release-1.1/docs/design/horizontal-pod-autoscaler.md

ingress – http://kubernetes.io/v1.1/docs/user-guide/ingress.html

Which to be fair I have talked about this in the blog about Load Balancing

jobs – https://github.com/kubernetes/kubernetes/blob/release-1.1/docs/user-guide/jobs.md


No part of this blog is sponsored or paid for by anyone other than the author. 


Kubernetes/Terraform – Multiple Availability Zone deployments

While some may disagree, personally I think Kubernetes is becoming the defacto standard for anyone wishing to orchestrate containers in wide scale deployments. It has good api support, is under active development, is backed by various large companies, is completely open-source, is quite scalable for most workloads and has a pretty good feature set for initial release.

Now having used it for sometime now I’ll be the first to claim is has some shortcomings. Things like external load balancing (Ingresses), autoscaling and persistent storage for things like databases would be pretty good ones to point out. But these also happen to be under active development and I expect will have viable solutions in the near future.

Load Balancing – Ingresses and Ingress Controllers

Autoscaling – built into Kubernetes soon

Persistent Storage – Kubernetes-Ceph/Flocker

So what about MultiAZ deployments?

We deploy/manage Kubernetes using Terraform (Hashicorp). Even though Terraform isn’t technically production ready yet, I expect it to fill a great role in our future deployments so we were willing to accept its relative immaturity for its ever expanding feature set.

You can read more about Terraform here. We are using several of their products including Vault and Consul.

Terraform:

  1. Creates a VPC, subnets, routes, security groups, ACLs, Elastic IPs and Nat machine
  2. Creates IAM users
  3. Creates a public and private hosted zone in route53 and adds dns entries
  4. Pushes data up to an AWS S3 bucket with dynamically generated files from Terraform
  5. Deploys autoscaling groups, launch configurations for master and minions
  6. Sets up an ELB for the Kubernetes Master
  7. Deploys the servers with user-data


Create the VPC

resource "aws_vpc" "example" {
    cidr_block = "${var.vpc_cidr}"
    instance_tenancy = "dedicated"
    enable_dns_support  = true
    enable_dns_hostnames  = true

    tags {
        Name = "example-${var.environment}"
    }
}

resource "aws_internet_gateway" "default" {
    vpc_id = "${aws_vpc.example.id}"
}


Create Routes

resource "aws_route53_record" "kubernetes-master" {
	# domain.io zone id
	zone_id = "${var.zone_id}"
	# Have to limit wildcard to one *
	name    = "master.${var.environment}.domain.io"
	type    = "A"

	alias {
	name = "${aws_elb.kube-master.dns_name}"
	zone_id = "${aws_elb.kube-master.zone_id}"
	evaluate_target_health = true
	}
}

resource "aws_route53_zone" "vpc_zone" {
  name   = "${var.environment}.kube"
  vpc_id = "${aws_vpc.example.id}"
}

resource "aws_route53_record" "kubernetes-master-vpc" {
  zone_id = "${aws_route53_zone.vpc_zone.zone_id}"
  name    = "master.${var.environment}.kube"
  type    = "A"

	alias {
	name = "${aws_elb.kube-master.dns_name}"
	zone_id = "${aws_elb.kube-master.zone_id}"
	evaluate_target_health = true
	}
}

Create Subnets – Example of public subnet

/*
  Public Subnet
*/
resource "aws_subnet" "us-east-1c-public" {
	vpc_id            = "${aws_vpc.example.id}"
	cidr_block        = "${var.public_subnet_cidr_c}"
	availability_zone = "${var.availability_zone_c}"

	tags {
		Name        = "public-subnet-${var.environment}-${var.availability_zone_c}"
		Environment = "${var.environment}"
	}
}

resource "aws_subnet" "us-east-1a-public" {
	vpc_id            = "${aws_vpc.example.id}"
	cidr_block        = "${var.public_subnet_cidr_a}"
	availability_zone = "${var.availability_zone_a}"

	tags {
		Name        = "public-subnet-${var.environment}-${var.availability_zone_a}"
		Environment = "${var.environment}"
	}
}

resource "aws_subnet" "us-east-1b-public" {
	vpc_id            = "${aws_vpc.example.id}"
	cidr_block        = "${var.public_subnet_cidr_b}"
	availability_zone = "${var.availability_zone_b}"

	tags {
		Name        = "public-subnet-${var.environment}-${var.availability_zone_b}"
		Environment = "${var.environment}"
	}
}

resource "aws_route_table" "us-east-1c-public" {
	vpc_id = "${aws_vpc.example.id}"

	route {
		cidr_block = "0.0.0.0/0"
		gateway_id = "${aws_internet_gateway.default.id}"
	}

	tags {
		Name        = "public-subnet-${var.environment}-${var.availability_zone_c}"
		Environment = "${var.environment}"
	}
}
resource "aws_route_table" "us-east-1a-public" {
	vpc_id = "${aws_vpc.example.id}"

	route {
		cidr_block = "0.0.0.0/0"
		gateway_id = "${aws_internet_gateway.default.id}"
	}

	tags {
		Name        = "public-subnet-${var.environment}-${var.availability_zone_a}"
		Environment = "${var.environment}"
	}
}
resource "aws_route_table" "us-east-1b-public" {
	vpc_id = "${aws_vpc.example.id}"

	route {
		cidr_block = "0.0.0.0/0"
		gateway_id = "${aws_internet_gateway.default.id}"
	}

	tags {
		Name        = "public-subnet-${var.environment}-${var.availability_zone_b}"
		Environment = "${var.environment}"
	}
}

resource "aws_route_table_association" "us-east-1c-public" {
	subnet_id      = "${aws_subnet.us-east-1c-public.id}"
	route_table_id = "${aws_route_table.us-east-1c-public.id}"
}
resource "aws_route_table_association" "us-east-1a-public" {
	subnet_id      = "${aws_subnet.us-east-1a-public.id}"
	route_table_id = "${aws_route_table.us-east-1a-public.id}"
}
resource "aws_route_table_association" "us-east-1b-public" {
	subnet_id      = "${aws_subnet.us-east-1b-public.id}"
	route_table_id = "${aws_route_table.us-east-1b-public.id}"
}

}

Create Security Groups– Notice how the ingress is only to the vpc cidr block

/*
  Kubernetes SG
*/
resource "aws_security_group" "kubernetes_sg" {
    name = "kubernetes_sg"
    description = "Allow traffic to pass over any port internal to the VPC"

    ingress {
        from_port = 0
        to_port = 65535
        protocol = "tcp"
        cidr_blocks = ["${var.vpc_cidr}"]
    }

    egress {
        from_port = 0
        to_port = 65535
        protocol = "tcp"
        cidr_blocks = ["0.0.0.0/0"]
    }

    ingress {
        from_port = 0
        to_port = 65535
        protocol = "udp"
        cidr_blocks = ["${var.vpc_cidr}"]
    }

    egress {
        from_port = 0
        to_port = 65535
        protocol = "udp"
        cidr_blocks = ["0.0.0.0/0"]
    }

    egress {
        from_port = 0
        to_port = 65535
        protocol = "udp"
        cidr_blocks = ["0.0.0.0/0"]
    }

    vpc_id = "${aws_vpc.example.id}"

    tags {
        Name = "kubernetes-${var.environment}"
    }
}

Create the S3 bucket and add data

resource "aws_s3_bucket" "s3bucket" {
    bucket = "kubernetes-example-${var.environment}"
    acl = "private"
    force_destroy = true

    tags {
        Name = "kubernetes-example-${var.environment}"
        Environment = "${var.environment}"
    }
}

You’ll notice below is an example of a file pushed to S3. We add depends_on aws_s3_bucket because Terraform will attempt to add files to the S3 bucket before it is created without it. (To be fixed soon according to Hashicorp)

resource "aws_s3_bucket_object" "setupetcdsh" {
    bucket = "kubernetes-example-${var.environment}"
    key = "scripts/setup_etcd.sh"
    source = "scripts/setup_etcd.sh"
    depends_on = ["aws_s3_bucket.s3bucket"]
}


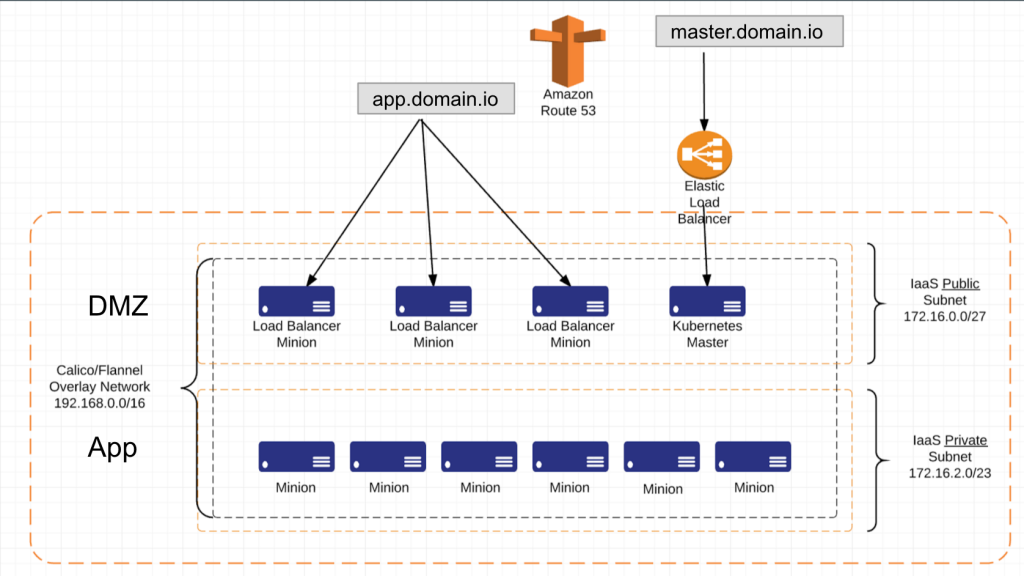
We distribute the cluster across 3 AZs, with 2 subnets (1 public, 1 private) per AZ. We allow internet access to the cluster through Load Balancer minions and the Kubernetes Master only. This reduces our exposure while maintaining scalability of load throughout.

Screen Shot 2016-01-01 at 3.28.44 PM

Load Balancer minions are just Kubernetes minions with a label of role=loadbalancer that we have chosen to deploy into the DMZ so they have exposure to the internet. They are also in an AutoScaling Group. We have added enough logic into the creation of these minions for them to assign themselves a pre-designated, Terraform created Elastic IP. We do this because we have A records pointing to these Elastic IPs in a public DNS zone and we don’t want to worry about DNS propagation.

In order to get Kubernetes into multiple availability zones we had to figure out what to do with etcd. Kubernetes k/v store. Many people are attempting to distribute etcd across AZs with everything else but we found ourselves questioning the benefit of that. If you have insights into it that we don’t, feel free to comment below. We currently deploy etcd in typical fashion with the Master, the API server, the controller and the scheduler. Thus there wasn’t much reason to distribute etcd. If the API or the Master goes down, having etcd around is of little benefit. So we chose to backup etcd on a regular basis and push that out to AWS S3. The etcd files are small so we can expect to back it up often without incurring any severe penalties. We then deploy our Master into an autoscaling group with scaling size of min=1 and max=1. When the Master comes up, it automatically attempts to pull in the etcd files from S3 (if available) and starts up its services. This combined with some deep health checks allows the autoscaling group to rebuild the master quickly.

We do the same with all our minions. They are created with autoscaling groups and deployed across multiple AZs.

We create a launch configuration that uses an AWS AMI, instance type (size), associates a public IP (for API calls and proxy requests), assigns some security groups, and adds some EBS volumes. Notice the launch configuration calls a user-data file. We utilize user-data heavily to provision the servers.

AWS launch configuration for the Master:

 resource "aws_launch_configuration" "kubernetes-master" {
 image_id = "${var.centos_ami}"
 instance_type = "${var.instance_type}"
 associate_public_ip_address = true
 key_name = "${var.aws_key_name}"
 security_groups = ["${aws_security_group.kubernetes_sg.id}","${aws_security_group.nat.id}"]
 user_data = "${template_file.userdatamaster.rendered}"
 ebs_block_device = {
 device_name = "/dev/xvdf"
 volume_type = "gp2"
 volume_size = 20
 delete_on_termination = true
 }
 ephemeral_block_device = {
 device_name = "/dev/xvdc"
 virtual_name = "ephemeral0"
 }
 ephemeral_block_device = {
 device_name = "/dev/xvde"
 virtual_name = "ephemeral1"
 }
 connection {
 user = "centos"
 agent = true
 }
 }

Then we deploy an autoscaling group that will describe the AZs to deploy into, min/max number of servers, health check, the launch configuration above and adds it to an ELB. We don’t actually use ELBs much in our deployment strategy but for the Master it made sense.

AutoScaling Group configuration:

resource "aws_autoscaling_group" "kubernetes-master" {
 vpc_zone_identifier = ["${aws_subnet.us-east-1c-public.id}","${aws_subnet.us-east-1b-public.id}","${aws_subnet.us-east-1a-public.id}"]
 name = "kubernetes-master-${var.environment}"
 max_size = 1
 min_size = 1
 health_check_grace_period = 100
 health_check_type = "EC2"
 desired_capacity = 1
 force_delete = false
 launch_configuration = "${aws_launch_configuration.kubernetes-master.name}"
 load_balancers = ["${aws_elb.kube-master.id}"]
 tag {
 key = "Name"
 value = "master.${var.environment}.kube"
 propagate_at_launch = true
 }
 tag {
 key = "Environment"
 value = "${var.environment}"
 propagate_at_launch = true
 }
 depends_on = ["aws_s3_bucket.s3bucket","aws_launch_configuration.kubernetes-master"]
 }


I mentioned earlier we use a user-data file to do quite a bit when provisioning a new Kubernetes minion or master. There are 5 primary things we use this file for:

  1. Polling the AWS API for an initial set of information
  2. Pulling dynamically configured scripts and files from S3 to create Kubernetes
  3. Exporting a list of environment variables for Kubernetes to use
  4. Creating an internal DNS record in Route53.


We poll the AWS API for the following:

Notice how we poll for the Master IP address which is then used for a minion to join the cluster.

MASTER_IP=`aws ec2 describe-instances --region=us-east-1 --filters "Name=tag-value,Values=master.${ENVIRONMENT}.kube" "Name=instance-state-code,Values=16" | jq '.Reservations[].Instances[].PrivateIpAddress'`
PUBLIC_IP=`curl http://169.254.169.254/latest/meta-data/public-ipv4`
PRIVATE_IP=`curl http://169.254.169.254/latest/meta-data/local-ipv4`
INSTANCE_ID=`curl http://169.254.169.254/latest/meta-data/instance-id`
AVAIL_ZONE=`curl http://169.254.169.254/latest/meta-data/placement/availability-zone`


List of environment variables to export:

MASTER_IP=$MASTER_IP
PRIVATE_IP=$PRIVATE_IP
#required for minions to join the cluster
API_ENDPOINT=https://$MASTER_IP
ENVIRONMENT=${ENVIRONMENT}
#etcd env config 
LISTEN_PEER_URLS=http://localhost:2380
LISTEN_CLIENT_URLS=http://0.0.0.0:2379
ADVERTISE_CLIENT_URLS=http://$PRIVATE_IP:2379
AVAIL_ZONE=$AVAIL_ZONE
#version of Kubernetes to install pulled from Terraform variable
KUBERNETES_VERSION=${KUBERNETES_VERSION}
KUBERNETES_RELEASE=${KUBERNETES_RELEASE}
INSTANCE_ID=$INSTANCE_ID
#zoneid for route53 record retrieved from Terraform
ZONE_ID=${ZONE_ID}

When an AWS server starts up it runs its user-data file with the above preconfigured information.

We deploy Kubernetes using a base CentOS AMI that has been stripped down with docker and aws cli installed.

The server then pulls down the Kubernetes files specific to its cluster and role.

aws s3 cp --recursive s3://kubernetes-example-${ENVIRONMENT} /tmp/

It then runs a series of scripts much like what k8s.io runs. These scripts set the server up based on the config variables listed above.


Currently we label our Kubernetes minions to guarantee containers are distributed across multiple AZs but the Kubernetes project has some work currently in process that will allow minions to be AZ aware.


UPDATE: The ubernetes team has an active working group our their vision of Multi-AZ. You can read up on that here and see their meeting notes here. Once complete I expect we’ll move that direction as well.