
I’ve been working on a little piece of software that determines Kubernetes DISA/STIG compliance. Written in Ansible, it prints out a report.html showing compliance of a given Kubernetes cluster. Super simple to run, just set KUBECONFIG as an environment variable.
Category: kubernetes
Kubernetes and AWS considerations
AWS
- EC2 user-data file should be generic – Having to modify user-data can cause major issues. Prefer to offload runtime based config to something like Ansible.
- AWS VPC CNI for EKS is not required. Although its an interesting option, the choice to run an alternate CNI plugin is yours.
Kubernetes
- Applications with slow startup times, should have a lower scaling (HPA) threshold so they can scale quickly enough to meet load demands.
- Kubernetes clusters running multiple host sizes should ensure pods are tainted/tolerated to run on the correct hosts.
- If automation of cloud services via Kubernetes is “in the cards” make sure all the dependencies can also be automated.
- Example: I once automated the use of AWS ALBs, ELBs and Route53 DNS via Kubernetes. Eventually we chose to use Cloud Front as well but there is no automation for it via Kubernetes (at the time of this writing). This left us with maintaining cloud front manually or writing Terraform separately.
Language specific best practices:
NodeJS
- Nodejs applications require 1 CPU and 1.5 GB of RAM by default. Make sure any application running nodejs has QoS set to 1 CPU and 1.75 GB of RAM. Nodejs apps without this run the risk of killing themselves because they assume they have the default regardless of what is set for QoS. The alternative is to modify the default resource requirements of Nodejs but many do not recommend doing this.
- Nodejs applications more heavily utilize DNS to make requests as they don’t by default cache a DNS entry. This tends to cause a significant amount of load on Kubernetes DNS.
Java
- Many Java applications utilize off-heap memory. Ensure QoS memory allocation for a Java app accounts for off-heap memory use.
- Java 8 and older use the server CPU for determining how much CPU is available. It ignores the amount set by Docker. This can lead to crashing if the app attempts to consume more CPU than it is allowed.
- Java 9+ can properly detect the correct CPU allocated.
Kubernetes – Device Plugins (alpha)
Brief History
In March of 2017, I wrote about Opaque Integer Resources whereby specific hardware capabilities could be used in Kubernetes. Alpha in 1.5, it allowed for the potential to enable resource like Last Level Cache, GPUs and Many Integrated Core devices etc etc.
In Kubernetes 1.8, Opaque Integer Resources were replaced with Extended Resources. This was a great move as it migrated from a kubernetes.io/uri model to allow resources to be assigned to any domain outside kubernetes.io and thus simply extend the API with API aggregation.
Extended Resources are a phenomenal start to vastly expand opportunities around Kubernetes workloads but it still had the potential to require modifications to Kubernetes core in order to actually use a new resource. And this is where Device Plugins come in.
Requirements:
Kubernetes 1.8
DevicePlugins enabled in Kubelet
Device Plugins
Device Plugins is a common framework by which hardware devices for specific vendors can be plugged into Kubernetes.
Think of it this way:
Extended Resources = how to use a new resource
Device Plugins = how vendors can advertise to and hook into Kubernetes without modifying Core
One of the first examples of Device Plugins in use is with Nvidia k8s-device-plugin. Which makes complete sense because Nvidia is leading an entire industry is various hardware arenas, GPU being just one of them.
How Device Plugins work
Device Plugins are/should be containers running in Kubernetes that provide access to a vendor (or enterprise) specific resource. The container advertises said resource to Kubelet via gRPC. Because this is hardware specific, it must be done on a per node basis. However a Daemonset can be deployed to cover a multitude of nodes for the same resource across multiple machines.
The Device Plugin has three parts:
Registration – plugin advertises itself to Kubelet over gPRC
ListandWatch – provides list of devices and/or modifies existing state of device on change including failures
Allocate – device specific instructions for Kubelet to make available to a container
At first glance this may seem rather simple but it should be noted that prior to Device Plugins, Kubelet specifically handled each device. Which is where hardware vendors had to contribute back to Kubernetes Core to provide net new hardware resources. With device plugin manager, this will be abstracted out and responsibility will lay on the vendor. Kubelet will then keep a socket open to ListandWatch for any changes in device state or list of devices.
Use of new devices through Extended Resources
Once a new Device Plugin is advertised to the cluster. It will be quite simple to use.
Now lets imagine we are using Nvidia’s GPU device plugin at nvidia.com/gpu
Here is how we allocate a gpu resource to a container.
apiVersion: v1
kind: Pod
metadata:
  name: need-some-gpu-pod
spec:
  containers:
  - name: my-container-needing-gpu
    image: myimage
    resources:
      requests:
        cpu: 2
        nvidia.com/gpu: 1
Gotchas
(At the time of this post)
Integers Only – this is common in Kubernetes but worth noting. 1 for gpu above can not be 0.5.
No Overallocation – Unlike Memory and CPU, devices can not be over allocated. So if Requests and Limits are specified, they must equal each other.
Resource Naming – I can’t confirm this but playing around with nvidia gpu I was unable to create multiple of the same device across multiple nodes.
Example:
I had difficulty advertising nvidia.com/gpu on node 2 once it was advertised on node one.
If correct, this would mean I would need to add nvidia.com/gpu-<node_name> or something of that measure to add the gpu device for multiple servers in a cluster. And also call out that specific device when assigning to the container requiring the resource. Now keep in mind, this is alpha so I would expect it to get modified rapidly but it is currently a limitation.
More info on Device Plugins
For a deeper review of the Device Plugin Manager
More on Extended Resources and Opaque Integer Resources
@devoperandi
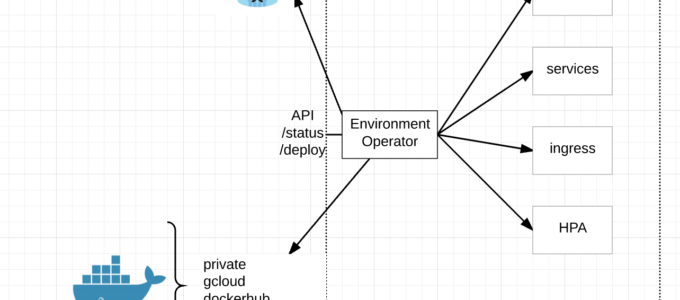
Open Source – Environment Operator
The day has finally come. Today we are announcing our open source project Environment Operator (EO).
Environment Operator is used throughout our project and has rapidly gained a name for itself as being well written and well thought out. Props go out to Simas Cepaitis, Cristian Radu and Ben Somogyi who have all contributed.
At its core, EO enables a seamless application deployment capability for a given environment/namespace within Kubernetes.
Benefits/Features:
- multi-cluster deployments
- audit trail
- status
- consistent definition of customer environments
- separate build from deploy
- minimizes risk and scope of impact
- simple abstraction from Kubernetes
- BYO CI/CD
- empowers our customers (dev teams)
- API interface
- multiple forms of authentication
- deploy through yaml config and API
- written in Go
- Docker Registries
Multi-Cluster Deployments – With EO running in each namespace and exposed via an API, CI/CD pipelines can simply call the API endpoint regardless of Kubernetes cluster and deploy new services.
API Interface – EO has its own API endpoint for deployments, status, logs and the like. This combined with a yaml config for its environment is a very powerful combination.
Audit Trail – EO provides an audit trail of all changes to the environment through its logging to stdout.
Status – EO provides a /status endpoint by which to understand the status of an environment or individual services within the environment with /status/${service}
Separate Build from Deploy – What we found was, while our CI/CD pipeline is quite robust it lacked real-time feedback and audit capabilities needed by our dev teams. Separating our build from deploy allowed us to add in these additional features, simplify its use and enabled our dev teams to bring their own familiar pipelines to our project.
Minimize Risk and Scope of impact – Because EO runs inside the Kubernetes cluster we could limit its capabilities through Kubernetes service accounts to only its namespace. This limits risk and impact to other dev teams running in the same cluster as well as requiring a dev to call and entirely wrong API endpoint in order to effect another environment. Further more, authentication is setup for each EO, so separation of concerns between environments can easily be made.
Simple Abstraction – Because EO is so simple to use, it has enabled our teams to get up and running much faster in Kubernetes. Very little prior knowledge is required, they can use their same pipelines by using a common DSL in our Jenkins plugin and get all the real-time information all from one place per environment.
BYO CI/CD – I think this is pretty self-explanatory but we have many dev teams at Pearson that already have their own CI/CD pipelines. They can continue using their pipeline or choose to use ours.
Empower our Dev teams – Ultimately EO is about empowering Dev teams to manage their own environments without requiring tons of prior knowledge to get started. Simply deploy EO and go.
Authentication – EO currently supports two different kinds of authentication. Token based which gets pulled from a Kubernetes secret or OAuth. We currently tie directly into Keycloak for auth.
Plugin (DSL) for Jenkins – Because most of our Dev teams run Jenkins, we wrote a plugin to hook directly into it. Other plugins could very easily be written.
Docker Registries – EO can connect to private, public, gcloud and docker hub registries.
As you can see, Environment Operator has a fair amount of capabilities built-in but we aren’t stopping there.
Near term objectives:
- Stateful sets
- Kubernetes Jobs
- Prometheus
Github:
https://github.com/pearsontechnology/environment-operator
https://github.com/pearsontechnology/environment-operator-jenkins-plugin
Let us know what you think!
@devoperandi
OpenID Connect – Enabling Your Team
Hello! My name is Matt Halder and I’ve had some interesting experiences working in a variety of IT fields. I started out working at a Government Contractor in Washington, D.C as a Networker Controller; moved my way up to Network Engineer and finished as a Lead Technologist. From there, headed westward to Denver, CO for an opportunity to work at Ping Identity as a Security Operations Engineer. Currently, I work at FullContact as DevOps Engineer. The FullContact team has been using kubernetes in production for the last seven months as a way to reduce our overall cloud hosting costs and move away from IaaS vendor lock-in. Both the development and staging clusters were bootstrapped using kops. The largest barrier to adoption that was echoed throughout the development team was needing the ability to tail logs. When role-based access control was introduced in kubernetes 1.6, the ability to provide access to the cluster outside of shared tokens, certs, or credentials became a reality. Here are the steps that were used to enable openid-connect on kubernetes.
When setting up an OpenID Connect provider, there are few terms to be aware of. First is the “IdP”, which is the identity provider; many technologies can be used as an identity provider such as Active Directory, Free IPA, Okta, Dex or PingOne. Second is the “SP”, which is the service provider; in this case the service provider is the kubernetes API. The basic overview of an OpenID Connect workflow is this: the user authenticates to the IdP, the IdP returns a token to the user, this token is now valid for any SP that is configured to use the the IdP that produced the token.
- Set up your IdP with an openid-connect endpoint and acquire the credentials.
- Configure the SP [aka configure the API server] to accept openid-connect tokens and include a super-admin flag so that existing setup will continue to work throughout the change.
- Generate kubeconfig file including oidc user config.
- Create role bindings for users on the cluster.
- Ensure all currently deployed services have role bindings associated with them.
Step 1: Set up the IdP
Since G Suite is already in place, we had an IdP that could be used for the organization. The added benefit is this IdP is pretty well documented and supported right out of the box, the caveat being that there is no support for groups so each user will need their own role binding on the cluster.
- Navigate to https://console.developers.google.com/projectselector/apis/library.
- From the drop-down create a new project.
- The side bar, under APIs & services -> select Credential.
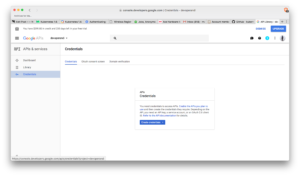
- Select OAuth consent screen (middle tab in main view). Select an email and choose a product name, press save.
- This will take you back to the Credentials tab (same as the screenshot above). Select OAuth clientID from the drop-down.
- From application type -> select Other and give a unique name.
- Copy the clientID and client secret or download the json. Download is under OAuth 2.0 client IDs on the right most side.
Step 2: Configure the SP [aka configure API Server] to accept OIDC tokens
Kops now has the ability to add pre install and post install hooks for openid-connect. If we were starting from scratch, this is the route that would be explored. However, adding these hooks didn’t trigger any updates and forcing a rolling update on a system running production traffic was too risky and was untested since staging had tested/updated prior to this functionality being introduced.
Kubelet loads core manifests from a local path, the kops clusters kubelet loads from /etc/kubernetes/manifests. This directory stores the kube-apiserver manifest file that tells kubelet how to deploy the api server as a pod. Editing this file will trigger kubelet to re-deploy the API server with new configuration. Note, this operation is much riskier on a single master cluster than on a multi master cluster.
- Copy the original kube-apiserver.manifest.
- Edit kube-apiserver.manifest adding these lines:
--authorization-mode=RBAC

--authorization-rbac-super-user=admin

--oidc-client-id=XXXXXX-XXXXXXXXXXX.apps.googlecontent.com

--oidc-issuer-url=https://accounts.google.com

--oidc-username-claim=email
- Kubelet should re-deploy the API server within a couple of minutes of the manifest being edited.
- Ensure that network overlays/CNI is functioning properly before proceeding, not all overlays shipped with service accounts and role bindings. This caused some issues with early adopters to kubernetes 1.6 (Personally, I had to generate a blank configmap for calico since it would fail if one wasn’t found).
Step 3: Generating a kubeconfig file
This process is broken into two steps, the first is to generate the cluster and context portion of the config while the second part is having the user acquire their openid-connect tokens and add them to the kubeconfig.
- While opinions will vary, I’ve opted to skip the TLS verifications on the kubeconfig. Reasoning being is this would require a CA infrastructure to generate certs per users which isn’t in place.
- There’s a bit of a chicken and egg thing going on here where kubectl needs to be installed so that a kubeconfig can be generated for the kubectl (although that’s how ethereumwallet is installed so maybe it’s just me). Either way, this script can be edited with correct context and endpoints to generate the first half of the kubeconfig:
#!/usr/bin/env bash

set -e

USER=$1

if [ -z "$USER" ]; then
  echo "usage: $0 <email-address>"
  exit 1
fi

echo "setting up cluster for user '$USER'"

# Install kubectl dependency
source $(dirname $(readlink -f "$0"))/install_kubectl.sh 1.6.8

# Set kubeconfig location the current users home directory
export KUBECONFIG=~/.kube/config

# Set cluster configs
kubectl config set-cluster cluster.justfortesting.org \
  --server=https://api.cluster.justfortesting.org \
  --insecure-skip-tls-verify=true

#Set kubeconfig context
kubectl config set-context cluster.justfortesting.org \
  --cluster=cluster.justfortesting.org \
  --user=$USER

kubectl config use-context cluster.justfortesting.org
- To generate the second part of the kubeconfig, use k8s-oidc-helper from here to generate the
userportion and append the output at the bottom of the config file. Now, with a functioning kubeconfig the user needs a role binding present in the cluster to have access. The IdP client-id and client-secret will need to be made available to users so they can generate the openid-connect tokens. I’ve had good success with LastPass for this purpose.
Step 4: User Role Bindings
- Now, create a default role that users can bind to. The example gives the ability to list pods and their logs from the default namespace.
kind: Role
apiVersion: rbac.authorization.k8s.io/v1beta1
metadata:
  namespace: default
  name: developer-default-role
rules:
- apiGroups: [""]
  resources: ["pods", "pods/log"]
  verbs: ["get", "list"]
- Now, bind users to this role (notice the very last line has to be identical to the G Suite email address that used in Step 3).
- At our organization, these files are generated by our team members and then approved via github pull request. Once the PR has been merged into master, the role bindings become active on the clusters via jenkins job.
apiVersion: rbac.authorization.k8s.io/v1beta1
kind: RoleBinding
metadata:
  name: ${USER}@organization.tld-binding
roleRef:
  apiGroup: rbac.authorization.k8s.io
  kind: Role
  name: developer-default-role
subjects:
- apiGroup: rbac.authorization.k8s.io
  kind: User
  name: $USER@organization.tld
Step 5: Existing tooling needs an account and binding
The last step is necessary for any existing tooling in the cluster to ensure continued functionality. The “–authorization-rbac-super-user=admin” flag from step 2 was added to ensure continuity throughout the process. We use helm to deploy foundational charts into the cluster; helm uses a pod called “tiller” on the cluster to receive all specs from helm sdk and communicate them to the API, scheduler, and controller-manager. For foundational tooling such as this, use service accounts and cluster role bindings.
apiVersion: v1
kind: ServiceAccount
metadata:
  name: tiller
  namespace: kube-system
---
apiVersion: rbac.authorization.k8s.io/v1beta1
kind: ClusterRoleBinding
metadata:
  name: tiller-cluster-rolebinding
subjects:
  - kind: ServiceAccount
    name: tiller
    namespace: kube-system
roleRef:
  kind: ClusterRole
  name: cluster-admin
  apiGroup: ""
Kubernetes: FaaS Options (part 1)
Over the last few months I’ve been diving into various Serverless/FaaS architectures that can run on Kubernetes. To say this space has exploded would be a severe understatement. The number of amazing developers working in this space is remarkable. Much less the number of them integrating with Kubernetes.
I’m not going to talk about wrappers around Lambda (which there are a TON of). I’m talking about true FaaS capabilities that can at least demonstrate they run on Kubernetes.
As it turns out there are a fair number of them.
I’ve worked with several of these now but I’ll point out the ones I’ve not as we go along. In most circumstances I was able to reduce the number of candidates to explore simply by reviewing their architectures to understand their pros and cons.
I’ve also come across what I believe will be some key indicators we may want to be aware of before taking on one of these capabilities.
- Language support
- Performance and Scalability (how quickly can a basic function execute)
- Asynchronous/Synchronous support
- Monitoring
- Architecture
OpenWhisk
OpenWhisk was built and designed by IBM. Seems to be gaining a fair amount of traction in this space and has a good reputation. An excellent overview of the OpenWhisk Architecture can be written by Markus Thömmes , an OpenWhisk contributor at medium.com.
Language Support – OpenWhisk has full language support for just about anything. It even has integrations with Swift, Cloudant, Slack and YouTube.
Performance and Scalability – I found performance of OpenWhisk to be somewhat sluggish out of the box. But Mark provides some pretty good ways to increase performance here. Scalability is quite good as all components including the controllers can be scaled out.
Asynchronous/Synchronous – Asynchronous Only. Sounds like there are some plans for (semi?) synchronous support.
Monitoring – IBM does have Dashboard that can be use with IBM Bluemix and the CLI can be used for gaining insights as well but built-in capabilities with open source monitoring platforms are non-existent.
Architecture –
CouchDB and Kafka are in direct line of the execution for any function. CouchDB being for both authentication and action retrieval. Personally I couldn’t see us requiring Authentication through OpenWhisk and I would imagine most others have their own Auth capabilities that support far more than what are offered here. Kafka because all requests are Asynchronous (at this time).
Primary problem the with the above is availability. The more stateful (semi or otherwise) services required to be available, the more opportunity for failure however you’ll find this is fairly common in FaaS. Some sort of message queue and some sort of storage for holding code. This tends to limit the number of languages (and/or versions) supported but IBM have done a good job here. Basically any container can be an invoker as long as it conforms to a few specifics.
Notes for OpenWhisk on Kubernetes:
- No use of Kubernetes scheduling.
- OpenWhisk controller talks directly with the Docker API on the host, thus limiting scalability to what that host can handle. Also not going to work for availability.
Recap: Overall OpenWhisk is a platform that’s been around for a little bit now. It largely resembles Lambda in its capability but open to the masses. I could see OpenWhisk being used in very large FaaS implementations but its number of dependencies in the critical path scare me. Its performance could use some enhancing out of the box. But for a FaaS that relies on injecting functions into containers, its language support is stellar and it has some pretty cool direct integrations.
Bottom Line: I can’t recommend this platform if running Kubernetes at this time.
Kubeless
Kubeless is almost a brand new project. As of the time of this writing, Kubeless has only been committed to in any earnest for the last 5 months. They are truly Kubernetes native and plug right in to the Serverless project. I did not get the chance to really test out this platform but I’m aiming to get a handle on it in the next few weeks.
Language Support – Python and NodeJS
Performance and Scalability – I just don’t know yet
Asynchronous/Synchronous – Both
Monitoring – Baked in monitoring with Prometheus.
Architecture –
Kubeless relies heavily on built-in Kubernetes capabilities such as ThirdPartyResources (or Custom Definitions depending on version of Kubernetes) and takes advantage of the built-in API server. Everything to run a function exists in the ThirdPartyResource. As a result however, the Kubeless team has to provide support by language/version for functions to run. My hope is they will make this a bit more generic to allow customer runtimes? Otherwise I fear they won’t be able to keep up.
Correction: Executions with Kubeless are through http or triggered events. Thank You @sebgoa for pointing this out.
Notes: Kubeless has an easily consumable UI and directly plugs in to the Serverless Framework.
Kubeless runs on vanilla Kubernetes, OpenShift and hooks seamlessless into Kubernetes-RBAC for security.
Recap: Really cool new up and coming project integrating deeply with Kubernetes. Could be a heavy contender in the future.
Bottom Line: Not yet unless you are solely Python and NodeJS based.
IronFunctions
IronFunctions are the current unsung heroes in my mind. Under heavy development starting in July of 2016, this is an easily consumable open source project that integrates well with Kubernetes while having the unique ability to run Lambda style functions as well. So for all you Lambda junkies wanting to break your addiction, this might be a pretty damn good option.
Language Support – Only limited by the docker containers you can dream up.
Performance and Scalability – Only limited by the infrastructure its running on. I quite easily executed it in several languages both locally and on a full cluster in the 200-250ms range for Synch requests and 300ish for Asynch. I don’t see any scalability issues at this time. If a ceiling was hit, it would be quite easy to simply spin up a new IronFunctions capability in a different namespace in Kubernetes.
Asynchronous/Synchronous – Both
Monitoring – Logs
Architecture –
IronFunctions are a truly well built platform that I’m hesitant to say could serve many different use cases. There are a few basic components to running IronFunctions.
- IronFunctions – Essentially the controller/API that manages incoming requests and starts up resources/container to fulfill said request.
- Database – for configuration only. Not in the critical request path.
- Message Queue – For Asynchronous requests.
Notes: Has a usable UI for managing functions. HotFunctions are pretty awesome. The CLI is very easy to use.
All in all, IronFunctions was the dark horse that surprised me by a long shot. I would love to see Prometheus monitoring make it in as I’m not terribly excited about Logging being the metrics collection point. Overall, minor gripe.
Recap: I was noticeably surprised by its scalability, performance and maturity for a project I just happen to run across. It has all the makings of a truly scalable, production capable FaaS offering. With Synchronous, Asynchronous AND HotFunction capabilities, I was very impressed. Combine that with ease of use, just enough integration with Kubernetes and I’m pretty much sold. Keep up the good work.
Bottom Line: Of the ones I’ve reviewed so far, a definite Yes. Just get me some metrics into Prometheus. 😉
In a future post I’ll have a look at Fission, Funktion and maybe an up and comer by alexellis called faas-netes.
@devoperandi
Kubernetes – PodPresets
Podpresets in Kubernetes are a cool new addition to container orchestration in v1.7 as an alpha capability. At first they seem relatively simple but when I began to realize their current AND potential value, I came up with all kinds of potential use cases.
Basically Podpresets inject configuration into pods for any pod using a specific Kubernetes label. So what does this mean? Have a damn good labeling strategy. This configuration can come in the form of:
- Environment variables
- Config Maps
- Secrets
- Volumes/Volumes Mounts
Everything in a PodPreset configuration will be appended to the pod spec unless there is a conflict, in which case the pod spec wins.
Benefits:
- Reusable config across anything with the same service type (datastores as an example)
- Simplify Pod Spec
- Pod author can simply include PodPreset through labels
Example Use Case: What IF data stores could be configured with environment variables. I know, wishful thinking….but we can work around this. Then we could setup a PodPreset for MySQL/MariaDB to expose port 3306, configure for InnoDB storage engine and other generic config for all MySQL servers that get provisioned on the cluster.
Generic MySQL Pod Spec:
apiVersion: v1
kind: Pod
metadata:
  name: mysql
  labels:
    app: mysql-server
    preset: mysql-db-preset
spec:
  containers:
    - name: mysql
      image: mysql:8.0
      command: ["mysqld"]
  initContainers:
  - name: init-mysql
    image: initmysql
    command: ['script.sh']
Now notice there is an init container in the pod spec. Thus no modification of the official MySQL image should be required.
The script executed in the init container could be written to templatize the MySQL my.ini file prior to starting mysqld. It may look something like this.
#!/bin/bash

cat >/etc/mysql/my.ini <<EOF

[mysqld]

# Connection and Thread variables

port                           = $MYSQL_DB_PORT
socket                         = $SOCKET_FILE         # Use mysqld.sock on Ubuntu, conflicts with AppArmor otherwise
basedir                        = $MYSQL_BASE_DIR
datadir                        = $MYSQL_DATA_DIR
tmpdir                         = /tmp

max_allowed_packet             = 16M
default_storage_engine         = $MYSQL_ENGINE
...

EOF
Corresponding PodPreset:
kind: PodPreset
apiVersion: settings.k8s.io/v1alpha1
metadata:
  name: mysql-db-preset
  namespace: somenamespace
spec:
  selector:
    matchLabels:
      preset: mysql
  env:
    - name: MYSQL_DB_PORT
      value: "3306"
    - name: SOCKET_FILE
      value: "/var/run/mysql.sock"
    - name: MYSQL_DATA_DIR
      value: "/data"
    - name: MYSQL_ENGINE
      value: "innodb"
This was a fairly simple example of how MySQL servers might be implemented using PodPresets but hopefully you can begin to see how PodPresets can abstract away much of the complex configuration.
More ideas –
Standardized Log configuration – Many large enterprises would like to have a logging standard. Say something simply like all logs in JSON and formatted as key:value pairs. So what if we simply included that as configuration via PodPresets?
Default Metrics – Default metrics per language depending on the monitoring platform used? Example: exposing a default set of metrics for Prometheus and just bake it in through config.
I see PodPresets being expanded rapidly in the future. Some possibilities might include:
- Integration with alternative Key/Value stores
- Our team runs Consul (Hashicorp) to share/coordinate config, DNS and Service Discovery between container and virtual machine resources. It would be awesome to not have to bake in envconsul or consul agent to our docker images.
- Configuration injection from Cloud Providers
- Secrets injection from alternate secrets management stores
- A very similar pattern for us with Vault as we use for Consul. One single Secrets/Cert Management store for container and virtual machine resources.
- Cert injection
- Init containers
- What if Init containers could be defined in PodPresets?
I’m sure there are a ton more ways PodPresets could be used. I look forward to seeing this progress as it matures.
@devoperandi
The perils of a Kube-DNS issue with Nginx Ingress
Ok so this is going to be a tough one to write but I’m going to do it anyway. This is a story of data overload, a shit ton of rabbit holes, some kick ass engineers and a few hours of my life I hope not to repeat. I never cease being amazed by how one thing can cause so much trouble.
Requirements:
- Using Kube-DNS for internal DNS resolution. I assume this to be most of my audience.
- Running Nginx Ingress Controllers for Reverse Proxy
If your environment doesn’t fit the bill on either of the above, you can probably ignore this terribly written yet informative post.
Our team recently took what I would call a partial outage as a result of this problem. I can’t, nor would I want, to go into the details around how long. 🙂 But needless to say we went through a lot of troubleshooting and I can only hope this will help someone else.
It all started out on a beautiful sunny Colorado day………………………………………………………………………………………………………………………………………………………………………………………………………………………………………………………………………………………………………………………………………………………………………………………………………………………………………………………………………………………………………………………………………………………………………………………………………………………………………… Nevermind. You probably don’t want to hear the ramblings of a terrible doesn’t-wanna-be-a-writer who can’t write.
So lets get to the symptoms.
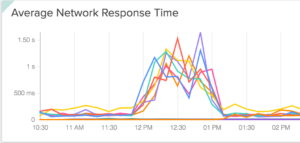
Symptoms included:
Higher than normal Network Response Times for applications.
Some domains worked and some don’t.
In the course of this troubleshooting we noticed that some domains worked and some didn’t. I mean like 100% of the time they worked. No errors. No problems. Take for example all our CI/CD applications and our documentation site. They all worked without fail. All these things are on the same platform. The only difference is their endpoint urls.

….or so it seemed.
To make matters worse, we had my-app-blue.prsn.io, my-app-green.prsn.io (blue/green deploys) AND my-app.prsn.io.
We could hit the blue and green endpoints just fine but my-app.prsn.io would err a portion of the time.
Here is the kicker, my-app-blue.prsn.io and my-app.prsn.io literally route to the same exact set of pods. Only difference is the endpoint url.
Tons of NXDOMAIN requests (more than normal):
What is an NXDOMAIN?
The NXDOMAIN is a DNS message type received by the DNS resolver (i.e. client) when a request to resolve a domain is sent to the DNS and cannot be resolved to an IP address. An NXDOMAIN error message means that the domain does not exist.
1. dnsmasq[1]:179843192.168.154.103/52278 reply my-app.my-base-domain.com.some-namespace.svc.cluster.local is NXDOMAIN
Now notice the event above shows
my-app.my-base-domain.com.some-domain.svc.cluster.local
This is because the resolver could not find
my-app.my-base-domain.com
so it attempted to add its default domain of “name-space.svc.cluster.local”
resulting in a string of NXDOMAINs like so:
dnsmasq[1]: 179861 192.168.125.227/43154 reply my-app.some-external-endpoint.com.svc.cluster.local is NXDOMAIN
dnsmasq[1]: 179863 192.168.125.227/43154 reply my-app.some-external-endpoint.com.svc.cluster.local is NXDOMAIN
dnsmasq[1]: 179866 192.168.71.97/55495 cached my-app.some-external-endpoint.com.cluster.kube is NXDOMAIN
dnsmasq[1]: 179867 192.168.120.91/35011 reply my-app.some-external-endpoint.com.cluster.local is NXDOMAIN
dnsmasq[1]: 179869 192.168.104.71/40891 reply my-app.some-external-endpoint.com.cluster.local is NXDOMAIN
dnsmasq[1]: 179870 192.168.104.71/57224 reply my-app.some-external-endpoint.com.cluster.local is NXDOMAIN
This is because Kubernetes ndots:5 by default. More on that here.
Next we found Domain Resolution Errors
A comment from a teammate:
I suspect it's DNS. Possibly ours, but I can't be sure where or how. Things are resolving fine internally presently and even externally...
But ingresses clearly log that they can't resolve certain things.

Now this we could gather this from the increase in NXDOMAIN events but this provided a more clarity as to what we were looking at.
Another teammate:
we know that kubedns pods resolve *external* dns entries fine
you can make sure of that running
    nslookup www.whatevs 127.0.0.1
on kube-dns pods
SO how in the hell do we have Nginx-controller throwing domain resolution errors but we can resolve anything we like just fine from the fucking DNS server itself?
In the mean time we got some more data.
We also saw Throttling at the API Server:
Throttling request took 247.960344ms, request: GET:http://127.0.0.1:8080/api/v1/namespaces/app-stg/pods
Throttling request took 242.299039ms, request: GET:http://127.0.0.1:8080/api/v1/namespaces/docs-prd/pods?labelSelector=pod-template-hash%3D2440138838%2Cservice%3Dkong-dashboard
Throttling request took 247.059299ms, request: GET:http://127.0.0.1:8080/api/v1/namespaces/otherapp-dev/configmaps
which caused us to have a look at ETCD.
ETCD likely Overloaded:
 W | etcdserver: server is likely overloaded
 W | etcdserver: failed to send out heartbeat on time (deadline exceeded for 129.262195ms)
 W | etcdserver: server is likely overloaded
 W | etcdserver: failed to send out heartbeat on time (deadline exceeded for 129.299835ms)
At this point here is what we’ve got:
- Network response times have increased
- Some domains are working just fine but others aren’t
- NXDOMAIN requests have increased
- Domain resolution errors from Nginx
- DNS resolution from ALL Kube-DNS pods work just fine
- API Server is throttling requests to save ETCD
Data points we missed:
- Domain endpoints that were under load failed more often
So what was the problem?
Next stop, Nginx.
Here is what bit us. For each backend in Nginx, a socket will be opened to resolve DNS. Identified by the line with “resolver” in it like below. This socket has a TTL of 30 seconds by default. Meaning if the something happens to the DNS resolver (kube-dns pod), Nginx will fail away from it in 30 seconds UNLESS retries are configured. IF retries are configured, the 30 second TTL will be reset every time a retry takes place. As you can imagine, Nginx ends up keeping the socket open almost indefinitely under high load and thus never creates a new socket to a kube-dns pod that is up and available.
Ours was set to:
resolver kube-dns.kube-system.svc.cluster.local;
Big mistake.
You see, resolving the resolver is well, bad form. Not to mention likely to cause a shit ton of head aches. It did for us.
What about adding
valid=10sat the end of the resolver line sense we are setting a domain variable? Only works for proxy_pass. Not for the resolver itself.
Ok fine, what options do we have? We thought of three.
- Add Kube-DNS/dnsmasq pod as a daemonset and have it added to every server. Not a bad idea over all. The IP could be setup to listen over the Docker socket and thus be static across all hosts. But this does present challenges. For example, we’ll still end up in a Chicken and Egg scenario especially if using things like a Private Docker Registry as a Kubernetes Pod in our cluster as we do.
- Running dnsmasq on every server with systemd and still have it available over the docker socket. Thus allowing for a statically assigned IP that can be set in Nginx. This also has the advantage of significantly reducing the number of DNS requests that make it to kube-dns, distributes the load and almost makes DNS significantly less hassle. It however does mean we wouldn’t be running it as a container. This also has the added benefit of being able to place dnsmasq on any server outside the Kubernetes world, thus allowing for a little bit more consistency across the platform.
- Run dnsmasq as a sidecar to all Nginx pods could be a valuable option as well. It lacks the availability of option #2 but it means Nginx could simply look at local loopback address for resolving DNS. It also has the added benefit of having Kubernetes automatically reschedule the container should it fail.
Alright, what did we pick?
**NOTE** we have changed and moved to running dnsmasq as a sidecar along side the Nginx container.
At this time we are using Option #2. Easy to setup, provides continuity across our platform, reduces network traffic due to caching of DNS requests and did I mention it was easy to setup?
Note: There is work in progress by the Kubernetes folks around this. Although I’m not sure there has been a definitive solution just yet.
Hope this helps you and yours from hitting the same pitfall we did. GL
@devoperandi
Open Source – Bitesize-controllers
The Bitesize team has been working with the nginx-controller for quite some time. Over that time we have modified, updated, coerced it to our will and its high time we open source this thing.
First I want to call out the engineers that have contributed to this controller and make sure they get the recognition they deserve. Congrats to Martin Devlin and Simas Cepaitis with encores Jeremy Darling and Thilina Piyasundara.
It takes the normal nginx-controller and bakes in Vault (Hashipcorp) integration.
Basic steps are:
- push TLS cert into Vault
- Create Ingress with
-
metadata:
  name: example
  namespace: some-namespace
  labels:
    ssl: true
-
- Nginx will get the new Ingress, pull the TLS cert from Vault and reload the nginx config.
I’ve written about Vault at various times. The latest is here.
In the future we intend add far more granularity to and even use this on a per project/namespace basis.
So here it is – Bitesize Controllers
And the Readme
We have plans to add more controllers in the future so stay tuned.
Kubernetes: Not just CPU and RAM (Opaque Integer Resources)
Ok so what the hell are Opaque Integer Resources and why are they valuable? Basically the idea is Kubernetes can take advantage of many other hardware level capabilities in a server and present those as discrete resources much like cpu and memory are assigned to a pod now.
Now keep in mind, this is alpha and work is under.
Version: Kubernetes 1.5 (alpha feature)
Use Case:
Lets imagine we are going to run some (almost) real-time analytics in Kubernetes requiring some serious parallel computing. Well for those that don’t know, CPU is likely not the best hardware to use for this. Instead with opaque integer resources we could take advantage of GPU or even MICs which have far more parallelized compute through the shear number of cores they run.
Now you might be thinking, GPU? Isn’t that for graphics? Well that was its original intent but its advantages very quickly were adopted by engineers and scientists in robotics, self driving cars, deep learning and artificial intelligence along with a plethora of other arenas.
And now this capability is on its way into Kubernetes.
So what are some other possibilities?
- LLC (last-level cache) allocation –
- GPU devices – Supreme parallel processing.
- FPGA devices – For programming hardware devices through HDL and making them usable by Pods.
- MICs (Many-Integrated Core, such as Xeon Phi)
- “Slots” for sharing bandwidth to a parallel file system.
So what about Kernel level runtime requirements? Who knows? We are really just at the front gate of the possibilities here but what we can expect is Kubernetes will be capable of consuming the latest and greatest hardware technologies as they come out.