Python Client for Kubernetes

For reasons I’ll divulge in a future post, we needed a python client to interact with Kubernetes. Our latest and greatest work is going to rely pretty heavily on it and we’ve had difficulty finding one that is fully functional.

SPOILER: Go to the bottom of the article if you just want the code. 😉

We explored options like libCloud, pykube and even went back to some of the original python-kubernetes clients like you would see on Pypi. What we found was they were all either a) out of date, b) still very much in their infancy or c) no longer being contributed. And we realized sitting around waiting on someone else to build and maintain one just wasn’t going to work.

So with a lot of exploring and a ton of learning (primarily due to my lack of python skillz), we came to realize we could simply generate our own with codegen. You see, Kubernetes uses swagger for its API and codegen allows us to create our own python client using the swagger spec.

# on mac install swagger-codegen

brew install swagger-codegen

Acquire v1.json from v1.json at Kubernetes website

and run something like:

swagger-codegen generate -l python -o k8sclient -i v1.json

And this was fantastic……..until it didn’t work and the build fails.

You see, Kubernetes is running swagger spec 1.2 and they are using “type”: “any” which is an undefined custom type and codegen doesn’t know how to handle it.

See the github issues referenced here and here for a more detailed explanation.

The end result is, while custom types in swagger-spec 1.2 are allowed, there was no way to document the custom types for codegen to consume. This is fixed in swagger-spec 2.0 with “additionalProperties” to allow this mapping to occur.

But we still had a problem. We couldn’t easily create a python client from codegen.

So what we have done, right or wrong, is replace everything in the v1.json of

"type": "any"

with

"type": "string"

and it works.

With that here is a link to the v1.json file with the change.

But we also did the same thing for extensions/v1beta because we are working on some future endeavors so here is a link to that as well.

With these v1.json and v1.beta1.json files you should be able to create your own python client for Kubernetes.

Or if you choose, you could just use the clients we created. We intend to keep these clients updated but if you find we haven’t, feel free to create your own. Its dead simple.

https://github.com/mward29/python-k8sclient

https://github.com/mward29/python-k8sclient-v1beta1


As a final departing note, these python clients have NOT been fully vetted. We have not run across any issues as of this moment but if you find an issue before we do, PLEASE be a good samaritan and let us know.

The beta version, because its running against the beta api extensions may not have everything you would expect in it.


Vault in Kubernetes

First off thanks to Martin for taking this from a POC to a product within Kubernetes.

When it comes to managing secrets inside Kubernetes, Vault is our go to solution. It is not exposed externally at this time although we have considered it for external workloads. We are working with it in a couple areas including dynamic secrets and have intentions of using it with OTP, SSH, MFA and SSL cert rotation in the near future.

We spin Vault up as a part of our default cluster build, use consul as its storage backend, automatically unseal the vault and ship the keys off to admins.

Reference Deploying Consul in Kubernetes for more information there.

First off lets start with the Dockerfile. This is a pretty standard Dockerfile. Nothing crazy here.

FROM alpine:latest
MAINTAINER Martin Devlin <martin.devlin@pearson.com>

ENV VAULT_VERSION 0.4.1
ENV VAULT_PORT 7392

COPY config.json /etc/vault/config.json

RUN apk --update add openssl zip\
&& mkdir -p /etc/vault/ssl \
&& wget http://releases.hashicorp.com/vault/${VAULT_VERSION}/vault_${VAULT_VERSION}_linux_amd64.zip \
&& unzip vault_${VAULT_VERSION}_linux_amd64.zip \
&& mv vault /usr/local/bin/ \
&& rm -f vault_${VAULT_VERSION}_linux_amd64.zip

EXPOSE ${VAULT_PORT}

COPY /run.sh /usr/bin/run.sh
RUN chmod +x /usr/bin/run.sh

ENTRYPOINT ["/usr/bin/run.sh"]
CMD []


But now lets take a look at run.sh. This is where the magic happens.

#!/bin/sh


if [ ! -z ${VAULT_SERVICE_PORT} ]; then
  export VAULT_PORT=${VAULT_SERVICE_PORT}
else
  export VAULT_PORT=7392
fi

if [ ! -z ${CONSUL_SERVICE_HOST} ]; then
  export CONSUL_SERVICE_HOST=${CONSUL_SERVICE_HOST}
else
  export CONSUL_SERVICE_HOST="127.0.0.1"
fi

if [ ! -z ${CONSUL_SERVICE_PORT} ]; then
  export CONSUL_PORT=${CONSUL_SERVICE_PORT}
else
  export CONSUL_PORT=8500
fi

openssl req -x509 -newkey rsa:1024 -nodes -keyout /etc/vault/ssl/some-vault-key.key -out /etc/vault/ssl/some-vault-crt.crt -days some_number_of_days -subj "/CN=some-vault-cn-or-other" 

  export VAULT_IP=`hostname -i`

sed -i "s,%%CONSUL_SERVICE_HOST%%,$CONSUL_SERVICE_HOST," /etc/vault/config.json
sed -i "s,%%CONSUL_PORT%%,$CONSUL_PORT,"                 /etc/vault/config.json
sed -i "s,%%VAULT_IP%%,$VAULT_IP,"                       /etc/vault/config.json
sed -i "s,%%VAULT_PORT%%,$VAULT_PORT,"                   /etc/vault/config.json

## Master stuff

master() {

  vault server -config=/etc/vault/config.json $@ &

  if [ ! -f ~/vault_keys.txt ]; then

    export VAULT_SKIP_VERIFY=true
    
    export VAULT_ADDR="https://${VAULT_IP}:${VAULT_PORT}"

    vault init -address=${VAULT_ADDR} > ~/vault_keys.txt

    export VAULT_TOKEN=`grep 'Initial Root Token:' ~/vault_keys.txt | awk '{print $NF}'`
    
    vault unseal `grep 'Key 1:' ~/vault_keys.txt | awk '{print $NF}'`
    vault unseal `grep 'Key 2:' ~/vault_keys.txt | awk '{print $NF}'`
    vault unseal `grep 'Key 3:' ~/vault_keys.txt | awk '{print $NF}'`
    vault unseal `grep 'Key 4:' ~/vault_keys.txt | awk '{print $NF}'`
    vault unseal `grep 'Key 5:' ~/vault_keys.txt | awk '{print $NF}'`
    vault unseal `grep 'Key 6:' ~/vault_keys.txt | awk '{print $NF}'`
    vault unseal `grep 'Key 7:' ~/vault_keys.txt | awk '{print $NF}'`
    vault unseal `grep 'Key 8:' ~/vault_keys.txt | awk '{print $NF}'`
    vault unseal `grep 'Key another_key:' ~/vault_keys.txt | awk '{print $NF}'`

  fi

}

case "$1" in
  master)           master $@;;
  *)                exec vault server -config=/etc/vault/config.json $@;;
esac

### Exec sending keys to admins
exec /tmp/shipit.sh
 

sleep 600

Above we do a few important things:

  1. We use environment variables from within the container to set configs in config.json
  2. We generate an x509 cert
  3. We unseal the vault with some sed magic
  4. We run shipit.sh to send off the keys and remove the vault_keys.txt file. The shipit script has information on admins we dynamically created to send keys to.


Here is what config.json looks like. Nothing major. A basic Vault config.json.

### Vault config

backend "consul" {
 address = "%%CONSUL_SERVICE_HOST%%:%%CONSUL_PORT%%"
 path = "vault"
 advertise_addr = "https://%%VAULT_IP%%:%%VAULT_PORT%%"
}

listener "tcp" {
 address = "%%VAULT_IP%%:%%VAULT_PORT%%"
 tls_key_file = "/etc/vault/ssl/some-key.key"
 tls_cert_file = "/etc/vault/ssl/some-crt.crt"
}

disable_mlock = true


Kubernetes Config for Vault. We deploy a service accessible internally to the cluster with proper credentials. And we create a replication controller to ensure a Vault container is always up.

---
apiVersion: v1
kind: Service
metadata:
  name: vault
  namespace: your_namespace
  labels:
    name: vault-svc
spec:
  ports:
    - name: vaultport
      port: 8200
  selector:
    app: vault
---
apiVersion: v1
kind: ReplicationController
metadata:
  name: vault
  namespace: your-namespace
spec:
  replicas: 1
  selector:
    app: vault
  template:
    metadata:
      labels:
        app: vault
    spec:
      containers:
        - name: vault
          image: 'private_repo_url:5000/vault:latest'
          imagePullPolicy: Always
          ports:
            - containerPort: 8200
              name: vaultport


Once Vault is up and running we insert a myriad of policies by which Vault can use to for various secret and auth backends. For obvious reasons I won’t be showing those.


@devoperandi


Note: Some data in code above intentionally changed for security reasons.


Upgraded Nginx-controller for Kubernetes

From my friend Simas. The ever reclusive genius behind the curtains. I’m beginning to feel like I might be repeating myself quite often if he keeps up this pace. I might also have to get my own ass to work so I have something to show.

For those that don’t know, the nginx-controller is basically an alpha external load balancer for Kubernetes that listens on a specified port(s) and routes traffic to applications in Kubernetes. You can read more about that in my post Load Balancing in Kubernetes.

So we’ve come out with an update to the original nginx-controller located (here).

The original nginx-controller was an excellent start so we chose to push the ball forward a little bit. Please understand this has not been thoroughly tested outside our team but we would love your feedback so feel free to have at it.

Here is pretty much the entirety of the code that was added. It creates a map and iterates over it to populate the nginx.conf file.

		knownHosts := make(map[string]extensions.Ingress)
		// we need a loop to see deselect all duplicate entries
		for _, item := range ingresses.Items {
			for _, rule := range item.Spec.Rules {
				if v, ok := knownHosts[rule.Host]; ok {
					knownTS := v.ObjectMeta.CreationTimestamp
					newTS := item.ObjectMeta.CreationTimestamp
					if newTS.Before(knownTS) {
						knownHosts[rule.Host] = item
					}
				} else {
					knownHosts[rule.Host] = item
				}
			}
		}


Here is the link to the Github where the code is located. Feel free to try it out.


How we do builds in Kubernetes

First off. All credit for this goes to my friend Simas. I’m simply relaying what he has accomplished because it would be a shame if others didn’t benefit from his expertise. He is truly talented in this space and provides simple yet elegant designs that just work.

Coming into my current position we have 400+ development teams. Virtually all of which are managing their own build pipelines. This requires significant time and effort to manage, develop and automate. Each team designates their own developer on a rotating basis, or worse, completely dedicates a dev to make sure the build process goes smoothly.

What we found when looking across these teams was they were all basically doing the same thing. Sometimes using a different build server, automating using a different scripting language or running in a different code repo but all in all, its the same basic process with the same basic principles. And because we have so many dev teams, we were bound to run into enough teams developing in a particular language that it would make sense to standardize their process so multiple teams could take advantage of it. This combined with the power of docker images and we have a win/win situation.

So let me define what I mean by “build process” just so we can narrow the scope a bit. Build process – The process of building application(s) code using a common build platform. This is our first step in a complete CI/CD workflow.

So why haven’t we finished it already? Along with the Dev teams we have quite a few other engineering teams involved including QA/Performance/CISO etc etc and we haven’t finished laying out how all those teams will work together in the pipeline.

We have questions like:

Do QA/Perf/Security engineers all have access to multiple kubernetes namespaces or do they have their own project area and provide a set of endpoints and services which can be called to utilize their capabilities?

Do we mock cross-functional services in each namespace or provide endpoints to be accessed from anywhere?

What about continuous system/integration testing?

Continuous performance testing? How do we do this without adversely affecting our dev efforts?

Those are just a few of the questions we are working through. We have tons of them. Needless to say, we started with the build process.

We create Docker images for each and every Java/NodeJS/Go/Ruby/language_of_the_month our developers choose. These images are very much standardized. Allowing for built-in, centrally managed, monitored, secure containers that deploy in very short periods of time. The only deltas are the packages for the actual application. We build those in deb packages and standardize the install process, directory locations, version per language type etc etc.

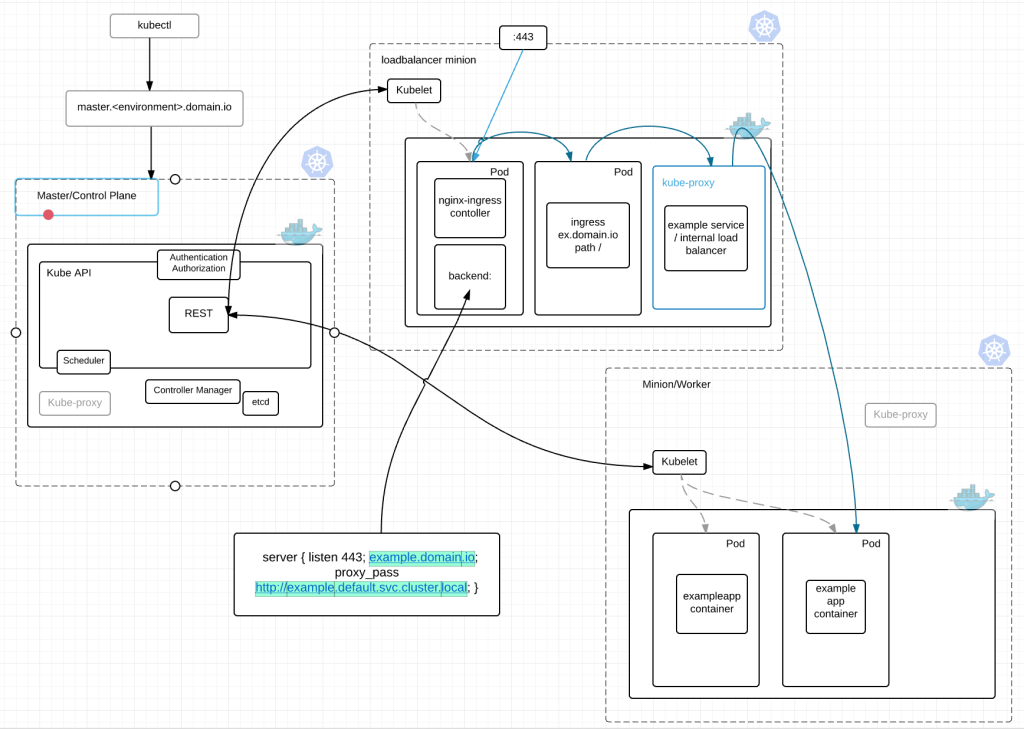
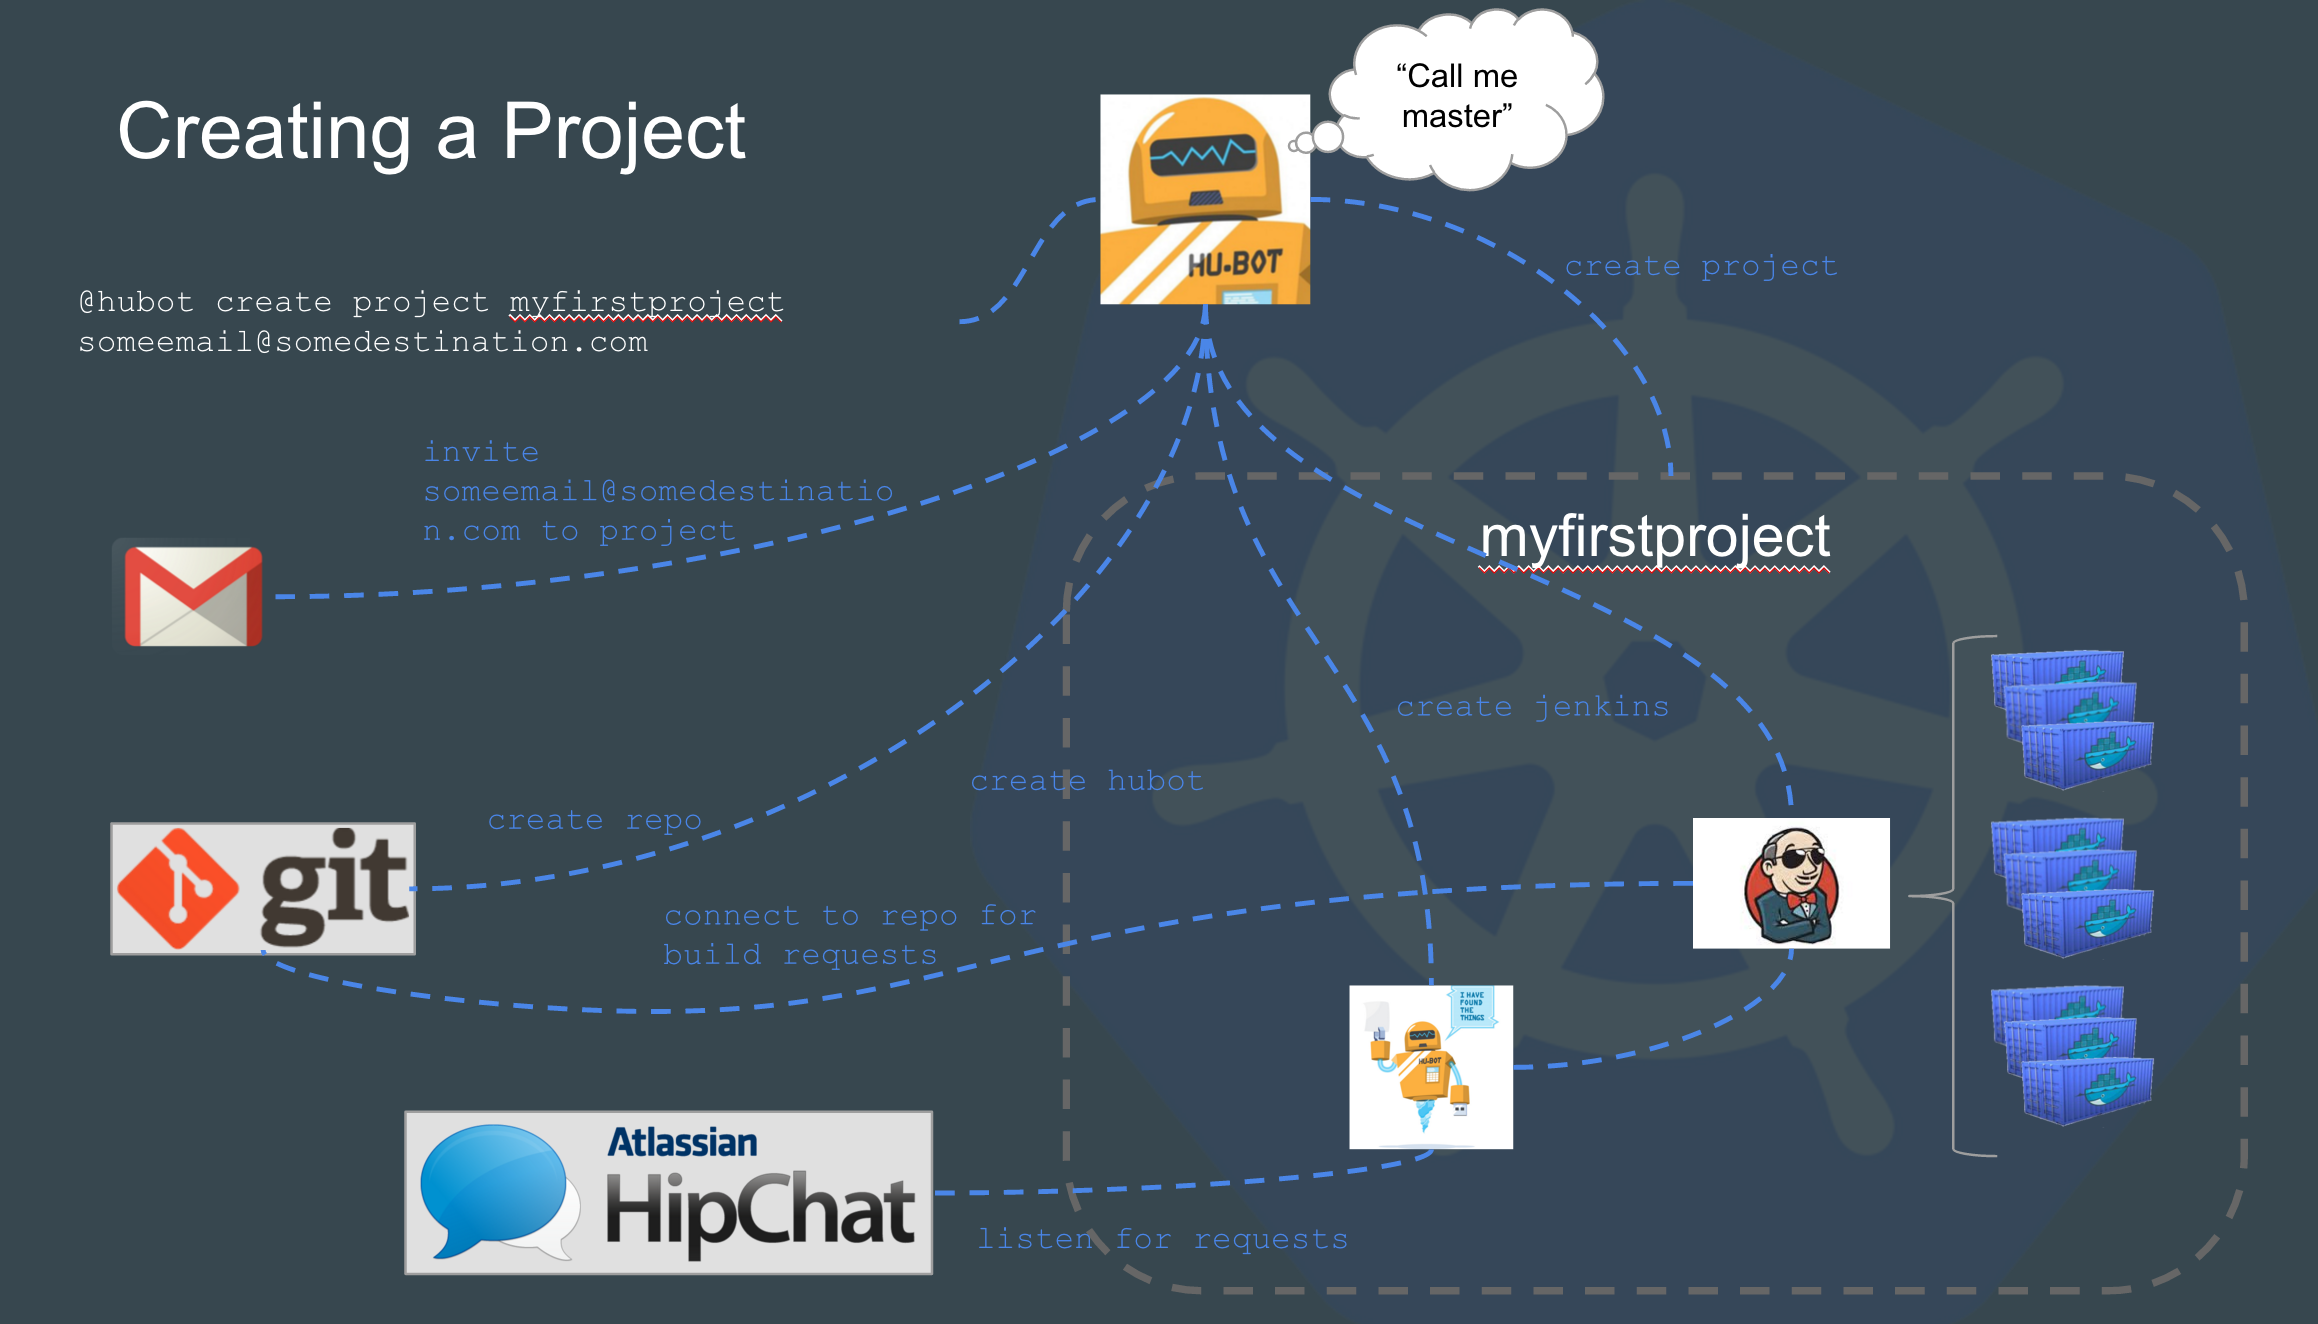
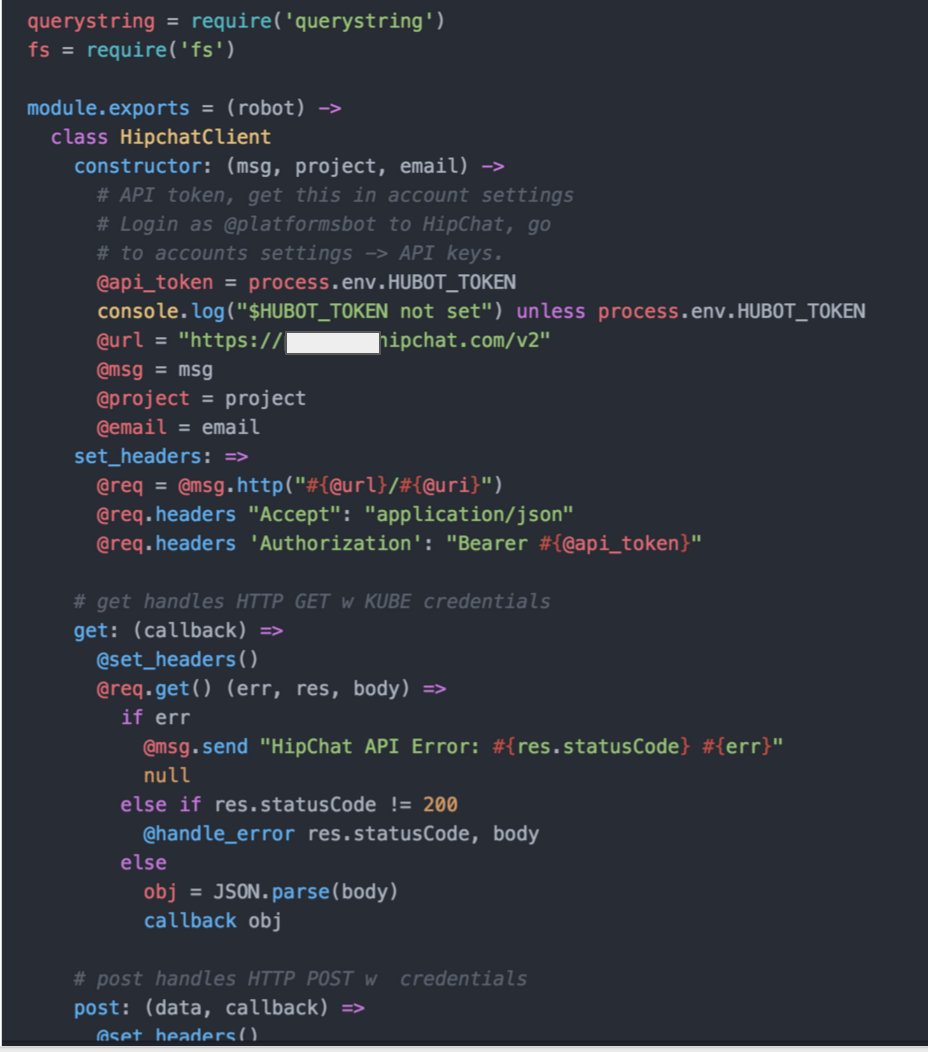
Dev teams get their own namespace in Kubernetes. In fact, in most cases they get three. Dev, Stage and Prod. For the purpose of this conversation every dev team is developing an application stack which could consist of 1 to many micro services. Every namespace has its own Hubot and its own Jenkins build server which is completely vanilla to start with.

See Integrating Hubot and Kubernetes for more info on Hubot.

Each Jenkins build server connects to at least two repositories. A standard jenkins job repo that consists of all the standardized builds for each language and the application code repositories for the applications. EVERY Jenkins server connects to the same jenkins job repo. Jenkins polls each repo for changes every X minutes depending on the requirements of the team. We thought about web hooks to notify Jenkins when a new build is needed but chose to poll from Jenkins instead. Primarily because we treat every external resource as if it has gremlins and we didn’t want to deal with firewalls. We’ve been looking at options to replace this but haven’t settled on anything at this point.
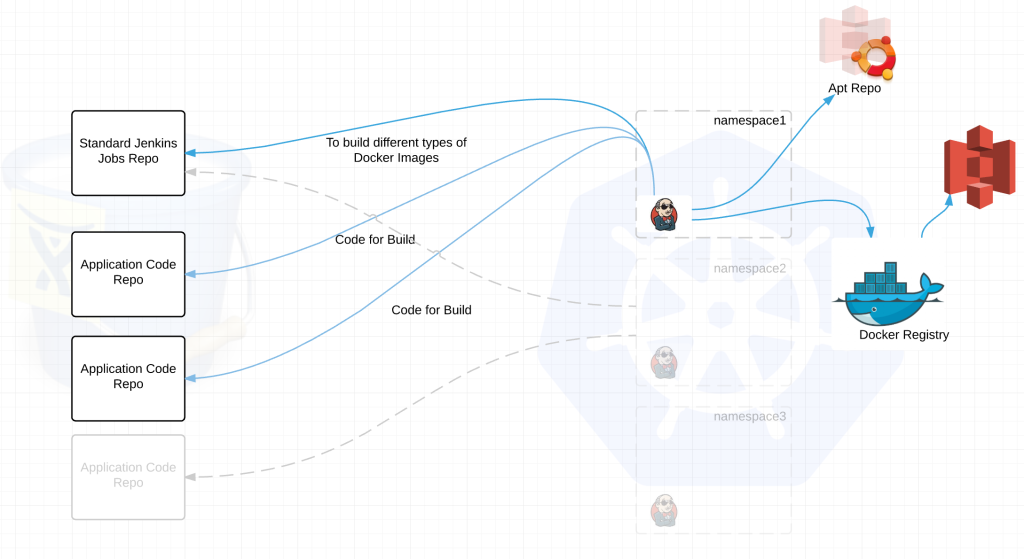
Screen Shot 2016-01-08 at 6.34.53 PM


jenkins job repo –

  1. all the possible standardized build jobs
  2. dockerfiles for building base images – ie java,nodejs,ruby etc etc
  3. metadata on communicating with the local hubot
  4. sets up kubectl for its namespace

application code repo –

  1. Contains application code
  2. Contains a default.json file

default.json is key to the success of the build process.

It has three primary functions:

  1. Informs Jenkins what type of build it should be setup for. Ex. If XYZ team writes code in Java and NodeJS, it tells Jenkins to configure itself for those build types. This way we aren’t configuring every Jenkins server for build artifacts it will never build.
  2. It tells Jenkins meta-data about the application like application name, version, namespace(s) to deploy to, min/max number of containers to deploy, associated kubernetes services etc etc
  3. Provides Jenkins various build commands and artifacts particular to the application

Here is a very simple example of what that default.json might look like.

{
  "namespace": "someproject",
  "application": {
    "name": "sample-application",
    "type": "http_html",
    "version": "3.x.x"
  },
  "build": {
    "system_setup": {
      "buildfacts": [ // Configure the Jenkins server
        "java",
        "nodejs"
      ]
    },
    "build_steps": [
      {
        "shell": "some shell commands"
      },
      {
        "gradle": {
          "useWrapper": true,
          "tasks": "clean build -Ddeployment.target=???"
        }
      }
    ]
  },
  "build_command": "some command to execute the build",
  "artifacts": "target/",
  "services": [
    {
      "name": "sample-service",
      "external_url": "www.sample-service.com",
      "application": "someproject/sample-application",
      "instances": {
        "min": 2,
        "max": 5
      }
    }
  ]
}


Ok now for a little more complexity:


Screen Shot 2016-01-08 at 6.41.45 PM

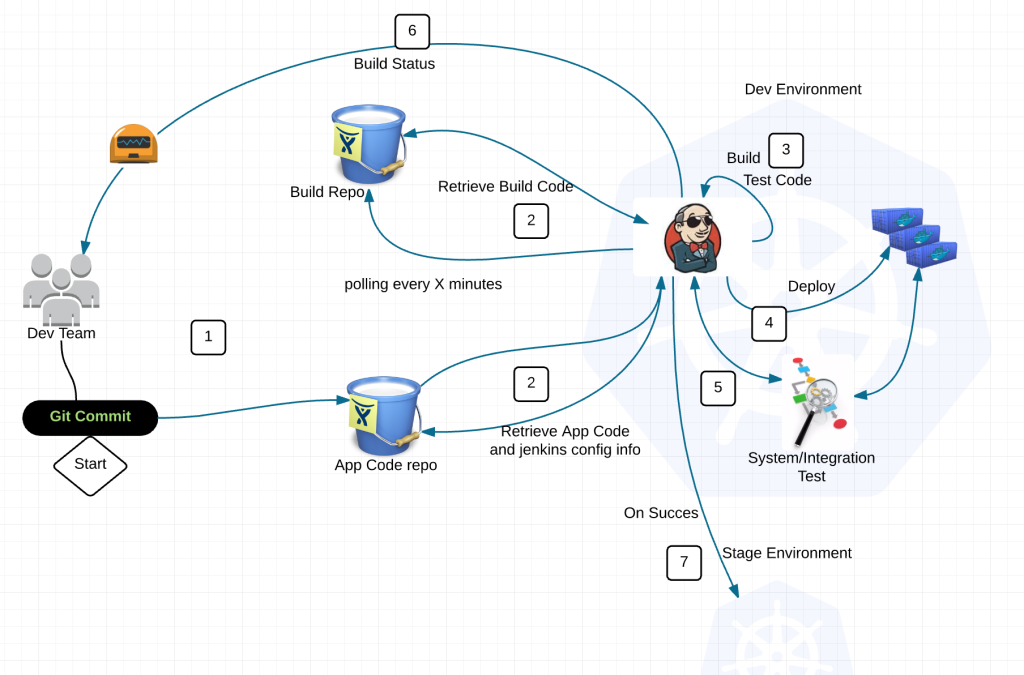
So what just happened?

1) Dev commits code to application repository

2) Jenkins polls the jenkins build repo and application repositories for changes

3) If there is a new standard build image (say for Java), jenkins will build the latest version of the application with this image and push the image to the docker registry with a specialized tag. Then notify Dev team of the change to provide feedback through hubot.

When there is a version change in the application code repository Jenkins runs typical local tests, builds deb package, ships it to apt repository, then builds a docker image combining a standardized image from the jenkins build repo with the deb package for the application and pushes the image to the Docker registry.

4) Deploy application into namespace with preconfigured kubectl client

5) Execute system/integration tests

6) Feedback loop to Dev team through Hubot

7) Rinse and repeat into Staging/Prod on success


Now you are probably thinking, what about all those extra libraries that some applications may need but other do not.

Answer: If its not a common library, it goes in the application build.


All in all this is a pretty typical workflow.  And for the most part you are absolutely correct. So what value do we get by separating the standard/base build images and placing it into its own repository?

  • App Eng develops standard images for each language and bakes in security/compliance/regulatory concerns
  • Separation of concerns – Devs write code, System/App eng handles the rest including automated feedback loops
  • Security Guarantee – Baked in security, compliance and regulatory requirements ensuring consistency across the platform
  • Devs spend more time doing what they do best
  • Economies of scale – Now we can have a few people creating/managing images while maintaining a distributed build platform
  • Scalable build process – Every Dev team has their own Jenkins without the overhead associated with managing it
  • Jenkins servers can be upgraded, replaced, redeployed, refactored, screwed up, thrown out, crapped on and we can be back to a running state in a matter of minutes. WOOHOO Jenkins is now cattle.
  • Standardized containers means less time spent troubleshooting
  • Less chance of unrecognized security concerns across the landscape
  • Accelerated time to market with even less risk


Lets be realistic, there are always benefits and limitations to anything and this design is not the exception.

Here are some difficulties SO FAR:

  • Process challenges in adjusting to change
  • Devs can’t run whatever version for a given language they want
  • Devs could be prevented from taking advantage of new features in the latest versions of say Java IF the App Eng team can’t keep up


Worth Mentioning:

  • Both Devs and App Eng don’t have direct access to Jenkins servers
  • Because direct access is discourage, exceptional logging combined with exceptional analytics is an absolute must


Ok so if you made it thus far. I’m either a damn good writer, your seriously interested in what I have to say or you totally crazy about build pipelines. Somehow I don’t think its option 1. Cheers


@devoperandi

Load Balancing in Kubernetes

There are two different types of load balancing in Kubernetes. I’m going to label them internal and external.

Internal – aka “service” is load balancing across containers of the same type using a label. These services generally expose an internal cluster ip and port(s) that can be referenced internally as an environment variable to each pod.

Ex. 3 of the same application are running across multiple nodes in a cluster. A service can load balance between these containers with a single endpoint. Allowing for container failures and even node failures within the cluster while preserving accessibility of the application.


External

Services can also act as external load balancers if you wish through a NodePort or LoadBalancer type.

NodePort will expose a high level port externally on every node in the cluster. By default somewhere between 30000-32767. When scaling this up to 100 or more nodes, it becomes less than stellar. Its also not great because who hits an application over high level ports like this? So now you need another external load balancer to do the port translation for you. Not optimal.

LoadBalancer helps with this somewhat by creating an external load balancer for you if running Kubernetes in GCE, AWS or another supported cloud provider. The pods get exposed on a high range external port and the load balancer routes directly to the pods. This bypasses the concept of a service in Kubernetes, still requires high range ports to be exposed, allows for no segregation of duties, requires all nodes in the cluster to be externally routable (at minimum) and will end up causing real issues if you have more than X number of applications to expose where X is the range created for this task.

Because services were not the long-term answer for external routing, some contributors came out with Ingress and Ingress Controllers. This in my mind is the future of external load balancing in Kubernetes. It removes most, if not all, the issues with NodePort and Loadbalancer, is quite scalable and utilizes some technologies we already know and love like HAproxy, Nginx or Vulcan. So lets take a high level look at what this thing does.

Ingress – Collection of rules to reach cluster services.

Ingress Controller – HAproxy, Vulcan, Nginx pod that listens to the /ingresses endpoint to update itself and acts as a load balancer for Ingresses. It also listens on its assigned port for external requests.

Screen Shot 2016-01-02 at 9.13.53 AM


In the diagram above we have an Ingress Controller listening on :443 consisting of an nginx pod. This pod looks at the kubernetes master for newly created Ingresses. It then parses each Ingress and creates a backend for each ingress in nginx. Nginx –> Ingress –> Service –> application pod.

With this combination we get the benefits of a full fledged load balancer, listening on normal ports for traffic that is fully automated.

Creating new Ingresses are quite simple. You’ll notice this is a beta extension. It will be GA pretty soon.

apiVersion: extensions/v1beta1
kind: Ingress
metadata:
  name: example-ingress
spec:
  rules:
  - host: ex.domain.io
    http:
      paths:
      - path: /
        backend:
          serviceName: example
          servicePort: 443

Creating the Ingress Controller is also quite easy.

apiVersion: v1
kind: ReplicationController
metadata:
  name: nginx-ingress
  labels:
    app: nginx-ingress
spec:
  replicas: 1
  selector:
    app: nginx-ingress
  template:
    metadata:
      labels:
        app: nginx-ingress
    spec:
      containers:
      - image: gcr.io/google_containers/nginx-ingress:0.1
        imagePullPolicy: Always
        name: nginx
        ports:
        - containerPort: 80
          hostPort: 80

Here is an ingress controller for nginx. I would use this as a template by which to create your own. The default pod is in its infancy and doesn’t handle multiple backends very well. Its written in Go but you could quite easily write this in whatever language you want. Its a pretty simple little program.

For more information here is the link to Ingress Controllers at Kubernetes project.


Integrating Hubot and Kubernetes

Recently my team has been integrating Kubernetes with Hubot.

The objective being, Lets provide net new customers a way to write one line and create an entire project from scratch. Keeping in mind everything in our project is in containers. You might be asking, Why? Kubectl is great. This project was primarily to introduce Developers to Kubernetes without requiring a ton of knowledge around containers. We wanted to get them playing with it, launching new projects with containers with less complexity.


Screen Shot 2015-12-07 at 8.26.03 AM

Real quick: Let me explain what is happening in the slide above. A Technical Project Manager or Program manager wants to create a new project. They run hubot create myfirstproject email@someemail.com this calls master hubot which then creates:

Git repository

Prepopulated data into the git repo

Separate namespace Kubernetes

A hubot to manage their own project/namespace

Jenkins build server which connects back to the new repo

Kubernetes service account

A new hipchat channel

Email invite to repository and chat channel


Repos and Hipchat are external to Kubernetes used via API calls. Having such a large organization (100s of development teams) we needed to deploy a generic Jenkins per project. So every project/development team gets their own Jenkins server. All jobs and specialized Jenkins configuration resides in the repository, not initially in Jenkins. All Jenkins jobs can be queried through Chat and run through Chat. Jenkins can be updated in a global fashion for features required across the organization.

We have divided our Hubot scripts based on function.

kubecommands.coffee – Contains any master level Hubot functionality we don’t allow across all Hubots such as creating a new project.

Screen Shot 2015-12-07 at 9.50.26 AM

kubeclient.coffee – For communications directly with Kubernetes API. You will notice we are allowing for basic auth. This is changed already as we tokenize everything with OpenID Connect now.

Screen Shot 2015-12-07 at 8.55.05 AM

repoclient.coffee – For requests to our repo APIs

Screen Shot 2015-12-07 at 8.48.41 AM

chatclient.coffee – For requests to our Chat client, in this case Hipchat

repo client

kubeproject.coffee – Hubot commands specific to hubots deployed into projects (limited set of functionality from the Master)

Example: Deploying a New Jenkins deploy

Screen Shot 2015-12-07 at 9.55.57 AM

Thats it, thanks for taking a look.

devops – a start

I’ve come to realize DevOps is highly misunderstood when its actually simple.

Tools + Communication + Automation = Speed, Stability and Value

Simple right?

So that’s how I look at it but what is the actual definition?

DevOps (a portmanteau of “development” and “operations”) is a software development method that stresses communication, collaboration, integration, automation, and measurement of cooperation between software developers and other information-technology (IT) professionals.

In theory its dead simple. In practice, it requires work just like everything else.

In my experience, even the companies that have a “culture of change” don’t change quite as easily as they may like to think. All the hemming and hawwing still happens. The nay sayers still exist. All the long drawn out meetings trying to convince key stakeholders still happen. And nothing moves quite as fast as the champion’s want them to AND THAT IS OK. Yep, you heard me right. Its perfectly ok.

Why do I say it’s ok? Because implementing a DevOps movement is scary and the vast majority of companies get it wrong while claiming a huge success. What generally happens is, we pick out the parts that sound cool like “Automation” (I’m 100% guilty of this), call our team members “DevOps Engineers” (managed not to do this), create a few meetings between Developers and Operations and call it good. Things get better between the teams, releases get better and we can deploy shit with the click of a button if we have spent enough time on it. But wait there’s more….if your company really gets a hair up their ass, they bake QA into the automation process. Thus hopefully we’ve gotten some integration between subsystems and system tests. Realizing that system tests generally catch issues which drive system integrations to happen. Bassackwards much?

After that, we officially have the gold nugget to success and true nirvana has hit its peak. We are deploying to production 80 times per day, PagerDuty never wakes us up and everything is air tight. right?

THE HOLY GRAIL!!!!

But as we soon come to find out, its not all beer and whiskey from here on out. The hard part is yet to come.

What’s missing? The most difficult parts are missing. feedback – collaboration – measurement of cooperation – communication. Which mostly boils down to Communication. But we can get away with what we have. I mean, its just a flesh wound right?

https://www.youtube.com/watch?v=ikssfUhAlgg

So inherently there is an order. A continuum by which DevOps is implemented. Easiest first, most difficult last. Go figure right? What’s the easiest? The parts that don’t require communication of course, automation and tools. Every geek can get behind those two. I mean, who doesn’t like tools? And who doesn’t like to click a button and see lots of cool shit happen that you can show off at your favorite meetup?

What do these other four things really buy us? How about planning, buy-in, innovation, reduced MTTR (mean time to recover), coordinated work, motivation, effectiveness, morale, speed, change lead time, retention, reduced costs from production defects, lower defect escape rate, reduced deployment times, and the list goes on.

I would propose that communication is the linchpin to a truly successful DevOps paradigm yet the one most avoided when getting started. Without it, all we really have is some cool automation.

But how do we do all this? Its hard right? It requires effort that geeks don’t generally engage in. How do we accomplish this part of DevOps and do it well? What makes this so difficult? Is it different for every company? Are we really that bad at communication? Or do we simply talk in different languages? Are their best practices to follow? How do we measure cooperation? What degree of collaboration is good?

In a follow-on post we’ll start to explore this paradigm of communication and how different companies make it happen.


Thoughts on communication:

Speak the same language – As odd as this sounds, encourage people to define what they mean by xyz. Make it a point to get definitions that may not be clear. I’ve seen and contributed to so many long conversations that could have been done in 3 minutes because multiple people were working from different definitions of the same word.

Innovate on communication – Have a retro on communication. Find out how to communicate in a manner that others can consume. Iterate on it.

Don’t allow different communication mechanisms to become a barrier – Allow people to consume Asynchronous information in different ways. Provide an ESB for communication if you will. Think ChatOps. Write some coffee script that will allow engineers to register with various types of communication. RSS feeds, email, message boards, online reporting, IM, Reddit, text to speech (maybe thats too far?). Let people consume information how they want to when its Asynchronous. Let them subscribe to what they think it important.

Provide venues for communication to happen organically – That sounds like a high level, completely ambiguous piece of no information. What I mean is, if multiple teams likes beer, make it a habit to go to lunch and drink every Friday. Find commonalities between the teams and exploit those to the companies benefit. Increase morale, collaboration and communication in one fail swoop. Some of the best ideas come from this one thing. DO NOT see this as a bunch of engineers taking off for the afternoon. You would be amazed at how many ideas come out of these venues.

Synchronous communication – should all happen the same way. Keep it consistent. One, maybe two technologies is fine. Beyond that is too much. Don’t have 10 different ways to constantly interrupt your colleagues.

Close the damn loop – All too often someone important gets left out of the communication loop. This can often happen because the email that got sent looks like the 1000 other emails received that day. Find a way to emphasize information that is important. You can even require an acknowledgement.


Painful to watch:

Hiring people that do both – really? I guess in a small organization it can work for some duration of time but I would have to argue that one person will never measure up to an engineer that is dedicated to one or the other. Its preposterous. If the application has any degree of complexity, the concept of one engineer being great at everything is plain ridiculous. What you end up with is a mediocre solution that is lacking in more than one thing. Its why we have QA, and developers and operations and performance engineers and security professionals. Because there is too much for one person to be good at all of it. Don’t be stupid, let people do what they are good at.


What do you think? What can we do to communicate better?