Hello! My name is Matt Halder and I’ve had some interesting experiences working in a variety of IT fields. I started out working at a Government Contractor in Washington, D.C as a Networker Controller; moved my way up to Network Engineer and finished as a Lead Technologist. From there, headed westward to Denver, CO for an opportunity to work at Ping Identity as a Security Operations Engineer. Currently, I work at FullContact as DevOps Engineer. The FullContact team has been using kubernetes in production for the last seven months as a way to reduce our overall cloud hosting costs and move away from IaaS vendor lock-in. Both the development and staging clusters were bootstrapped using kops. The largest barrier to adoption that was echoed throughout the development team was needing the ability to tail logs. When role-based access control was introduced in kubernetes 1.6, the ability to provide access to the cluster outside of shared tokens, certs, or credentials became a reality. Here are the steps that were used to enable openid-connect on kubernetes.
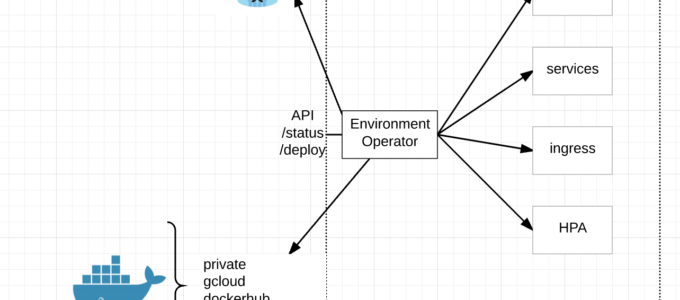
When setting up an OpenID Connect provider, there are few terms to be aware of. First is the “IdP”, which is the identity provider; many technologies can be used as an identity provider such as Active Directory, Free IPA, Okta, Dex or PingOne. Second is the “SP”, which is the service provider; in this case the service provider is the kubernetes API. The basic overview of an OpenID Connect workflow is this: the user authenticates to the IdP, the IdP returns a token to the user, this token is now valid for any SP that is configured to use the the IdP that produced the token.
- Set up your IdP with an openid-connect endpoint and acquire the credentials.
- Configure the SP [aka configure the API server] to accept openid-connect tokens and include a super-admin flag so that existing setup will continue to work throughout the change.
- Generate kubeconfig file including oidc user config.
- Create role bindings for users on the cluster.
- Ensure all currently deployed services have role bindings associated with them.
Step 1: Set up the IdP
Since G Suite is already in place, we had an IdP that could be used for the organization. The added benefit is this IdP is pretty well documented and supported right out of the box, the caveat being that there is no support for groups so each user will need their own role binding on the cluster.
- Navigate to https://console.developers.google.com/projectselector/apis/library.
- From the drop-down create a new project.
- The side bar, under APIs & services -> select Credential.
- Select OAuth consent screen (middle tab in main view). Select an email and choose a product name, press save.
- This will take you back to the Credentials tab (same as the screenshot above). Select OAuth clientID from the drop-down.
- From application type -> select Other and give a unique name.
- Copy the clientID and client secret or download the json. Download is under OAuth 2.0 client IDs on the right most side.
Step 2: Configure the SP [aka configure API Server] to accept OIDC tokens
Kops now has the ability to add pre install and post install hooks for openid-connect. If we were starting from scratch, this is the route that would be explored. However, adding these hooks didn’t trigger any updates and forcing a rolling update on a system running production traffic was too risky and was untested since staging had tested/updated prior to this functionality being introduced.
Kubelet loads core manifests from a local path, the kops clusters kubelet loads from /etc/kubernetes/manifests. This directory stores the kube-apiserver manifest file that tells kubelet how to deploy the api server as a pod. Editing this file will trigger kubelet to re-deploy the API server with new configuration. Note, this operation is much riskier on a single master cluster than on a multi master cluster.
- Copy the original kube-apiserver.manifest.
- Edit kube-apiserver.manifest adding these lines:
--authorization-mode=RBAC

--authorization-rbac-super-user=admin

--oidc-client-id=XXXXXX-XXXXXXXXXXX.apps.googlecontent.com

--oidc-issuer-url=https://accounts.google.com

--oidc-username-claim=email
- Kubelet should re-deploy the API server within a couple of minutes of the manifest being edited.
- Ensure that network overlays/CNI is functioning properly before proceeding, not all overlays shipped with service accounts and role bindings. This caused some issues with early adopters to kubernetes 1.6 (Personally, I had to generate a blank configmap for calico since it would fail if one wasn’t found).
Step 3: Generating a kubeconfig file
This process is broken into two steps, the first is to generate the cluster and context portion of the config while the second part is having the user acquire their openid-connect tokens and add them to the kubeconfig.
- While opinions will vary, I’ve opted to skip the TLS verifications on the kubeconfig. Reasoning being is this would require a CA infrastructure to generate certs per users which isn’t in place.
- There’s a bit of a chicken and egg thing going on here where kubectl needs to be installed so that a kubeconfig can be generated for the kubectl (although that’s how ethereumwallet is installed so maybe it’s just me). Either way, this script can be edited with correct context and endpoints to generate the first half of the kubeconfig:
#!/usr/bin/env bash

set -e

USER=$1

if [ -z "$USER" ]; then
  echo "usage: $0 <email-address>"
  exit 1
fi

echo "setting up cluster for user '$USER'"

# Install kubectl dependency
source $(dirname $(readlink -f "$0"))/install_kubectl.sh 1.6.8

# Set kubeconfig location the current users home directory
export KUBECONFIG=~/.kube/config

# Set cluster configs
kubectl config set-cluster cluster.justfortesting.org \
  --server=https://api.cluster.justfortesting.org \
  --insecure-skip-tls-verify=true

#Set kubeconfig context
kubectl config set-context cluster.justfortesting.org \
  --cluster=cluster.justfortesting.org \
  --user=$USER

kubectl config use-context cluster.justfortesting.org
- To generate the second part of the kubeconfig, use k8s-oidc-helper from here to generate the
user portion and append the output at the bottom of the config file. Now, with a functioning kubeconfig the user needs a role binding present in the cluster to have access. The IdP client-id and client-secret will need to be made available to users so they can generate the openid-connect tokens. I’ve had good success with LastPass for this purpose.
Step 4: User Role Bindings
- Now, create a default role that users can bind to. The example gives the ability to list pods and their logs from the default namespace.
kind: Role
apiVersion: rbac.authorization.k8s.io/v1beta1
metadata:
  namespace: default
  name: developer-default-role
rules:
- apiGroups: [""]
  resources: ["pods", "pods/log"]
  verbs: ["get", "list"]
- Now, bind users to this role (notice the very last line has to be identical to the G Suite email address that used in Step 3).
- At our organization, these files are generated by our team members and then approved via github pull request. Once the PR has been merged into master, the role bindings become active on the clusters via jenkins job.
apiVersion: rbac.authorization.k8s.io/v1beta1
kind: RoleBinding
metadata:
  name: ${USER}@organization.tld-binding
roleRef:
  apiGroup: rbac.authorization.k8s.io
  kind: Role
  name: developer-default-role
subjects:
- apiGroup: rbac.authorization.k8s.io
  kind: User
  name: $USER@organization.tld
Step 5: Existing tooling needs an account and binding
The last step is necessary for any existing tooling in the cluster to ensure continued functionality. The “–authorization-rbac-super-user=admin” flag from step 2 was added to ensure continuity throughout the process. We use helm to deploy foundational charts into the cluster; helm uses a pod called “tiller” on the cluster to receive all specs from helm sdk and communicate them to the API, scheduler, and controller-manager. For foundational tooling such as this, use service accounts and cluster role bindings.
apiVersion: v1
kind: ServiceAccount
metadata:
  name: tiller
  namespace: kube-system
---
apiVersion: rbac.authorization.k8s.io/v1beta1
kind: ClusterRoleBinding
metadata:
  name: tiller-cluster-rolebinding
subjects:
  - kind: ServiceAccount
    name: tiller
    namespace: kube-system
roleRef:
  kind: ClusterRole
  name: cluster-admin
  apiGroup: ""